
Hosting client management is keeping every customer’s details, services, domains, invoices, payments, and support requests in one place, so you can run your reseller business without juggling spreadsheets and email threads. In the Truehost Reseller Panel, that place is the client profile.
Most clients create their own accounts when they order from your website. Sometimes, though, you will need to add a customer yourself, for example, when they pay offline or are moving over from another provider. Either way, once the account exists, you manage it from the same screens.
This guide walks you through the whole process inside your panel: adding a client, reading the client profile, viewing the account as the customer, recording existing domains and hosting, managing account credit, merging duplicates, working with many clients at once, understanding statuses, and fixing common problems. You do not need any previous experience with billing panels or WHMCS.
Adding a New Client to the Reseller Panel #
You can add a client manually whenever the normal self-signup route does not fit. Common cases are:
- A customer who pays by phone call or another offline arrangement.
- A customer migrating from another hosting provider.
- An existing customer who now needs to be recorded in your billing system.
Step-by-step: create a client #
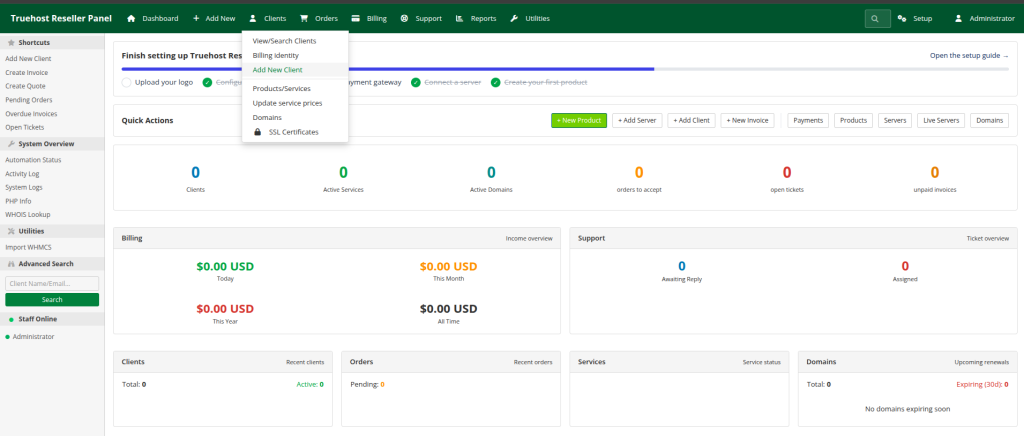
- Go to Clients → Add New Client.
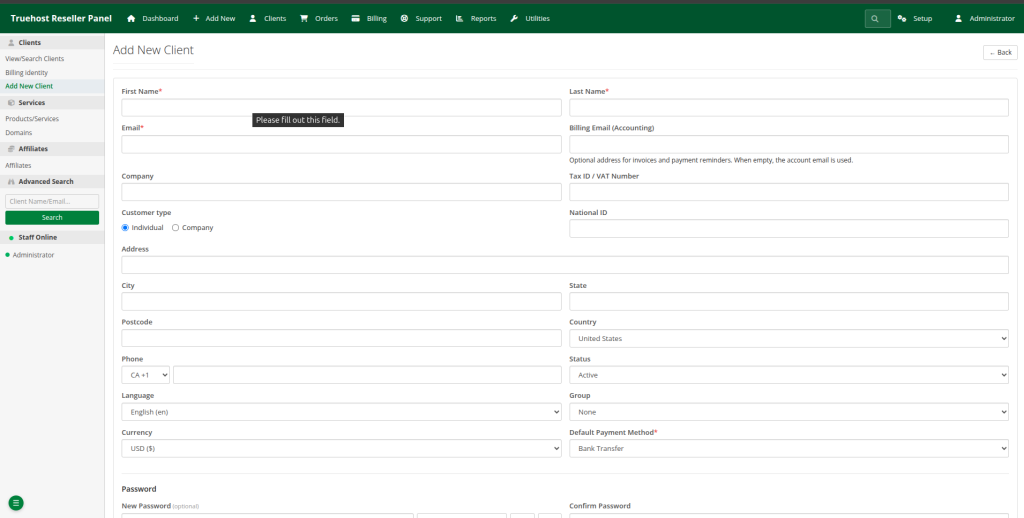
- Enter the client’s first name, last name and email address.
- Complete the address, phone number and country fields.
- Select the appropriate client status.
- Set the client group, currency and language where applicable.
- Set a password, or select Generate Password to have one created for you.
- Select Create Client.
Important fields and what they do #
| Field | Purpose |
| Contact information | Name, email, address, and phone identify the customer and appear on invoices and emails. The email address is also the customer’s login name. |
| Status | Marks the account as Active, Inactive, or Closed. |
| Group | Lets you organise clients into groups of your choosing, and filter or move them in bulk later. |
| Currency | The currency the client is billed in. Choose it carefully, because accounts in different currencies behave differently when merged (section 6). |
| Language | The language used for the client’s area and emails. |
| Password | Gives the client login access to the client area. |
Domain registries require complete contact details. If these are missing or inaccurate, a domain registration for this client can fail. Enter the real details now rather than fixing them under pressure later.
Optional billing fields #
- Customer Type: whether the client is an individual or a business.
- Tax ID and National ID: record these where your local tax or invoicing rules require them.
- Billing Email: when set, invoices and payment reminders go to this address instead of the primary account email. Use it when a company’s accounts department handles payments.
The password is not optional in practice #
A client created without a password has no login access to the client area. The Login as Client feature will not work for that account either.
The panel does not email the generated password to the customer. Copy it before you leave the page, send it to the customer through a secure channel, and encourage them to change it after their first sign-in.
Check the email address twice before selecting Create Client. It is the most common cause of duplicate accounts and of the “The email has already been taken” error.
Client Profile and Its Tabs #
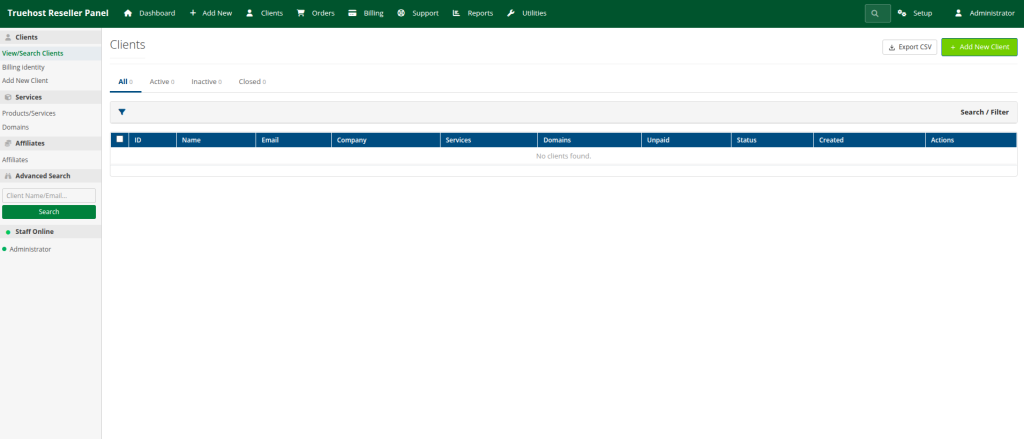
To open an existing customer, go to Clients → View/Search Clients, find the customer in the list, and open their record. The client profile is the central place for viewing and managing one customer’s account.
What each tab is for #
| Tab | What you use it for |
| Summary | A snapshot of the client’s billing position, plus quick actions. Start here when a customer contacts you. |
| Services | The hosting products and services linked to the client. Check what they own and add existing ones (section 4). |
| Domains | The domains linked to the client. Check renewals and add externally registered domains (section 4). |
| Invoices | The customer’s billing records. Confirm whether something was billed or paid. |
| Tickets | Support conversations. Review the history before replying to a repeat issue. |
| Notes | Internal information about the customer that the customer cannot see. |
| Activity Log | A record of activity on the account. Useful when investigating what happened and when. |
Billing Summary – This shows paid invoices, unpaid invoices, overdue invoices and the Credit Balance – A quick glance tells you whether a customer is up to date, owes you money, or has funds on account.
Quick Actions
- Login as Client: opens the client area exactly as the customer sees it.
- Edit Client: change the client’s details, status, group, and password.
- New Invoice: create an invoice for this client.
- New Ticket: open a support ticket for this client.
- Merge: combine this account with another.
Admin Notes are internal records visible to staff, not customers. Use them for agreed discounts, payment arrangements, or reminders. A Sticky Note pins important information at the top of the client’s profile, so you see it every time you open the account.
How to View the Client Area as a Customer #
Login as Client lets you see the customer’s account the way they see it, without asking for their password.
- Open the client’s profile (Clients → View/Search Clients).
- On the Summary tab, under Quick Actions, select Login as Client.
- The customer’s client area opens. Look for the indicator that you are viewing the account as the customer.
- When you are done, select Return to Admin to go back to the administrative panel.
When this helps #
- Checking whether a customer can open and see an invoice.
- Investigating a domain-related complaint.
- Reproducing a problem the customer reported.
- Understanding what the customer sees when they log in.
Password requirement #
This feature depends on the account having login credentials. If the client was created without a password, Login as Client will not work. Open Edit Client and set a password first.
Adding Existing Domains and Hosting Services to a Client #
When a customer moves to you, you can record the domains and hosting they already have, so billing and renewals run from your panel. Recording an item here is not the same as registering a domain or building a hosting account. It only creates a record in your billing system.
Adding an existing domain #
- Open the client’s profile and go to the Domains tab.
- Select Add Domain.
- Enter the domain details and save.
A reseller adds an externally registered domain so that its billing and renewal charges can be managed from the panel. This action does not register the domain and does not transfer it to Truehost. The domain stays where it is registered.
If the customer wants the domain moved to Truehost, they must start a real domain transfer. See the separate Domain Transfers guide for the steps.
Adding an existing hosting service #
- Open the client’s profile and go to the Services tab.
- Select Add Service.
- Choose the product and complete the details.
- Decide whether to tick Create the account on the server now (explained below).
- Save.
Recording an existing service links the hosting product to the client, so it appears in their account and can be billed.
Create the account on the server now: which option? #
| Option | What happens | Use it when |
| Ticked | A new hosting account is created on the server. | You are setting up brand-new hosting for this client, for example one who paid you offline. |
| Left unticked | The service is recorded for billing only. No new server account is created. | The customer’s site already runs somewhere (including an account you have already built or migrated), and you only need billing records. |
Caution: Ticking the box when the hosting account already exists can create a second, unwanted account. If you are unsure, leave it unticked.
Managing Client Account Credit #
Account credit is money held on a client’s account that can be used towards future payments. It is different from an unpaid invoice: an invoice is money the customer owes you, while credit is money you hold for them.
Common reasons to use it:
- A customer receives a refund, and you keep the amount as credit.
- A customer overpays and the extra stays on the account.
- You add funds to a customer’s account yourself.
Add or remove credit #
- Open the client’s profile.
- Find Credit Balance in the Billing Summary.
- Select Manage.
- Choose Add Credit or Remove Credit.
- Enter the amount and a description.
- Confirm the action.
Always write a clear description, such as “Refund for cancelled order” or “Overpayment on invoice”. The History section records each credit change, and a good description makes your financial records easy to understand months later.
How customers use credit #
- When paying an invoice, the customer can select Use my account credit.
- Customers can also add funds themselves with Add Funds in the client area.
Credit is applied when the customer chooses to use it on an invoice. Do not assume it automatically pays every invoice.
Merging Duplicate Client Accounts #
Duplicates happen when a customer signs up with a different email address or accidentally registers twice. Keeping two records for one person splits their invoices, domains and tickets, and makes it harder to see what they owe. Merging brings everything into a single account.
Merging changes many records at once. Check both accounts carefully before you confirm, including names, email addresses, services, and currencies.
Step-by-step: merge two accounts #
- Open the duplicate client’s account, the one you want to remove from use.
- Select Merge.
- Enter the client ID or email address of the account you want to keep.
- Review the suggested matches, where available.
- Select the correct account.
- Choose Merge accounts.
What moves to the account you keep #
- Services
- Domains
- Invoices
- Payments
- Tickets
- Notes
- Account credit
What happens to the duplicate #
The duplicate account is closed, not deleted. It remains in your records with the Closed status.
Currency warning #
If the two accounts use different currencies, the transferred amounts stay exactly as they were. They are not converted. For example, an invoice of 5,000 in one currency arrives as 5,000 in the other. After merging, review the affected prices, invoices, and credit, and correct anything that no longer makes sense.
Managing Multiple Clients at Once #
When you have many customers, bulk actions save you from repeating the same change one account at a time. Go to Clients → View/Search Clients, tick the clients you want, and choose an action.
The available actions are:
- Set status: change the status of all selected clients together.
- Move to group: place the selected clients in a client group.
- Send email: send one message to all selected clients.
- Export selected (CSV): download details for only the clients you ticked.
- Export CSV for the entire client list: download every client in your panel.
What is CSV? #
CSV stands for comma-separated values. It is a plain file that opens in Excel or Google Sheets, with one client per row. Export it to back up your customer list, prepare a mailing, share a report with your accountant, or review your customers in a spreadsheet.
Use Export selected (CSV) for a specific group, such as clients you have just moved into a new client group. Use the full-list export when you need everything.
Check which clients are ticked before applying Set status or Send email. A bulk action affects every selected account.
Client Account Statuses #
Every client has one of three statuses. You set it when creating the client or later with Edit Client, and you can change many at once with Set status.
| Status | Meaning | Practical use |
| Active | A normal client account. | Use for customers with active accounts. |
| Inactive | A client account placed on hold. | Use the Status filter to locate inactive customers. |
| Closed | A former client or a duplicate account that has been merged. | Choose the Any except closed filter to leave closed accounts out of email campaigns. |
A status describes the client record. Do not assume that changing it automatically suspends hosting or cancels services; check the Services tab and handle those separately.
Common Client Management Problems and How to Fix Them #
1. “No user account linked to this client” #
Cause: The client was created without a password, so no login exists for the account.
Fix: Open the client’s profile, select Edit Client, set a password, and save. Then try again.
If it still fails: Confirm the client’s email address is correct and that the change saved. Reopen the profile and try the action again.
2. Client cannot sign in #
Cause: Usually a mistyped email address or a forgotten password.
Fix: Check the email address on the client’s profile against what the customer is typing. Ask them to use Forgot Password and Send Reset Link on the sign-in page.
If it still fails: Make sure the account has a password set. Then use Login as Client to confirm the account itself works, and check the client’s status.
3. “The email has already been taken” #
Cause: The email address already belongs to another account in your panel.
Fix: Search for the address under Clients → View/Search Clients. If it is the same customer, use the existing account. If the customer already has two accounts, consider merging them.
If it still fails: Search by name and by other email addresses the customer may have used. The existing account may be listed under a slightly different spelling, or may be a closed account.
4. Domain registration fails because of contact details #
Cause: The client’s address, phone number, or country is missing or inaccurate.
Fix: Open the client’s profile, select Edit Client, complete or correct the address, phone number, and country, save, and retry the registration.
If it still fails: Compare the details with what the customer can confirm, such as the phone number format and the country selected, and update anything that does not match.
Best Practices for Managing Reseller Clients #
- Keep details accurate – Correct names, phone numbers, and addresses prevent failed domain registrations and misdirected invoices.
- Set login credentials when you create a client manually – It avoids the “No user account linked” problem and keeps Login as Client working.
- Verify before merging – Confirm you have the right pair of accounts, and that you are keeping the one you intend to.
- Check currencies first – Amounts are not converted during a merge.
- Use internal notes. Record agreements, special pricing, and context so any team member can pick up where you left off.
- Watch unpaid and overdue invoices – Glance at the Billing Summary when you open an account.
- Keep existing domain and hosting records accurate – Update them when renewals, moves, or cancellations happen.
- Use bulk actions carefully – Re-check your selection before sending email or changing statuses.
- Review the Activity Log when investigating a complaint – It often shows what happened before you need to ask the customer.
Conclusion #
Centralised client management is what keeps a reseller business organised. From one panel, you can create customers, manage their services and domains, monitor billing, handle account credit, and resolve common account problems.
Ready to try it? Go to Clients → Add New Client and add your first customer today.