If you’re encountering complications with email delivery for your WordPress forms, fret not. By implementing SMTP (Simple Mail Transfer Protocol), you can effortlessly resolve this issue on your website.
Discover in this comprehensive guide the step-by-step process of installing and configuring the renowned Easy WP SMTP plugin on your WordPress platform.
Maximize the effectiveness of your email dispatches from your website by employing SMTP authentication—an indispensable practice.
By implementing this method, you significantly enhance the likelihood of your emails reaching their intended recipients, rather than languishing in the spam folder.
Join us as we delve into the realm of adding SMTP authentication to your WordPress site using the powerful Easy WP SMTP plugin, thereby elevating your email deliverability to new heights.
- Why Have an SMTP Plugin
- How to Install the Easy WP SMTP plugin
- How to Setup Easy WP SMTP
Why Have an SMTP Plugin #
WordPress possesses a native feature for sending emails directly from your website. However, if left unconfigured, WordPress relies on the PHP mail function to dispatch mail.
Unfortunately, this method lacks authentication, resulting in spam filters often categorizing these messages as junk. Surprisingly, despite this drawback, WordPress continues to employ the unauthenticated PHP mail function as its default mechanism.
Regrettably, there is no built-in solution to rectify this issue. Fortunately, a range of plugins, such as the highly efficient Easy WP SMTP plugin, offer a speedy resolution.
These plugins effectively address the problem, ensuring prompt mitigation. Bid farewell to this predicament and embrace a hassle-free email experience with the assistance of Easy WP SMTP and its counterparts.
How to Install the Easy WP SMTP plugin #
Step #1
Login to your WordPress Dashboard
Step #2
Click on the Plugins in the left navigation menu.

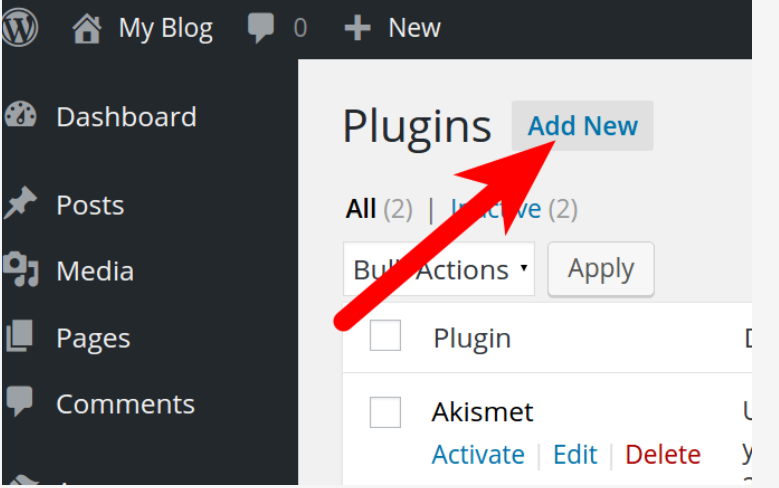
Step #3
To begin, navigate to the Plugins page and locate the “Add New” button. Give it a click to proceed.
Step #4
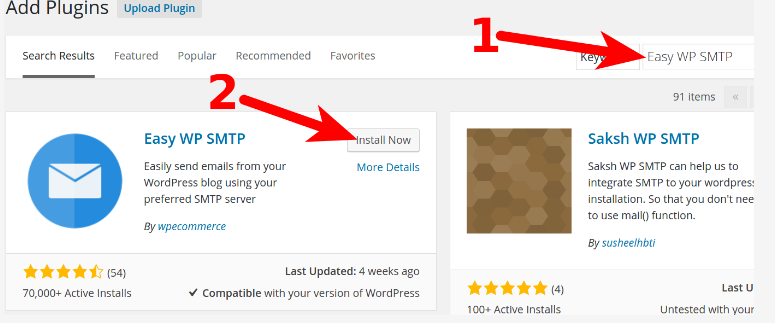
In the designated Search Plugins field, input “Easy WP SMTP” and press the Enter key to initiate the search process.
Step #5
Locate the Easy WP SMTP plugin within the provided list and proceed by clicking the Install Now button adjacent to its name.
Step #6
Once you have selected the plugin, it will be swiftly installed, causing the Install Now button to seamlessly transition into the Activate button. Simply click on the Activate Plugin button to set Easy WP SMTP into active mode.
How to Setup Easy WP SMTP #
Step #1
Feel free to create an email address dedicated to your site’s mail, provided you haven’t done so already.
To circumvent potential spam filter complications, ensure that this address shares the same domain name as your site.
From an organizational standpoint, it is advisable for the sending address to be a unique email solely designated for site mail purposes.
Step #2
If necessary, you may consider setting up a separate “reply” address depending on your business requirements. This address will be responsible for receiving any responses to the emails you send from your site.
Step #3
To proceed, log in to your WordPress Dashboard and navigate to the left-hand navigation menu. Locate and click on “Plugins.”
If you’ve followed the installation steps mentioned earlier, you should already find yourself in this section.
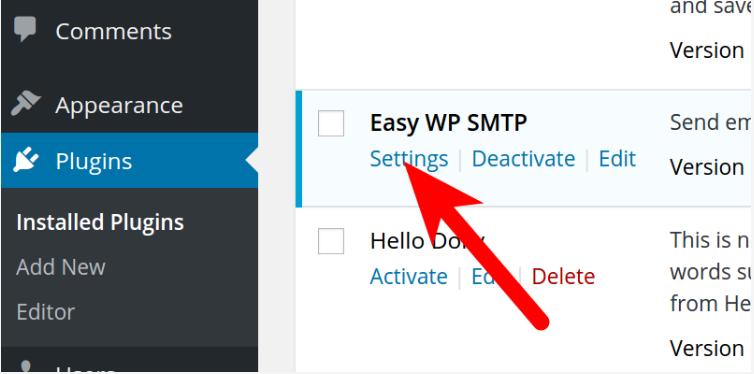
Step #4
Within the Plugins section, you will spot the Easy WP SMTP plugin listed. Simply click on the “Settings” link to proceed with the configuration.
Step #5
Proceed to the General Settings page and input your SMTP settings using the details from your cPanel account and the designated email address for sending site mail.
It’s crucial to note that these settings can vary significantly between different accounts, so ensure to cross-verify your site’s settings in cPanel. Default settings will not suffice for the plugin to function correctly.
Step #6
Once you’ve entered the necessary information, click the Save Changes button. A confirmation message stating “Settings saved” will appear.
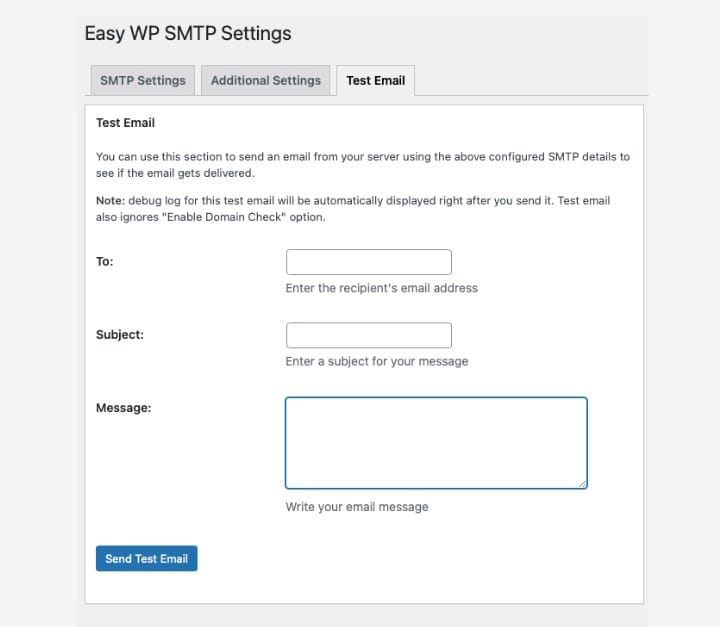
However, we still have a few more steps to complete. Let’s move on to the Test Email tab.
Step #7
Choose a recipient address for your test email and enter it in the To: field. It’s advisable to use an email address that is not on the same domain or server as your site to ensure accurate testing.
I recommend using a personal address from a reputable provider like Microsoft or Gmail to avoid triggering any spam filters.
Step #8
Compose a subject and message for your test email, making sure to avoid using gibberish. A meaningful subject line and a few concise sentences will suffice.
The goal is to prevent your test message from being rejected as spam. Once you have crafted a brief yet meaningful note, click on the Send Test Email button.
Step #9
If your test email is successfully delivered, you will receive a confirmation. However, if the message fails to send, you will be notified accordingly.
In either case, you can review the Debug Log to obtain further details and troubleshoot any issues that may arise.
With the completion of the aforementioned steps, you should encounter no further obstacles when sending emails from your site.
However, it is crucial to ensure that you adhere to email best practices to maintain optimal deliverability. Rest assured that your messages will no longer be rejected on the grounds of sending unauthenticated mail.


