In this guide, we will show you how you can deploy your Django Python application on your CloudPanel.
Create your site. Go to your CloudPanel dashboard and click Add Site. #

Click Create a Python Site. #

Add the domain. Other fields will be filled automatically. Then click Create. The Python site will be created. #

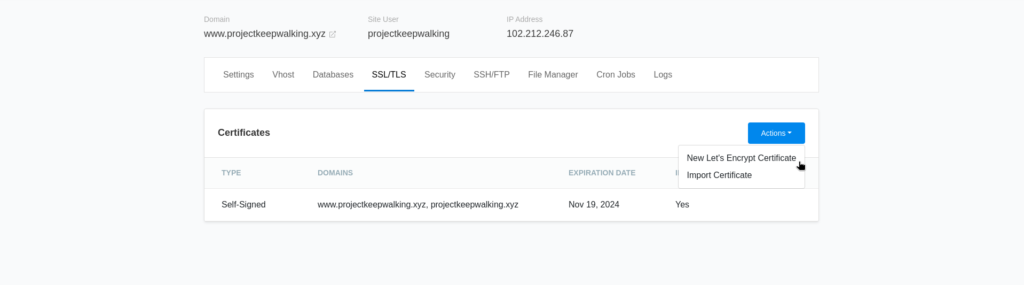
Next, we’ll install SSL certificate for your site. Click the SSL/TLS tab, click Actions then click New Let’s Encrypt Certificate. #
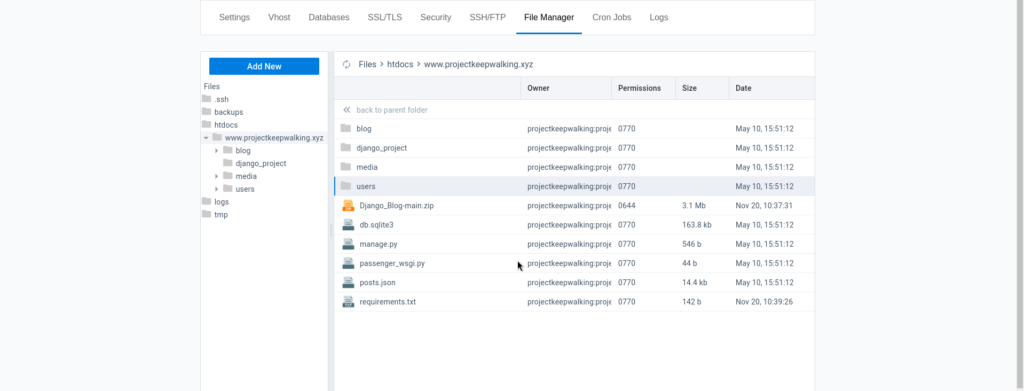
Upload your files. You can upload through FileZilla or CloudPanel’s File Manager. Upload all your python files except env or Venv folder. #
Let’s install Django and create a virtual environment. Go to the Settings page and copy the Root Directory. #

Log in via SSH as root to your VPS. Access the root directory by typing the following command: #
cd /home/<your-domain>/htdocs/www.<your-domain>.com
Create a virtual environment: #
apt install -y python3.10-venv python3-pippython3 -m venv env
Activate the virtual environment #
source env/bin/activate
If your terminal has env, then your virtual environment is active. #
Now install requirements.txt file: #
pip install -r requirements.txt
Now install Django and Gunicorn #
pip install django gunicorn psycopg2-binary
Migrate your database #
python3 manage.py makemigrations
python3 manage.py migrate
Next, let’s collect our static files. Ensure your STATIC_ROOT is set well. Then run the following command: #
python3 manage.py collectstatic
Let’s allow access to our port through the firewall. #
ufw allow 8090
You can test your project by starting up the Django development server with this command: #
python3 manage.py runserver 0.0.0.0:8090
In your web browser, visit your domain name. If your site loads, then the setup was successful.
We need to set up Gunicorn to as a more robust way to start or stop our site. First, deactivate from virtual environment and create a Gunicorn socket: #
deactivate
nano /etc/systemd/system/gunicorn.socket
Copy/paste this code there then save the file:
[Unit]
Description=gunicorn socket

[Socket]
ListenStream=/run/gunicorn.sock

[Install]
WantedBy=sockets.target
Then create and open a systemd service file for Gunicorn #
nano /etc/systemd/system/gunicorn.service
Copy/paste this code there. Change the bold parts to match your application i.e user to your site user, directory to your root directory and wsgi application to directory where the wsgi file is found (exclude the root directory). Save the file.
[Unit]
Description=gunicorn daemon
Requires=gunicorn.socket
After=network.target

[Service]
User=projectkeepwalking
Group=www-data
WorkingDirectory=/home/projectkeepwalking/htdocs/www.projectkeepwalking.xyz
ExecStart=/home/projectkeepwalking/htdocs/www.projectkeepwalking.xyz/env/bin/gunicorn \
          --access-logfile - \
          --workers 3 \
          --bind unix:/run/gunicorn.sock \
          django_project.wsgi:application

[Install]
WantedBy=multi-user.target
Let’s start and enable the Gunicorn socket. When a connection is made to that socket, systemd will automatically start the gunicorn.service to handle it:
systemctl start gunicorn.socket
systemctl enable gunicorn.socket
To check the status of the Gunicorn socket, type the following command:
systemctl status gunicorn.socket
The status should be similar to this:
Output
● gunicorn.socket - gunicorn socket
     Loaded: loaded (/etc/systemd/system/gunicorn.socket; enabled; vendor preset: enabled)
     Active: active (listening) since Mon 2023-11-20 09:34:12 UTC; 34s ago
   Triggers: ● gunicorn.service
     Listen: /run/gunicorn.sock (Stream)
     CGroup: /system.slice/gunicorn.socket

Nov 20 09:34:12 vm-fa710939 systemd[1]: Listening on gunicorn socket.
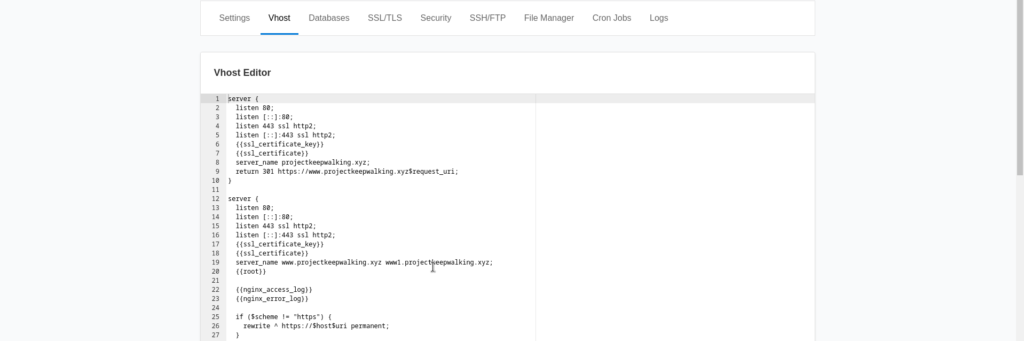
Go to the CloudPanel Site Settings, then click the Vhost tab. #
server {
  listen 80;
  listen [::]:80;
  listen 443 ssl http2;
  listen [::]:443 ssl http2;
  {{ssl_certificate_key}}
  {{ssl_certificate}}
  server_name www.projectkeepwalking.xyz;
  {{root}}

  {{nginx_access_log}}
  {{nginx_error_log}}

  if ($scheme != "https") {
    rewrite ^ https://$host$uri permanent;
  }


  location ~ /.well-known {
    auth_basic off;
    allow all;
  }

 location = /favicon.ico { access_log off; log_not_found off; }
    location /static/ {
        root /home/projectkeepwalking/htdocs/www.projectkeepwalking.xyz/blog;
    }

  {{settings}}

  index index.html;

 location / {
        include proxy_params;
        proxy_pass http://unix:/run/gunicorn.sock;
    }

  #location ~* ^.+\.(css|js|jpg|jpeg|gif|png|ico|gz|svg|svgz|ttf|otf|woff|woff2|eot|mp4|ogg|ogv|webm|webp|zip|swf)$ {
  #  add_header Access-Control-Allow-Origin "*";
  #  expires max;
  #  access_log on;
  #}

  if (-f $request_filename) {
    break;
  }
}
Replace the server_name with your domain name and root with your root directory. Click the Save button.
If there are no errors, go ahead and restart Nginx. Type this in the terminal: #
systemctl restart nginx
ufw delete allow 8090
ufw allow 'Nginx Full'
Check the status of Nginx:
systemctl status nginx


hello, how are you? I did the process exactly as described and it worked perfectly on my computer, but when I access the site from another computer or through the anonymous tab it cannot load my static files.
Can you help me fix this problem?