Google Analytics is a robust web analytics platform that provides valuable data and metrics about your website’s performance, visitor behavior, how they interact with your website content, traffic sources, your visitor geo-location, browsers, default language, screen resolution, JavaScript support, etc.
By integrating it with your WordPress site, you gain access to a wealth of information that can help you optimize your content, marketing campaigns, and user experience.
How To Set Up Google Analytics Account? #
Step #1 #
To begin the process, navigate to the Google Analytics website and locate the prominent “Get started today” button. Give it a click to proceed with the account creation.

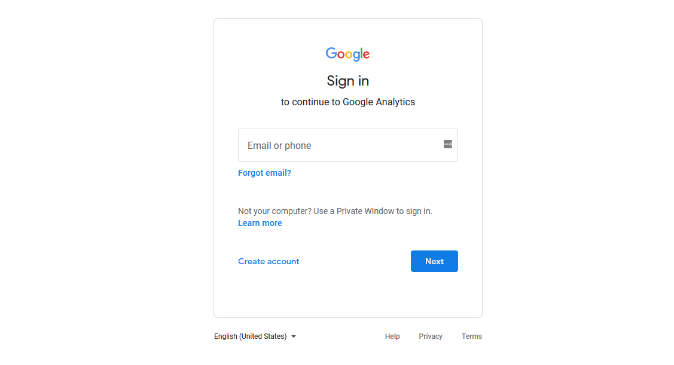
Now, it’s time to log in to your Google account. If you’re already a proud owner of a Google or Gmail account, you can conveniently use those credentials to sign in. However, if you don’t have an account yet, don’t fret! You have the option to create a brand new Google account tailored to your needs.
Step #2 #
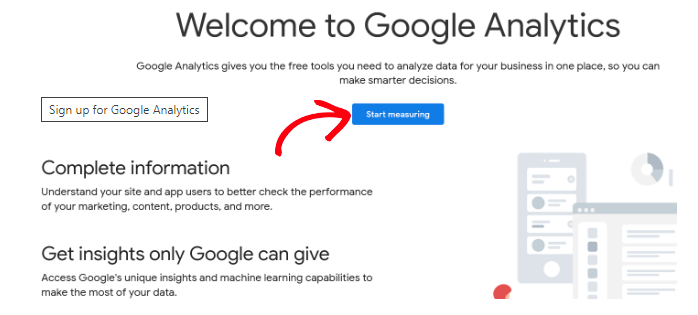
After successfully signing in with your Gmail account, you’ll be greeted with a welcoming screen resembling the one depicted below.
Here, you’ll proceed to sign up for Google Analytics using your Gmail account. Take the proactive step of clicking the enticing ‘Start measuring’ button to initiate the process.
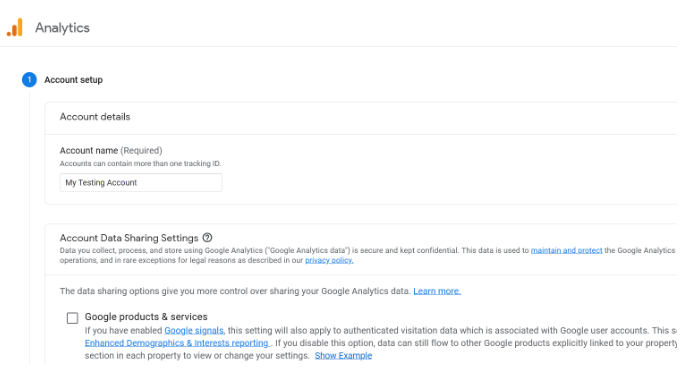
Upon doing so, a prompt will appear, requesting you to provide an account name. This name serves as an internal identifier, allowing you the flexibility to choose any name that resonates with your business or website.
Furthermore, Google Analytics presents you with various options for account data sharing.
These settings empower you with control over the sharing of your valuable Google Analytics data. If you prefer, you can adhere to the default settings and seamlessly progress to the next stage of the setup.
Step #3 #
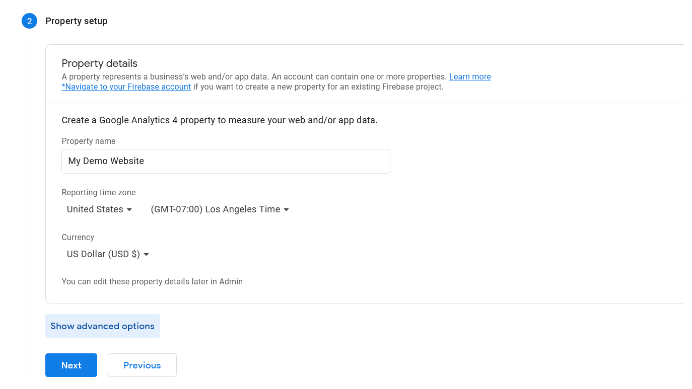
Moving forward, the subsequent screen prompts you to create a Google Analytics property, a crucial step in the setup process.
Google has unveiled the latest iteration of Analytics known as Google Analytics 4 or GA4.
This cutting-edge version offers an integrated tracking solution for both your website and mobile apps, conveniently housed within a single account.
Embrace the enhanced features, metrics, and a refreshed interface that accompanies GA4, empowering you with comprehensive insights through revamped reports.
It’s imperative to take note of an important update: If you currently utilize Universal Analytics, it’s crucial to commence tracking data in Google Analytics 4 (GA4) as well.
The reason being, Google has announced the sunset of Universal Analytics on July 1, 2023. Once the sunset date arrives, Universal Analytics will cease to receive any data and eventually cease functioning altogether.
Setting up a Google Analytics 4 property after the sunset date will necessitate starting from scratch.
However, there’s a proactive approach you can adopt. Begin sending data into GA4 while still leveraging Universal Analytics.
By doing so, you’ll accumulate historical data in Google Analytics 4, facilitating seamless comparison and in-depth analysis even after Universal Analytics shuts down.
How to set up Google Analytics 4 #
Let’s dive into the process. Begin by entering an appropriate property name that accurately represents your website or app.
Next, select your preferred reporting time zone and currency, ensuring that your analytics align with your specific requirements. To proceed, simply click the ‘Next’ button and progress to the next stage of the setup.
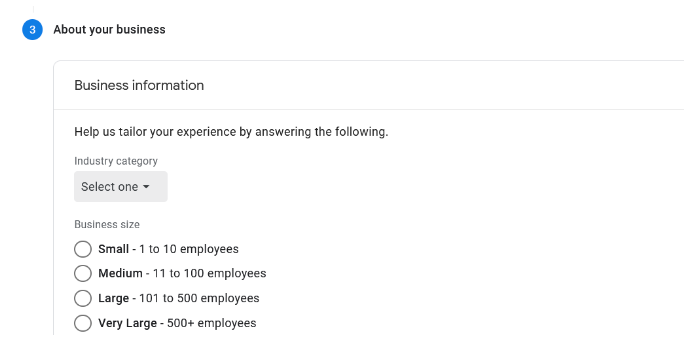
Upon advancing to the subsequent screen, you’ll be prompted to make a selection from the dropdown menu under the ‘Industry category’ section. Choose the category that best aligns with your website’s niche. Additionally, you’ll be required to indicate your ‘Business size’ by selecting from the available options.
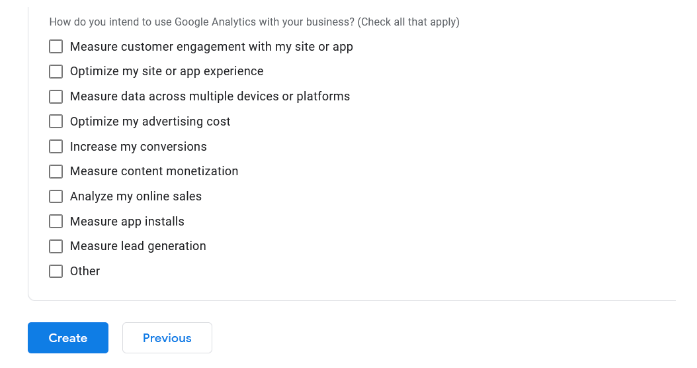
Moving forward, scroll down the page and specify how you intend to utilize Google Analytics for your business.
Options include measuring engagement, optimizing advertising costs, increasing conversions, and more.
Feel free to select multiple options or choose all that are relevant to your specific objectives. Once you’ve made your choices, don’t forget to click the ‘Create’ button to proceed.
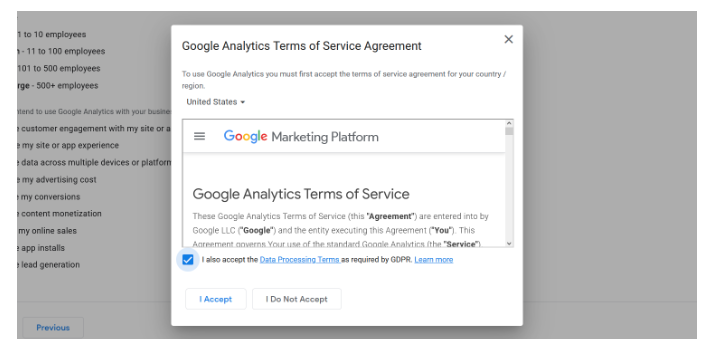
Upon clicking the ‘Create’ button, a popup window will appear, presenting you with Google Analytics’ terms of service agreement.
To proceed, simply check the box indicating your acceptance of the Data Processing Terms as mandated by GDPR. Then, click the ‘I Accept’ button to move forward.
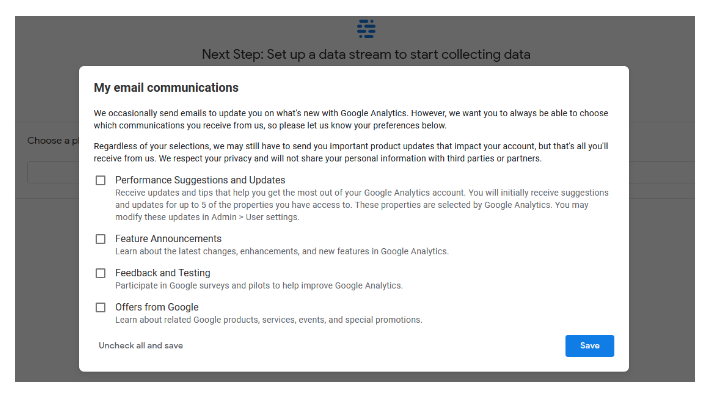
The subsequent popup provides you with options regarding communication emails from Google Analytics. Tailor your preferences by checking the boxes corresponding to the updates you wish to receive.
Once you’ve made your selections, finalize the process by clicking the ‘Save’ button.
Step #4 #
Presented before you now are the options for your Google Analytics Web stream, which will allow you to track and analyze data from your WordPress site.
Since we’re specifically configuring Google Analytics for a WordPress site, it’s recommended to select ‘Web’ as the platform of choice.
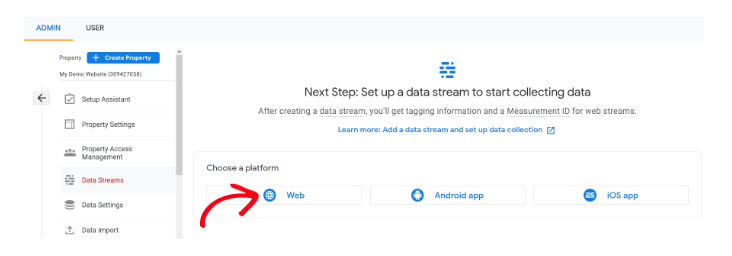
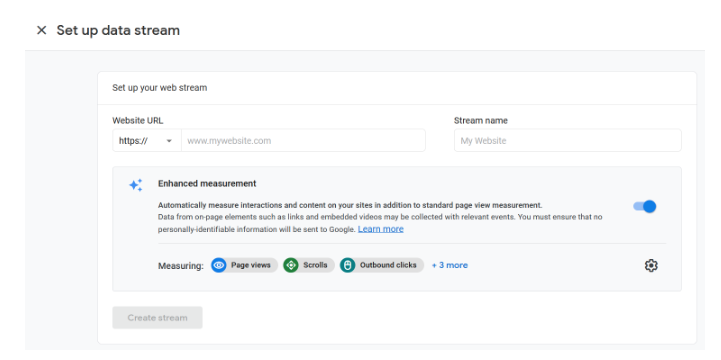
After making the platform selection, proceed by entering the URL of your website and assigning a name to the stream.
By default, Google Analytics enables the Enhanced Measurement feature, which empowers you to track various user interactions such as page views, scrolls, outbound clicks, file downloads, and more.
This comprehensive data is instrumental in gaining valuable insights through Google Analytics.
To continue with the setup process, simply click the ‘Create stream’ button, propelling you further along the journey.
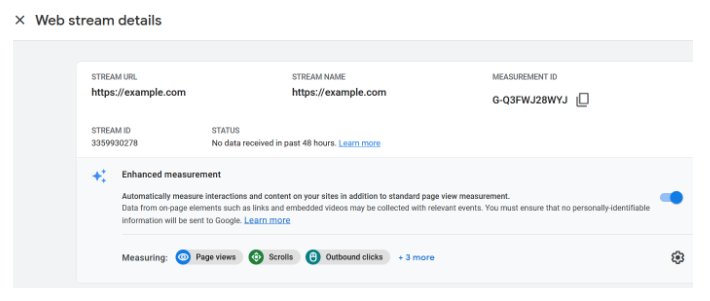
At this stage, you’ll be able to view essential details such as the Stream URL, name, and Measurement ID.
Additionally, Google Analytics provides an overview of the different enhanced measurements it will diligently record.
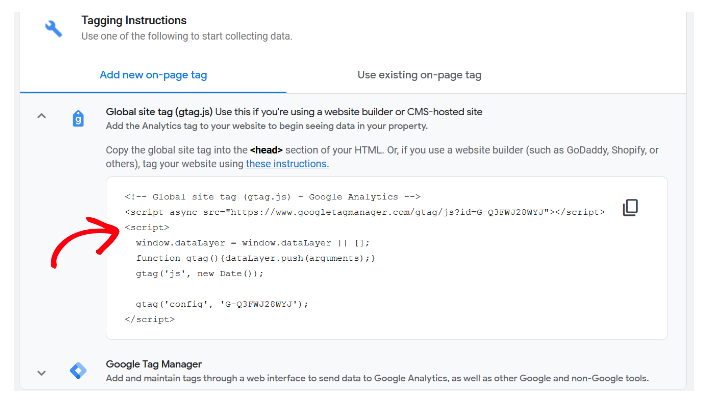
In the ‘Tagging Instructions’ section, Google Analytics offers various methods to add the Google Analytics code to your WordPress website.
If you opt for the ‘Global site tag (gtag.js)’ option, you’ll be presented with the Google Analytics tracking code.
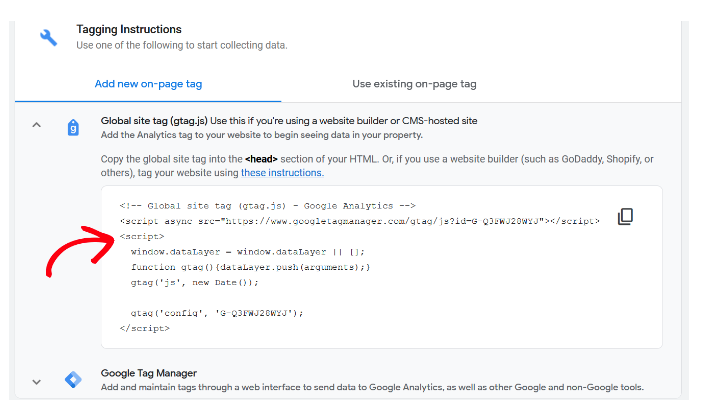
It is advisable to copy this tracking code as you will need to insert it into your WordPress site later, depending on the method you choose to implement.
Alternatively, you can keep this browser tab open and switch back to it when necessary, ensuring easy access to the code.
We recommend keeping the Analytics browser tab open throughout the process, as you may need to revisit it after you have successfully installed the code on your WordPress site.
Now that you have successfully set up your Google Analytics account, let’s delve into the next step: installing Google Analytics in WordPress.
How to Install Google Analytics in WordPress #
When it comes to integrating Google Analytics into your WordPress website, there exist multiple approaches to choose from.
In this section, we will explore three distinct methods, with the first option being the most straightforward and the final one requiring a bit more technical proficiency.
Each method serves a specific purpose, so you can select the one that aligns most effectively with your requirements and skill level.
However, it is crucial to note that employing only one of these methods on your website is essential.
This practice ensures that your page views are not double-tracked within your Google Analytics account, maintaining the accuracy and integrity of your data.
Method 1. Google Analytics for WordPress by MonsterInsights
Introducing MonsterInsights, the renowned Google Analytics plugin for WordPress, trusted by over 3 million websites, including prestigious brands like Bloomberg, PlayStation, Zillow, and WPBeginner.
This user-friendly plugin offers an unrivaled solution for seamlessly integrating Google Analytics into your WordPress site, catering to beginners and experts alike.
Notably, it features a unique Dual Tracking capability, enabling you to effortlessly incorporate both Universal Analytics and Google Analytics 4 without any coding requirements.
MonsterInsights is available in two versions: a free edition and a premium paid version. For the purpose of this tutorial, we will focus on the free version, which provides ample functionality.
However, should you desire advanced features such as eCommerce tracking, Ads tracking, or Author tracking, the MonsterInsights Pro version is available for your consideration.
Regardless of the version, the setup process remains consistent.
Now, let’s dive into the setup process.
To begin, you must install and activate the MonsterInsights plugin. For a detailed walkthrough, refer to our comprehensive guide on installing WordPress plugins.
Upon activation, you’ll notice a new menu item labeled ‘Insights’ added to your WordPress admin menu, accompanied by a welcoming screen.

Clicking the ‘Launch the Wizard’ button will initiate the MonsterInsights setup wizard, guiding you through the configuration process.
First, you’ll be prompted to select a category that best represents your website, such as a business website, blog, or online store.
Choose the appropriate category and click ‘Save and Continue’ to proceed.

Next, you’ll establish a connection between MonsterInsights and your WordPress site.
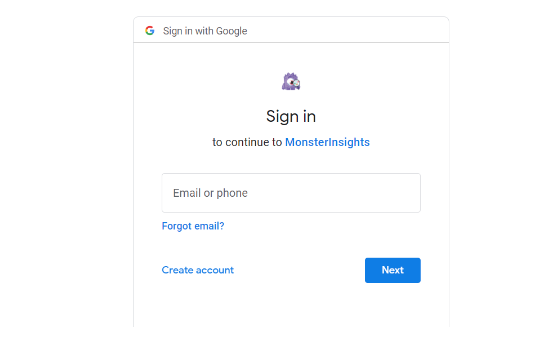
Simply click the ‘Connect MonsterInsights’ button, which will redirect you to your Google accounts.
Select your preferred Google account or sign in using your email.
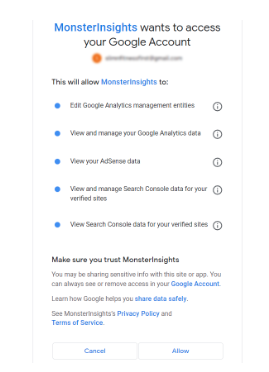
Granting access to MonsterInsights to link with your Google Analytics account is the next step.
Click the ‘Allow’ button to proceed.
To complete the connection, select the profile corresponding to your website that you wish to track. Click the ‘Complete Connection’ button to finalize the process.
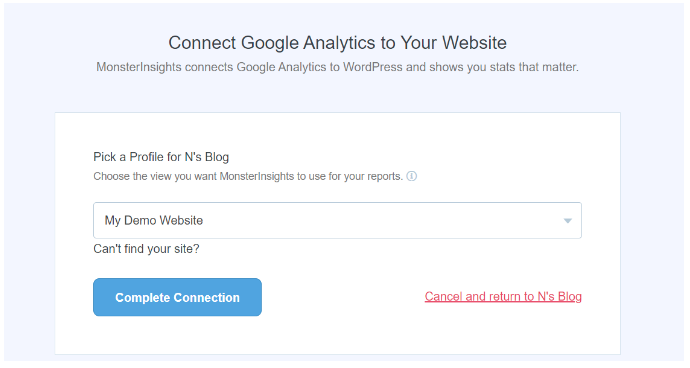
MonsterInsights will then install Google Analytics on your website.
You’ll be presented with recommended settings for your website, which should be suitable for most scenarios.
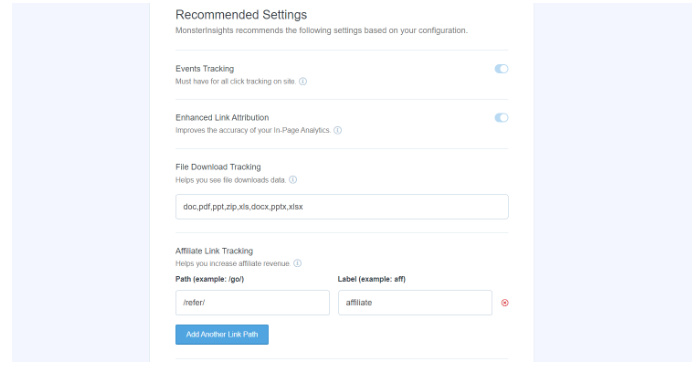
However, if you employ an affiliate link plugin, it is advisable to add the path used to cloak affiliate links. This ensures the tracking of affiliate links within Google Analytics.
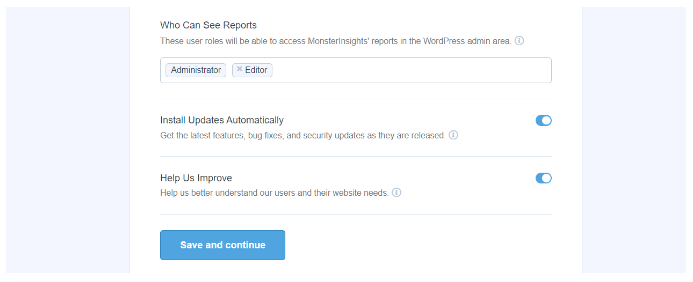
Furthermore, MonsterInsights allows you to define which WordPress user roles can access the reports. Once you’ve made the necessary selections, click ‘Save and Continue’ to save your settings.
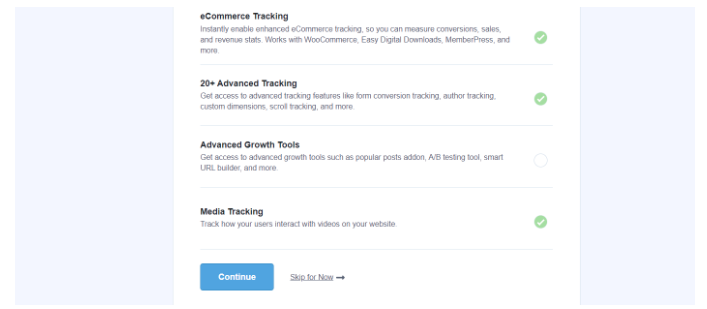
MonsterInsights will present you with a list of website tracking features to enable. You can either proceed by clicking ‘Continue’ or choose to skip for now.
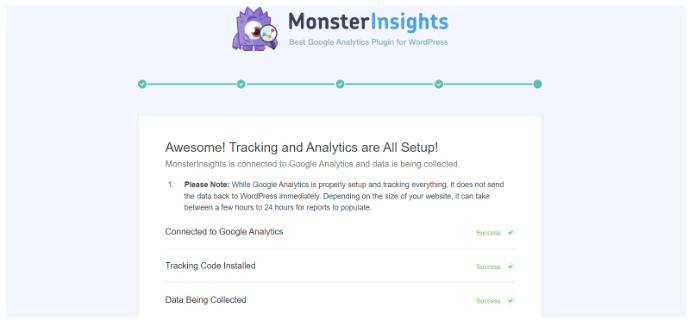
On the following screen, MonsterInsights will confirm the successful setup of Google Analytics tracking.
You can verify that Google Analytics is connected, the tracking code is installed, and data is being collected accordingly.
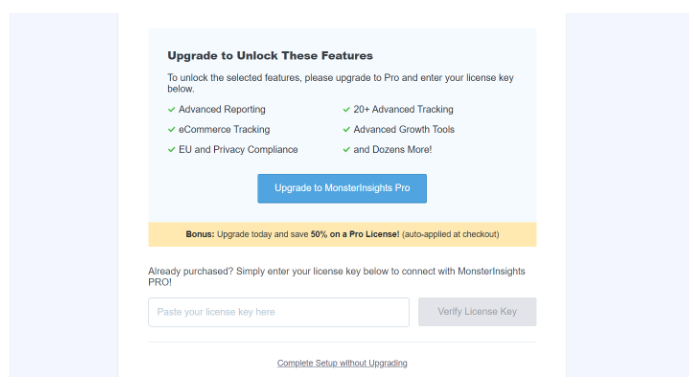
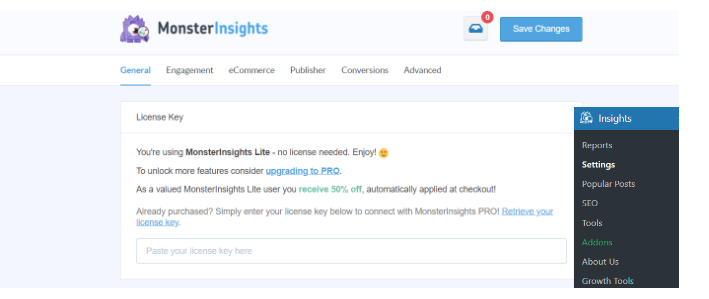
Scrolling down, you’ll find a field where you can enter your license key. For now, select the option ‘Complete Setup without Upgrading.’
Congratulations! You have successfully added Google Analytics to your WordPress website.
The next step involves creating a Measure Protocol API Secret. This allows MonsterInsights to track essential events such as eCommerce purchases and form conversions.
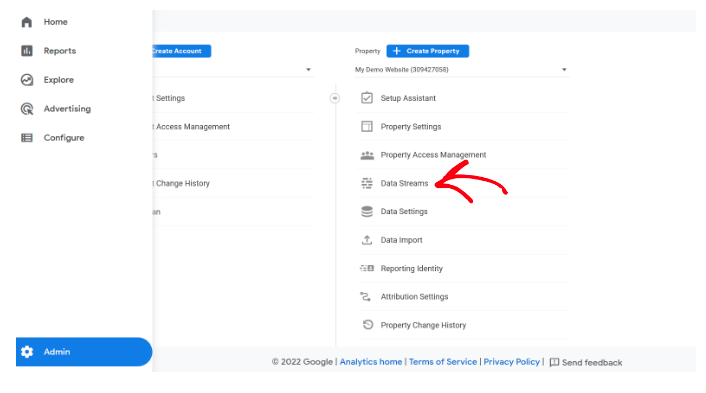
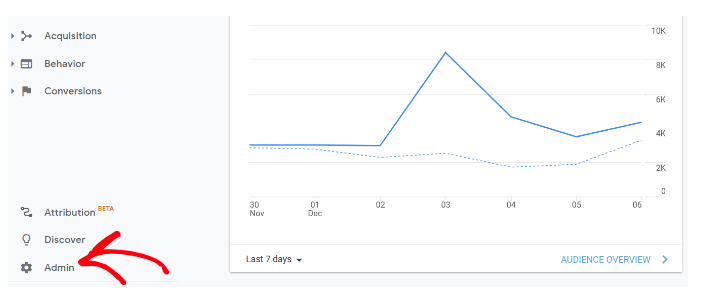
To begin, log in to your Google Analytics account and navigate to the ‘Admin’ settings page. From there, click on the ‘Data Streams’ option.
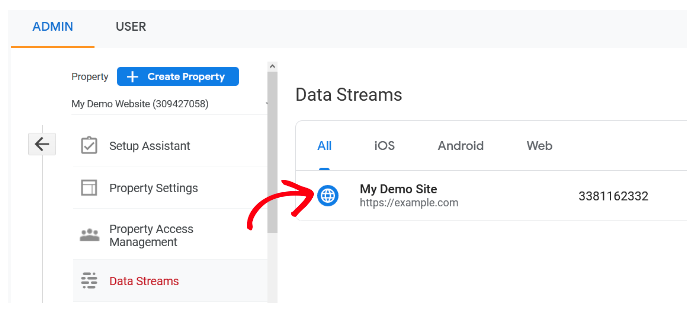
You’ll be presented with your Data Streams. Simply select the data stream connected with MonsterInsights.
In the subsequent screen, scroll down to the ‘Advanced Settings’ section and click on the ‘Measure Protocol API Secrets’ option.
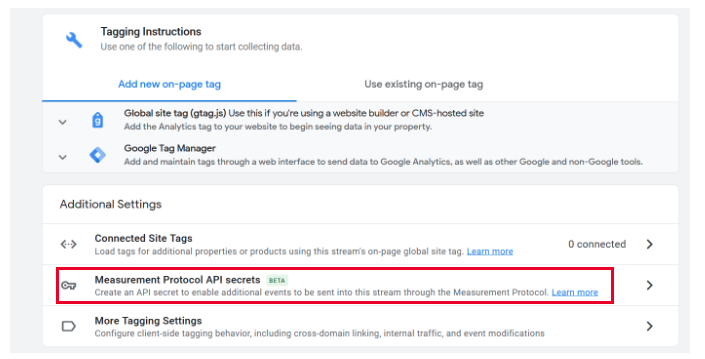
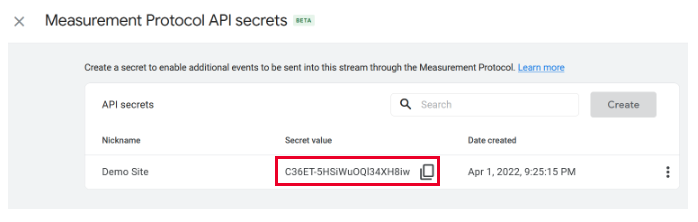
A new window will appear, displaying your Measurement Protocol API Secrets. Initially, this page will be empty, devoid of any API secrets. Click the ‘
Create’ button to proceed.
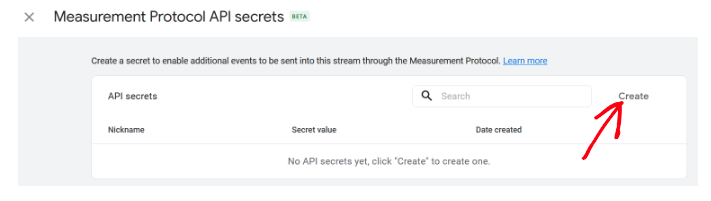
Enter a nickname for your API secret and click ‘Create.’
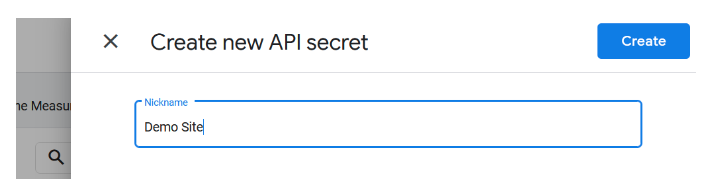
Your API secret is now generated. Copy the secret value displayed under the ‘Secret Value’ field.
Next, return to MonsterInsights by accessing ‘Insights » Settings’ from your WordPress admin panel.

Navigate to the ‘General’ tab and locate the ‘Google Authentication’ section. Paste the Secret Value into the ‘Measurement Protocol API Secret’ field.
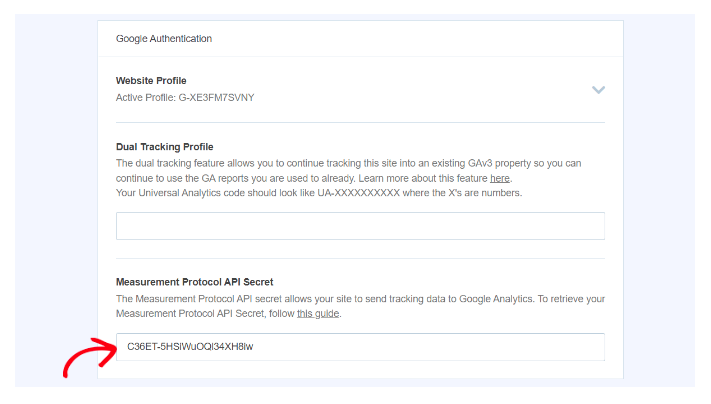
Congratulations! You have successfully configured the Measurement Protocol API Secret in MonsterInsights.
Now, let’s explore how to utilize the dual tracking feature in MonsterInsights if you possess a Universal Analytics account.
How to Set Up Dual Tracking When Using Universal Analytics
With MonsterInsights, tracking both Universal Analytics and Google Analytics 4 becomes a breeze, even if you already have a Universal Analytics account.
The beauty of it all is that you won’t need to tinker with any code.
However, it’s important to note that Universal Analytics will be phased out on July 1, 2023, rendering data tracking impossible beyond that date.
We strongly recommend setting up a Google Analytics 4 property promptly and commence data transmission to GA4.
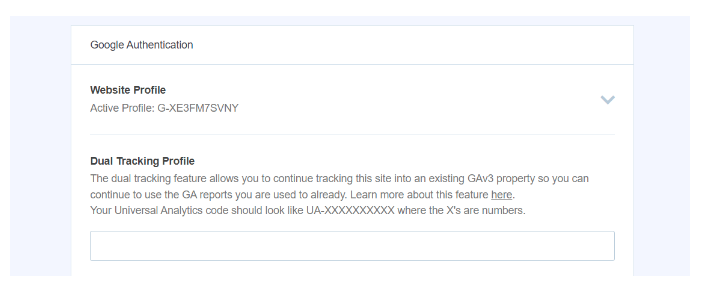
To initiate dual tracking, navigate to Insights » Settings in your WordPress dashboard and access the ‘General’ tab.
Once there, scroll down to the ‘Google Authentication’ section.
Within the ‘Dual Tracking Profile’ field, you can input your Universal Analytics (UA) code.
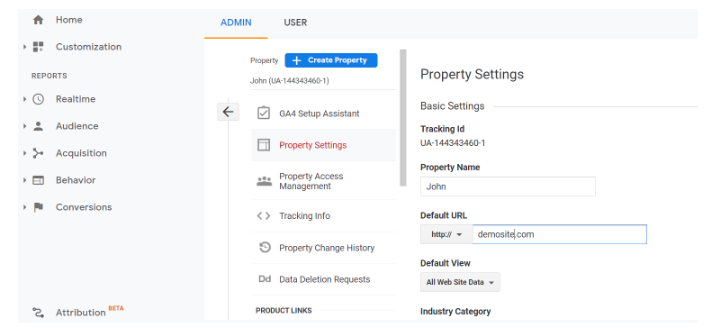
To find the Universal Analytics code, head to the ‘Admin’ settings page within Google Analytics.
Click on ‘Property Settings’ under the Property column.
You’ll find your ‘Tracking Id’ in the following format: UA-123456789-1.
Congratulations! You have now successfully implemented Universal Analytics tracking alongside Google Analytics 4 on your WordPress site.
Bear in mind that it may take some time for Google Analytics to display your statistics.
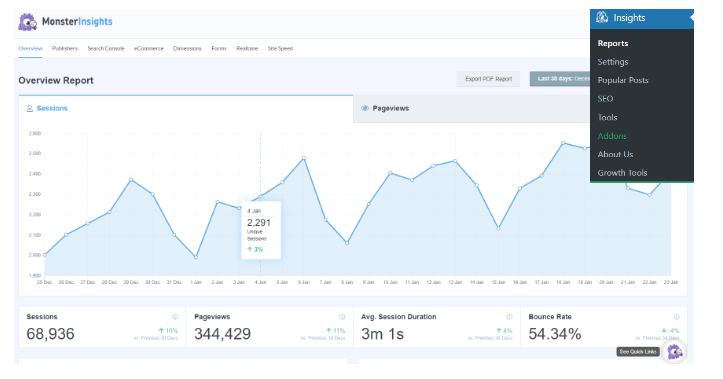
One of the standout features of MonsterInsights is the ability to access your Google Analytics reports directly within your WordPress dashboard. Simply visit the Insights » Reports page for a quick overview of your analytics data.
Furthermore, MonsterInsights offers a Popular Posts addon that can showcase your top-performing content, elevating your traffic and pageviews.
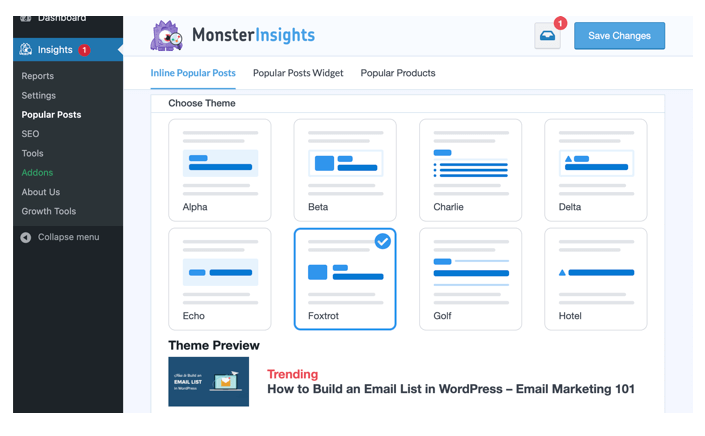
By leveraging this addon, you can automatically include inline popular post links to enhance engagement.
For those operating online stores, MonsterInsights can even add your best-selling products at the end of each blog post, amplifying sales potential.
Please note that MonsterInsights was formerly known as Google Analytics for WordPress by Yoast. In 2016, WPBeginner’s founder, Syed Balkhi, acquired the plugin and rebranded it as MonsterInsights.
Method 2. WPCode Plugin #
Using this method may not offer the same level of functionality as MonsterInsights.
Advanced tracking configuration and the ability to view Google Analytics data within your WordPress dashboard will be limited.
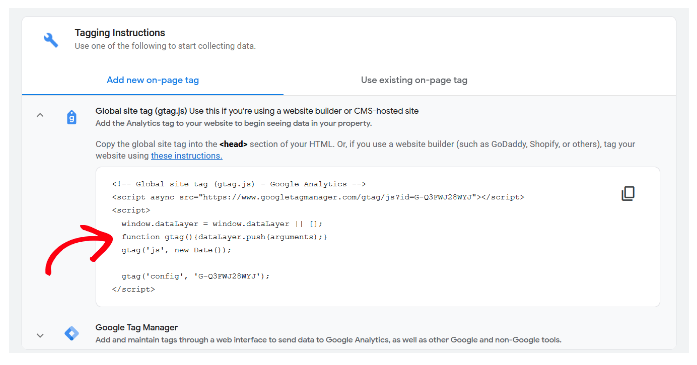
To begin, you’ll need to retrieve your Google Analytics tracking code (Global site tag) that you copied during Step 4 when setting up your Google Analytics account.
You can locate it in the Web stream details within the ‘Tagging Instructions’ section.
Now, proceed by installing and activating the WPCode plugin. For detailed instructions, refer to our comprehensive guide on installing WordPress plugins.
Once activated, navigate to the Code Snippets » Header & Footer page. Here, paste the previously copied Google Analytics tracking code into the ‘Header’ section.
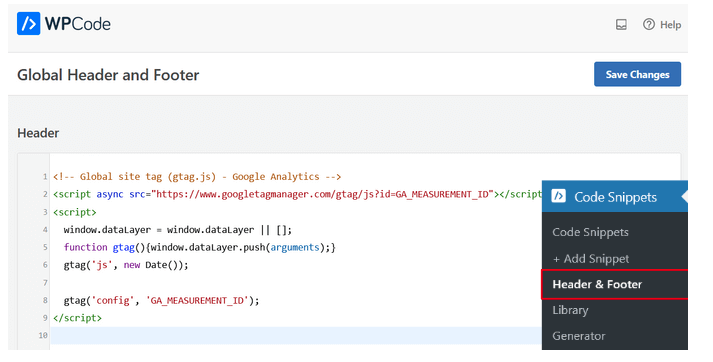
Remember to save your changes by clicking the ‘Save Changes’ button to preserve your settings.
That’s it! Congratulations on successfully installing Google Analytics on your website.
Method 3. Install Google Analytics in WordPress Theme
This method is primarily intended for advanced users who are comfortable working with code.
However, it comes with certain drawbacks, such as potential code loss when switching or updating your theme.
We rarely recommend utilizing this method due to its unreliability.
If you’re new to adding code snippets to your WordPress files, we suggest referring to our comprehensive guide on how to copy and paste code snippets in WordPress.
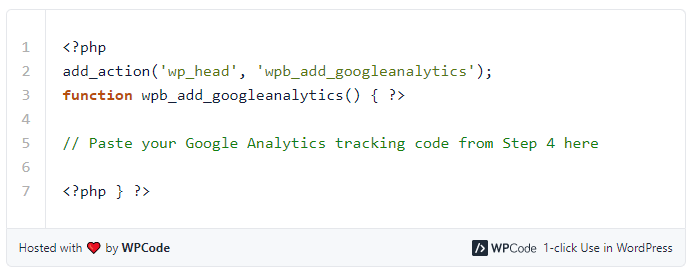
To begin, you’ll need to copy the Google Analytics tracking code that you previously copied during Step 4. You can locate it within the Web stream details section under the ‘Tagging Instructions’ section.
Once you have the tracking code, there are two common approaches to adding it to your WordPress theme files.
You can choose either one of them, but it’s important to note that using both methods simultaneously is unnecessary.
1. Adding the Code in the header.php File #
To implement this approach, simply edit the header.php file within your WordPress theme. Then, paste the Google Analytics tracking code you copied earlier right after the <body> tag.
Remember to save your changes and upload the modified file back to your server.
2. Adding via the Functions File #
Alternatively, you can incorporate the Google Analytics tracking code into the WordPress functions file. By doing so, the tracking code will automatically be added to every page of your WordPress site.
To proceed with this method, you’ll need to insert the code into your theme’s functions.php file.
Viewing Reports on Google Analytics Website
Google Analytics presents a wealth of valuable data that can provide insights into your website’s performance. To access this data, simply navigate to your Google Analytics dashboard.
Exploring Universal Analytics Reports:
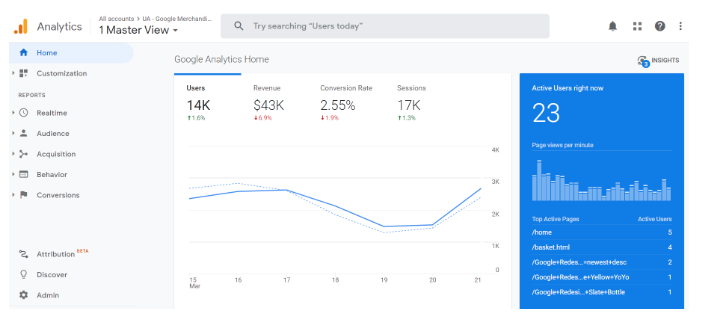
Within Universal Analytics, the left column of the dashboard displays the built-in Google Analytics reports.
Each section is divided into various tabs, and clicking on a tab expands it to reveal additional options.
Here’s an overview of the different reports available in Universal Analytics:
- Real-time report: Provides a live view of your website’s traffic.
- Audience tab: Offers reports to help you understand your users better.
- Acquisition reports: Explore the sources from which your users arrived at your website.
- Behavior reports: Summarize users’ actions on your site after arriving.
- Conversion reports: Evaluate how effectively you’re achieving your goals.
Discovering Google Analytics 4 Reports:
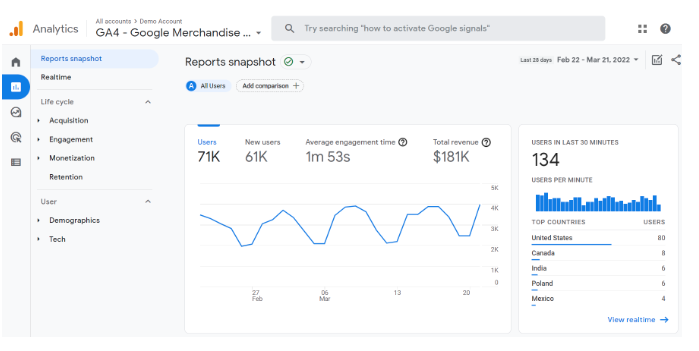
In Google Analytics 4, the reporting structure differs slightly from Universal Analytics. Within the left column, you’ll find a dedicated Reports option. The reports are grouped into two main categories: Life Cycle and User.
When compared to Universal Analytics reports, you’ll notice a few notable differences in GA4 reports.
For instance, the bounce rate metric is absent, and the reporting interface has been redesigned.
GA4 introduces new metrics like engagement time, eliminates goals, and promises additional features and reports in the future.
Here’s an overview of the different reports available in Google Analytics 4:
- Realtime report: Similar to Universal Analytics, this report displays active users on your site in real time.
- Acquisition report: Provides insights into the mediums through which users discover your website, such as organic, referral, email, and affiliate.
- Engagement report: Highlights conversions and events occurring on your site.
- Monetization report: Consolidates eCommerce data and introduces new reports like In-app purchases and Publisher ads.
- Retention report: Compares new visitors to returning visitors, offering valuable insights on user retention.
- Demographics: Presents website traffic information based on top countries, cities, and more, while also showcasing gender breakdown and interest reports.
- Tech report: Offers data on the most commonly used devices, browsers, operating systems, app versions, and screen sizes for accessing your website.
It’s worth noting that Google Analytics 4 is actively evolving, as development for Universal Analytics has concluded, and Universal Analytics will reach its sunset on July 2023.
Expect to see additional features, reports, and metrics introduced in Google Analytics 4 in the future.


