Everything you need to know, from placing your order to chatting with your AI assistant
1. Welcome to Your OpenClaw VPS #
Thank you for choosing Truehost Cloud for your OpenClaw hosting. This guide walks you through everything that happens after you place your order — what our systems do automatically, what you will receive, and how to connect your AI assistant to your favourite messaging app and start using it.
What is OpenClaw? #
OpenClaw is an open-source personal AI assistant that runs entirely on your own private server. Unlike browser-based AI tools you visit on a website, OpenClaw lives on your VPS and is always on — ready to respond whenever you message it through the apps you already use every day.
Think of it as your own private AI assistant that you interact with through messaging platforms. You send it a message on Telegram, WhatsApp, Slack, or Discord, and it responds using a powerful AI model — in your case, Anthropic Claude. It can answer questions, help with writing, summarise documents, execute tasks, manage files, and much more.
Supported Messaging Platforms #
OpenClaw connects to the messaging platforms you already use. Once set up, you simply open your preferred app and start chatting with your assistant as you would with any contact:
💬 Telegram📱 WhatsApp💼 Slack🎮 Discord📧 Google Chat💬 Microsoft Teams📡 Signal
💡 Recommended for first-time users: Telegram is the easiest platform to connect first. It does not require any special port forwarding and the bot setup process takes just a few minutes.
What Makes OpenClaw Different? #
Most AI assistants are cloud services — your conversations are processed and stored on someone else’s servers. OpenClaw is different:
- Your data stays on your server — conversation history and memory are stored on your VPS, not on a third-party platform
- Always on — your assistant runs 24/7 on your VPS, even when your phone or laptop is off
- Persistent memory — OpenClaw remembers context from previous conversations and builds knowledge about your projects and preferences over time
- Works across platforms — one assistant, accessible from all your messaging apps simultaneously
- You only pay for what you use — API costs go directly to the AI provider with no markup
2. The Ordering Process #
Placing your order for an OpenClaw VPS on Truehost Cloud takes just a few minutes. Here is a step-by-step walkthrough of what you will see.
Step 1 — Navigate to the Order Page #
Log in to your Truehost Cloud account at truehost.cloud and find the OpenClaw VPS product. Click Order Now to begin. You will be taken to the server configuration page.
Truehost Cloud order page showing the OpenClaw VPS product and Order Now button
Step 2 — Configure Your Server #
All configurations are done in the backend and shared once the installation is complete.
Step 3 — Review and Check Out #
Click Continue or Check Order to proceed to the checkout summary. Review your order details to confirm everything looks correct before completing payment.
Step 4 — Choose a Payment Method #
Select your preferred payment method. Truehost Cloud supports multiple payment methods, including card payments and mobile money. Complete the payment to confirm your order.
Payment method selection page
Step 5 — Order Confirmed #
Once your payment is received, your order is confirmed, and provisioning begins automatically. You will see a confirmation screen and receive a confirmation email. No further action is needed from you — our system handles everything from here.
3. What Happens After You Order #
Installation is initiated immediately upon payment. and should complete within 15-25 minutes.
4. Your Welcome Email #
When provisioning is complete, you will receive a welcome email from us containing everything you need to get started. Keep it safe — it includes sensitive credentials.
| Item | Details |
|---|---|
| OpenClaw URL | The full HTTPS web address for your OpenClaw Control UI (e.g. https://openclaw-abc123.truehost.biz) |
| Gateway Token | Your unique token for authenticating with the OpenClaw gateway — keep this private |
| VPS IP Address | The public IP address of your server |
| SSH Username | root — used for direct server access if needed |
| SSH Password | Your server root password for command-line access |
| Assigned IP | |
| Assigned hostname |
⚠️ Important: Keep your Gateway Token private at all times. Anyone with this token can access and control your OpenClaw instance. Do not share it or post it publicly.
4b. Accessing the OpenClaw Control UI #
Once you receive your welcome email, you can access the OpenClaw Control UI directly from your browser. Unlike traditional dashboards that use a username and password, OpenClaw uses a WebSocket connection with a gateway token. Here is how to connect for the first time.
Step-by-Step Login Process #
- Open your welcome email and copy your OpenClaw URL (e.g.
https://openclaw-abc123.truehost.biz). - Paste the URL into your browser and press Enter. You will see the OpenClaw Gateway Dashboard — a simple connection form with three fields.
- Fill in the fields as follows:
- WebSocket URL — enter
wss://openclaw-abc123.truehost.biz(same as your URL but starting withwss://instead ofhttps://) - Gateway Token — paste the gateway token from your welcome email
- Password — leave this field empty
- WebSocket URL — enter
- Click Connect. The Control UI will load and you will land on the OpenClaw dashboard.
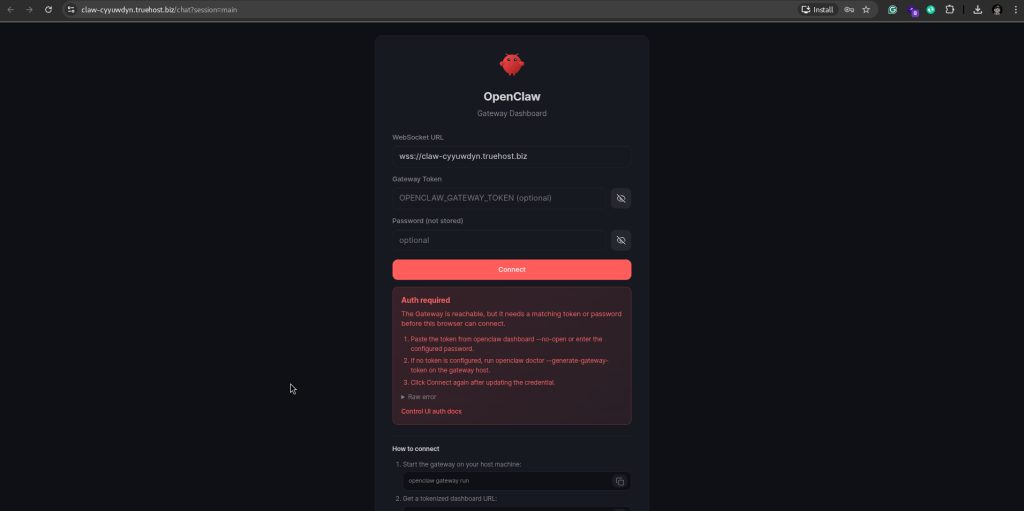
OpenClaw Gateway Dashboard showing the WebSocket URL, Gateway Token, and Password fields
💡 What is wss://? The wss:// prefix stands for WebSocket Secure — it is the encrypted WebSocket protocol, the same way https:// is the encrypted version of http://. OpenClaw uses WebSockets for real-time communication between your browser and the gateway.
⏳ URL not loading yet? After provisioning, DNS records can take up to 60 seconds to propagate. If your OpenClaw URL is not reachable immediately after receiving your welcome email, wait 2 to 3 minutes and try again. This is normal.
On first connection, you will need to approve your device for UI access. The command is clearly displayed once you click connect on the preveous image:
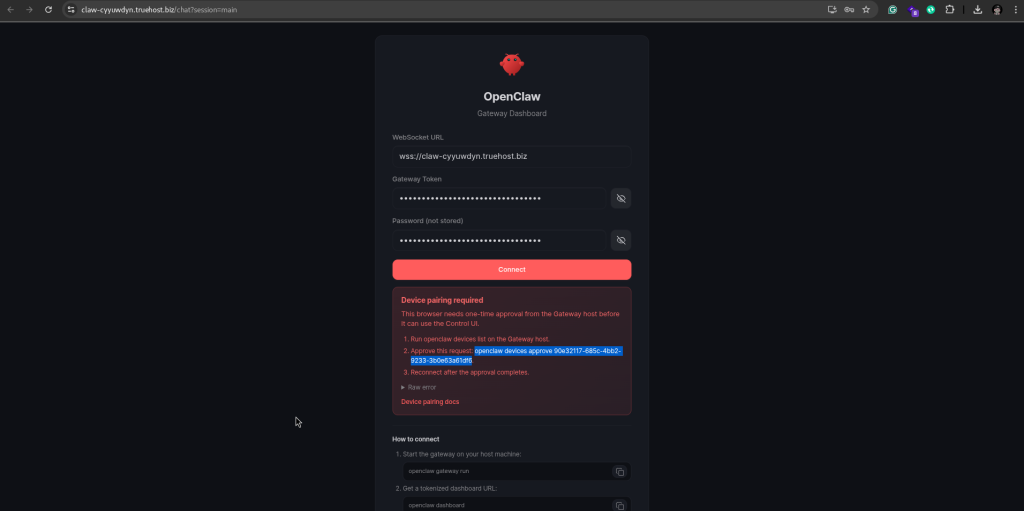
Access OpenCLAW CLI with the provided SSH access from your email and run the provided command with the token (note to omit the preceding. on the token)

Once approved, you will be able to access the UI
5. Getting Your AI Provider API Key #
OpenClaw needs an AI provider API key to power its responses. This is what connects your assistant to the intelligence behind it. We recommend using Anthropic Claude — it is the most capable model for complex tasks and follows instructions with high accuracy.
💡 You can add your API key at any time. Your OpenClaw Control UI is fully accessible before you add an API key — you can explore the dashboard, connect your messaging platform, and configure your settings first. When you are ready, simply go to Settings → AI Provider in the Control UI to add your key. Your assistant will start responding to messages as soon as the key is saved.
ℹ️ What is an API key? An API key is a unique code that identifies you to the AI provider and allows OpenClaw to send messages to their AI model on your behalf. You are charged by the AI provider directly based on how much you use — Truehost Cloud does not add any markup to these costs.
Getting an Anthropic Claude API Key #
- Go to console.anthropic.com and create a free account or log in.
- Once logged in, navigate to API Keys in the left menu.
- Click Create Key, give it a name (e.g.
my-openclaw), and click Create. - Copy the API key immediately — it is only shown once. Store it somewhere safe.
- You will need to add billing details to your Anthropic account before the key can be used for API calls.
Anthropic Console showing the API Keys section and Create Key button
Adding Your API Key via the Control UI #
Once you have your API key, adding it to OpenClaw takes just a few steps directly from the Control UI — no terminal or SSH required:
- Log in to your OpenClaw Control UI at your OpenClaw URL.
- Click Settings in the left navigation menu.
- Select AI Provider from the settings submenu.
- Select Anthropic Claude as your provider from the dropdown.
- Paste your API key into the API Key field.
- Choose your preferred Claude model (see the model guide below).
- Click Save. Your assistant will immediately start using the key.
OpenClaw Control UI Settings → AI Provider showing the API key field and model selector
Choosing Your Claude Model #
When adding your API key you will also be asked to choose a Claude model. OpenClaw supports all current Anthropic Claude models. Here is a guide to help you pick the right one for your needs:
| Model | Best for | Speed | Cost |
|---|---|---|---|
| Claude Haiku | Everyday tasks — quick questions, simple writing, short summaries. Best for high-volume use where speed matters. | ⚡ Fastest | 💰 Most affordable |
| Claude Sonnet | Most users — a great balance of intelligence and speed. Handles complex tasks, long documents, and detailed writing well. | 🚀 Fast | 💰💰 Moderate |
| Claude Opus | Complex reasoning, research, and tasks that need deep analysis. Best when quality matters more than speed. | 🐢 Slower | 💰💰💰 Premium |
💡 Not sure which model to pick? Start with Claude Sonnet — it is the best all-round choice for most clients. You can always change your model later from Settings → AI Provider in the Control UI without needing to re-enter your API key.
ℹ️ Changing your model later: You are not locked into a model choice. At any time you can go to Settings → AI Provider in the Control UI, select a different Claude model from the dropdown, and save. The change takes effect immediately — your next message will use the new model.
Estimated API Costs #
For typical personal use — a few dozen messages per day — API costs are very affordable:
| Usage Level | Estimated Monthly API Cost |
|---|---|
| Light use (occasional queries) | $1 – $5 / month |
| Moderate use (daily assistant) | $5 – $15 / month |
| Heavy use (team or automation) | $15 – $50+ / month |
💡 Tip: OpenClaw logs every API call with token counts so you can monitor your usage and costs at any time from the Control UI.
6. Connecting Your Messaging Platform #
Once your OpenClaw instance is running and you have your API key ready, the next step is to connect the messaging platform you want to use to chat with your assistant. OpenClaw supports multiple platforms — you can connect one or several at the same time.
💡 New to OpenClaw? We recommend starting with Telegram. It is the simplest platform to connect — no special configuration or port forwarding is required, and the bot setup takes just a few minutes.
General Connection Process #
The process for connecting any messaging platform follows these general steps:
- Log in to your OpenClaw Control UI — open your OpenClaw URL in the browser, enter your WebSocket URL and Gateway Token, and click Connect (see Section 4b for the full login process).
- Navigate to Channels or Platforms in the Control UI.
- Select the messaging platform you want to connect (e.g. Telegram, WhatsApp, Slack, Discord).
- Follow the on-screen instructions specific to that platform — this usually involves creating a bot account on that platform and pasting a token or webhook URL into OpenClaw.
- Add your Anthropic Claude API key when prompted under Settings → AI Provider.
- Send a test message to confirm everything is working.
OpenClaw Control UI showing the Channels / Platforms connection page
Platform-Specific Notes #
| Platform | What you need |
|---|---|
| Telegram | Create a bot via @BotFather on Telegram and copy the bot token into OpenClaw. |
| Requires a WhatsApp Business API account or a supported third-party provider. | |
| Slack | Create a Slack App in your workspace and configure the bot token and event subscriptions. |
| Discord | Create a Discord Application and bot, and invite it to your server with the correct permissions. |
| Google Chat | Requires a Google Workspace account and a configured Chat app with webhook access. |
| Microsoft Teams | Requires a Microsoft 365 account and a registered Teams bot via Azure. |
ℹ️ Need help connecting a platform? Raise a support ticket at truehost.cloud and our team will assist you with the setup.
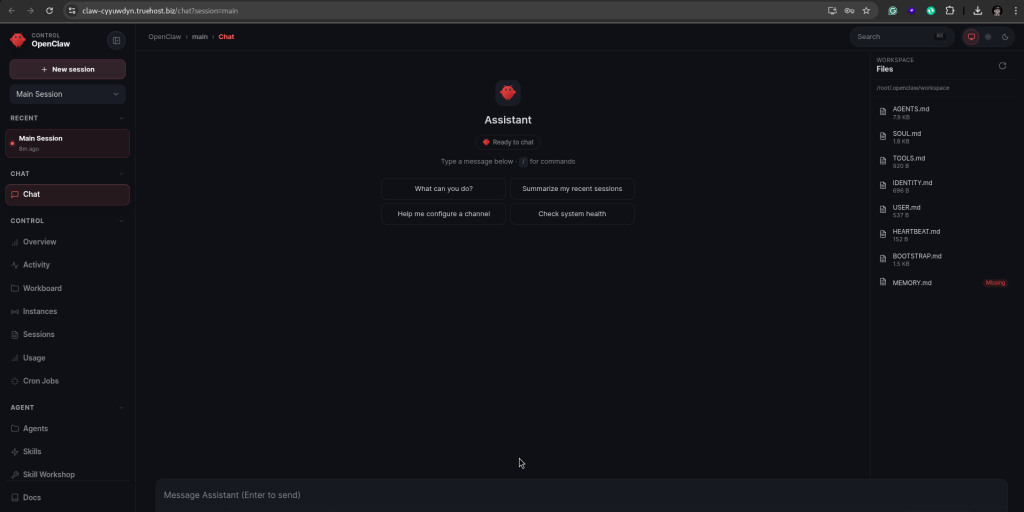
7. Using the OpenClaw Control UI #
The OpenClaw Control UI is a web-based dashboard where you manage your assistant’s settings, connected platforms, API keys, and conversation history. You access it from your browser using the URL in your welcome email — see Section 4b above for the full login process using your WebSocket URL and Gateway Token.
Main Sections of the Control UI #
🔌 Channels #
This is where you connect and manage your messaging platforms. You can see which platforms are currently connected, add new ones, and remove or reconfigure existing connections. Each connected platform shows its status so you can quickly see if everything is working correctly.

OpenClaw Control UI Channels section showing connected messaging platforms
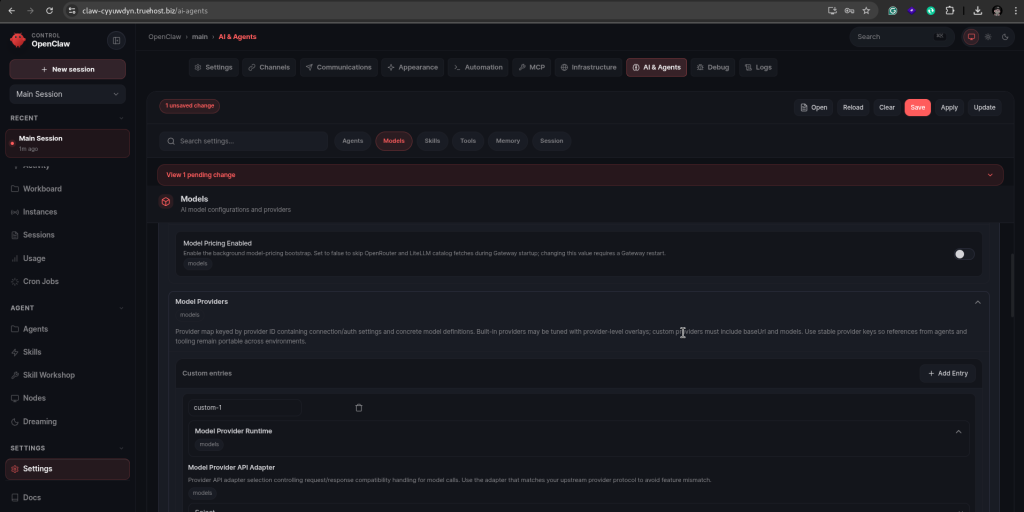
🤖 AI Provider Settings #
This is where you enter and manage your AI provider API key. To add your Anthropic Claude key:
- Navigate to Settings → AI Provider in the Control UI.
- Select Anthropic Claude as your provider.
- Paste your API key into the field provided.
- Select your preferred Claude model — we recommend starting with Claude Haiku for everyday tasks (fast and cost-effective) or Claude Sonnet for more complex tasks.
- Save your settings.
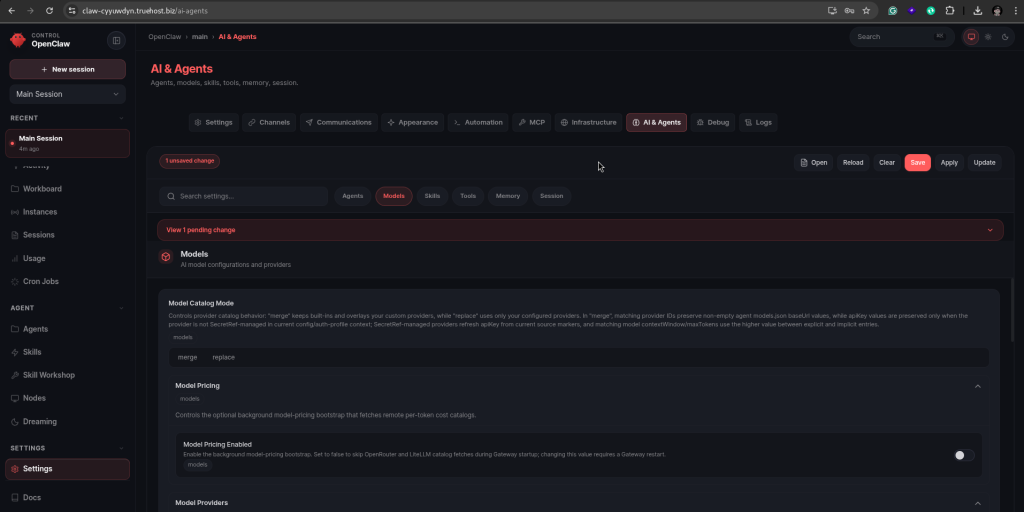
OpenClaw Control UI AI Provider settings showing API key input and model selection
💬 Conversation History #
OpenClaw keeps a log of all your conversations across all connected platforms. From the Control UI you can browse past conversations, search through them, and see which platform each conversation came from. This is useful for reviewing what your assistant has done and for troubleshooting if something does not respond as expected.
🧠 Memory and Context #
One of OpenClaw’s most powerful features is persistent memory. Your assistant remembers information from previous conversations — your preferences, ongoing projects, and important details you have shared. Over time it becomes more useful as it builds up context about how you work and what you need. You can view and manage stored memories from the Control UI.
⚙️ Settings #
The Settings section lets you configure your assistant’s behaviour — including its name, personality, system prompt (the instructions that define how it responds), and notification preferences. You can also manage your gateway token and update your server configuration from here.
8. Having Your First Conversation #
Once your messaging platform is connected and your API key is added, your OpenClaw assistant is ready to use. Here is how to start:
- Open the messaging app you connected (e.g. Telegram) on your phone or computer.
- Find the bot or contact that represents your OpenClaw assistant.
- Send a message — for example, type Hello or What can you do?
- Your assistant will respond within a few seconds using Anthropic Claude.
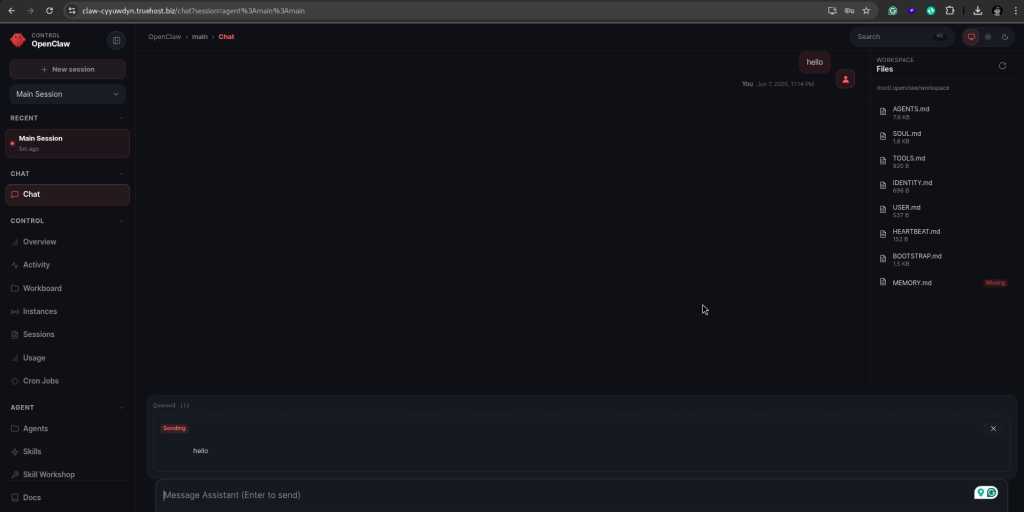
Example conversation with OpenClaw on a messaging platform
Things You Can Ask Your Assistant #
OpenClaw is a general-purpose AI assistant. Here are some examples of what it can help you with:
| Task | Example message |
|---|---|
| Writing help | “Draft a professional email to a client explaining a project delay.” |
| Research | “Summarise the key differences between REST and GraphQL APIs.” |
| Code assistance | “Write a Python script that reads a CSV file and outputs the total of a column.” |
| Planning | “Create a 7-day content calendar for a tech startup’s social media.” |
| Translation | “Translate this paragraph into French.” |
| Summarisation | “Summarise this document in 5 bullet points.” (paste or attach the text) |
💡 Tip: The more context you give your assistant, the better its responses will be. Instead of “write an email”, try “write a professional email to a client named James explaining that our project delivery has been delayed by one week due to a dependency issue, and reassure him that we are on track.”
9. Your Domain and URL #
Your OpenClaw instance is accessible via a unique subdomain created automatically during provisioning.
Your Subdomain Format #
Your URL follows this format: https://openclaw-abc123.truehost.biz — where abc123 is a unique 6-character identifier generated for your account.
SSL and Security #
Your OpenClaw URL is always served over HTTPS. All traffic between your browser and your server is encrypted. The SSL certificate is issued by Let’s Encrypt and renews automatically — you do not need to manage this.
Using a Custom Domain (Optional) #
If you would like to use your own domain name (e.g. assistant.yourcompany.com) instead of the default subdomain, raise a support ticket with your preferred domain and our team will assist you.
10. SSH Access to Your Server #
Your VPS comes with full root SSH access, giving you complete control over your server. This section is intended for advanced users who need to manage the server directly.
ℹ️ Note: SSH access is not required to use OpenClaw. Most clients will never need it. The Control UI and your messaging app are all you need for everyday use.
How OpenClaw Runs on Your Server #
OpenClaw runs as a Docker container on your VPS. It is configured to restart automatically if it ever stops unexpectedly. Your conversation history and memory data are stored in a Docker volume on the server, which persists independently of the container — so your data is safe even if the container is restarted.
Firewall #
| Port | Name | Purpose |
|---|---|---|
22 | SSH | Remote server access |
80 | HTTP | Used during SSL certificate issuance |
443 | HTTPS | All OpenClaw traffic goes through this port |
Connecting via SSH #
On macOS or Linux, open a Terminal and run:
ssh root@YOUR_VPS_IP_ADDRESSEnter the SSH password from your welcome email when prompted. On Windows, use PuTTY (putty.org) or the built-in Windows Terminal.
Useful Server Commands #
| Task | Command |
|---|---|
| Check OpenClaw container status | docker ps | grep openclaw |
| Restart OpenClaw | docker restart openclaw |
| View OpenClaw logs | docker logs openclaw --tail 100 |
| Check disk usage | df -h |
| Check memory usage | free -h |
| Check firewall rules | ufw status |
11. Reinstalling OpenClaw #
If you ever need to reinstall OpenClaw from scratch — for example, after accidentally breaking a configuration — you can trigger a reinstall from your WHMCS client area.
⚠️ Warning: A reinstall will permanently wipe all your OpenClaw data, including conversation history, memory, connected platform configurations, and your API key settings. Make sure to note down your settings before proceeding.
How to Reinstall #
- Log in to your Truehost Cloud account and go to Services. Click Manage next to your OpenClaw VPS product.
- Find the Reinstall button on the management page and click it.
- Confirm the action when prompted. The reinstall process will run automatically.
- You will receive a new welcome email with fresh credentials when the reinstall is complete. You will then need to reconnect your messaging platforms and re-enter your API key.
ℹ️ Prefer to let us handle it? If you would like Truehost Cloud to carry out the reinstall on your behalf, simply raise a support ticket at truehost.cloud → Support → Open Ticket and our team will sort it out for you.
12. Getting Help #
Truehost Cloud Support #
Our support team can help with anything related to your VPS or provisioning — including server issues, welcome email problems, custom domain setup, messaging platform connection help, resource upgrades, and billing queries.
To raise a support ticket, log in at truehost.cloud and go to Support → Open Ticket. Include your service ID and a description of the issue.
OpenClaw Documentation #
For help with using OpenClaw itself — configuring your assistant, adding skills, or understanding features — the official documentation is the best place to start:
- docs.openclaw.ai — Official OpenClaw documentation
- docs.openclaw.ai/vps — VPS-specific setup and configuration
13. Quick Reference Card #
| Item | Details |
|---|---|
| My OpenClaw URL | Check your welcome email or WHMCS client area |
| Gateway Token | In your welcome email — keep it private |
| WebSocket URL | Same as your OpenClaw URL but starting with wss:// instead of https:// |
| Control UI Login | Enter WebSocket URL + Gateway Token in the connection form — leave password empty |
| AI Provider | Anthropic Claude — API key from console.anthropic.com |
| Add API Key | Control UI → Settings → AI Provider → paste key → Save |
| Change Model | Control UI → Settings → AI Provider → select model → Save |
| Recommended Model | Claude Sonnet — best balance of speed and intelligence for most users |
| Supported Platforms | Telegram, WhatsApp, Slack, Discord, Google Chat, Teams, Signal |
| VPS IP Address | In your welcome email |
| SSH Username | root |
| SSH Password | In your welcome email |
| Provisioning Time | 10 – 15 minutes after order confirmation |
| SSL Certificate | Issued by Let’s Encrypt — renews automatically |
| Firewall | Ports 22, 80, 443 open — all others blocked |
| Restart OpenClaw | docker restart openclaw via SSH |
| Support | truehost.cloud → Support → Open Ticket |
| OpenClaw Docs | docs.openclaw.ai |


