Thunderbird is one of the most popular email clients, known for its flexibility and ease of use. This guide will walk you through the process of connecting your cPanel webmail account to Thunderbird, whether you prefer an automatic setup or a manual configuration.
Why Use Thunderbird for Webmail? #
Thunderbird offers a range of features that make it an excellent choice for managing your emails:
- Offline Access: Read and compose emails without an internet connection.
- Unified Inbox: Manage multiple email accounts in one place.
- Customization: Add-ons and themes to personalize your experience.
- Security: Built-in phishing protection and encryption options.
Two Ways to Connect Your Webmail to Thunderbird #
There are two primary methods to connect your webmail account to Thunderbird: Automatic Configuration and Manual Configuration. While the automatic method is quicker, the manual method gives you more control over the setup.
1. Automatic Configuration #
This is the easiest and fastest way to set up your webmail account in Thunderbird. Here’s how it works:
- Open Thunderbird on your computer.
- Go to File > New > Existing Mail Account.
- Enter your name, email address, and password.
- Click Continue.
Thunderbird will attempt to automatically detect the configuration settings for your server. If successful, your account will be set up, and you can start using it immediately.
2. Manual Configuration #
If the automatic method doesn’t work or you prefer to configure your account manually, follow these steps:
Step 1: Open Thunderbird #
Launch Thunderbird on your computer.
Step 2: Start Account Setup #
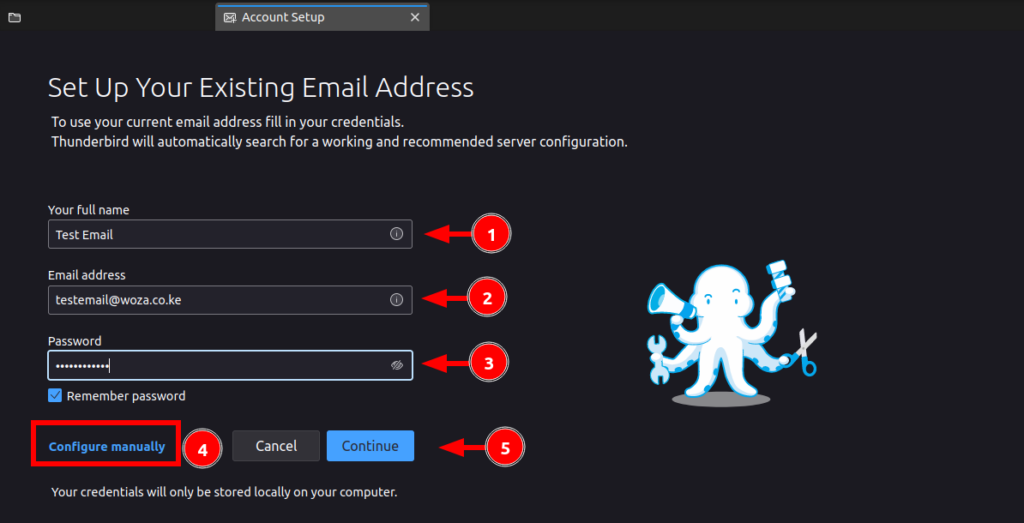
- Go to File > New > Existing Mail Account.
- Enter your name, full email address, and password.
- Check the box for Configure Manually and click Next.
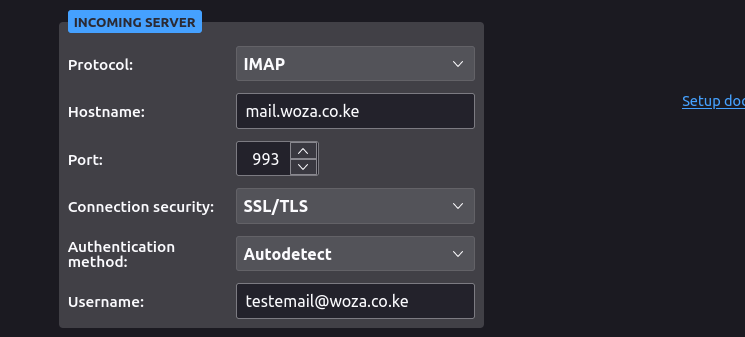
Step 3: Enter Incoming Server Details #
Under the Incoming Server section, fill in the following details:
- Server:
mail.yourdomain.tld(replace with your domain, e.g.,mail.mydomain.co.ke). - Port:
993 - Encryption Security:
SSL/TLS - Protocol:
IMAP
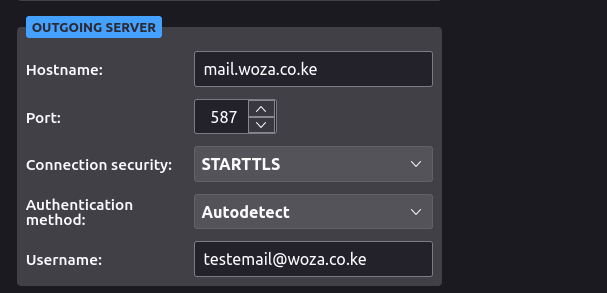
Step 4: Enter Outgoing Server Details #
Under the Outgoing Server section, fill in the following details:
- Server:
mail.yourdomain.tld(replace with your domain, e.g.,mail.mydomain.co.ke). - Port:
587 - Encryption Security:
STARTTLS
Alternatively, if your domain is hosted on a specific server, you might use the server hostname provided by your hosting provider, such as mtl101.truehost.cloud. For domains hosted on truehost, just login to cpanel and check server information.
”
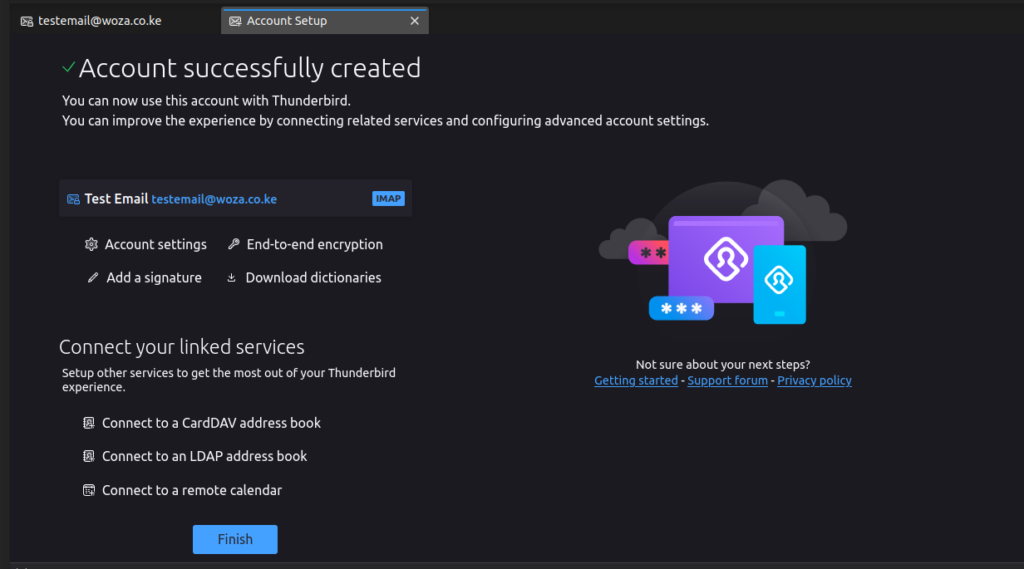
Step 5: Complete the Setup #
- Double-check all the details you’ve entered.
- Click Done.
- If the settings are correct, you’ll see a message saying Account Created Successfully.
- Click Finish.
Troubleshooting Tips #
- Incorrect Settings: Double-check the server names, ports, and encryption methods. These details MUST be correct. If NOT sure, contact support for assistance.
- Password Issues: Ensure you’re using the correct password for your email account.
- Firewall or Antivirus: Sometimes, security software can block Thunderbird from connecting to your email server. Temporarily disable them to test the connection.
Start Using Thunderbird #
Once your account is set up, you can start using Thunderbird to send, receive, and manage your emails. Enjoy the convenience of accessing your webmail directly from your desktop!
Congratulations. You’ve successfully configured your email.
Happy Emailing!