Domain RegistrationFind and register the perfect domain for your website.
 .COM DomainChoose a widely recognized domain to build global credibility.
 All TLDsFind and register your perfect domain. Choose from local and global extensions.
 whoisCheck domain ownership details, expiration dates, and registrar information.
 US DomainRegister a .US domain and build trust in the USA.
 Web HostingEverything your website needs to run smoothly
 WordPress HostingWordPress hosting that just works
 Windows HostingReliable hosting for Windows environments
 Reseller HostingTurn hosting into your business
 Email HostingEmail that looks professional and works anywhere
 cPanel HostingFull control of your hosting with cPanel
 Affiliate ProgramJoin as a partner and earn commissions on every referral you send our way.
 Vps HostingScalable virtual servers that expand as you need.
 Dedicated ServersGet complete access and full control over your dedicated physical server.
 Managed vpsNot tech-savvy? We will take care of everything with our fully managed VPS hosting for you.
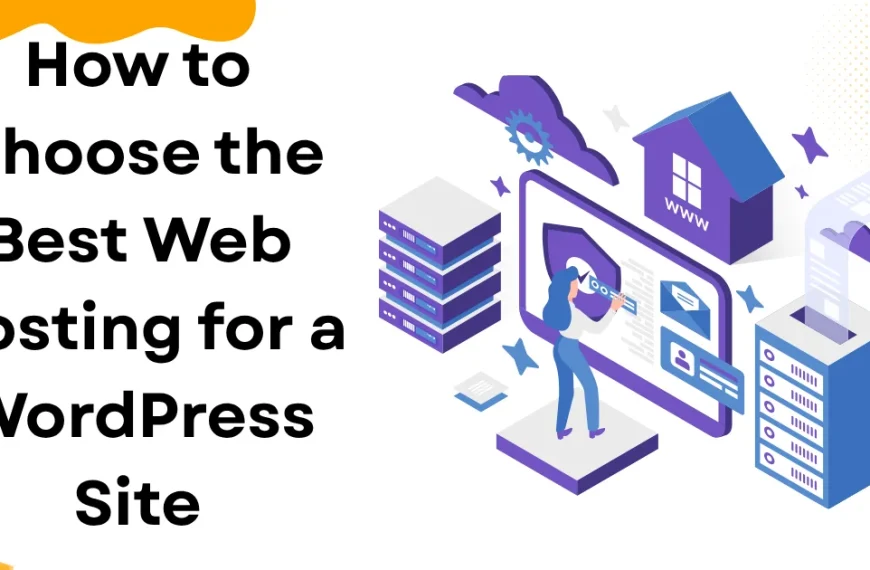
Creating a website with WordPress can seem daunting, but it need not be.
WordPress is one of the most popular content management systems (CMS) used today—two out of every five websites on the internet use it.
In this step-by-step guide, we’ll show you how to create your own website with WordPress in no time!
Whether you are starting your own business or creating an online presence for yourself, WordPress can help you achieve your desired results quickly and efficiently.
What is WordPress?
WordPress is a content management system (CMS) that is one of the most widely used and versatile tools for creating a website.
It was initially created as an open-source blogging platform in 2003, but has since grown to become a powerful and popular way to build websites of all types.
This blogging platform offers users an easy-to-use interface, allowing them to customize their website without writing any code.
Why is WordPress So Popular?
Why is everyone singing WordPress?
Well, it got to do with its perks.
a). It’s Free
WordPress is a free and open-source CMS, which means it’s accessible to everyone, from small businesses to large corporations.
It’s easy to get up and running and you don’t need to be a web developer to create a website.
And you can guess, we love free stuff!
b). It’s Highly Customizable
You can easily customize your website with WordPress, giving it a perfect look and feel you envision.
With themes and plugins, you can extend the capabilities and make it look and work the way you want.
No matter what you are looking for, WordPress can handle it.
You can create almost anything from online stores to membership sites with WordPress.
c). It’s Easy to Use
WordPress is incredibly user-friendly and allows for easy customization.
This makes it one of the most popular CMSs among beginners and experienced web developers.
It’s also easy for non-technical users to learn and manage the content on their website.
You don’t have to worry about getting your hands dirty through coding.
But that doesn’t mean you can’t.
If you are comfortable with coding, you can tweak the code as you please.
WordPress makes it easy to tinkle with the site code such as adding custom functions and creating custom plugins.
d). It’s Secure
WordPress is one of the most secure CMSs out there. It is constantly updated with improvements, bug fixes and security patches.
You can also use additional security plugins to make your website even more secure.
e). It Has a Great Support Community
WordPress has a great community of users who are always willing to help out other users.
The WordPress Support Forum is always bustling with activity and it’s a great place to get help and advice.
f). It Has Lots of Plugins and Themes
WordPress has a wide range of plugins and themes available for free or at a premium.
This gives you the freedom to customize your website to make it unique.
You can find almost anything you need with a plugin or theme.
These are just some of the reasons why WordPress is so popular.
With its flexibility, affordability, and user-friendly interface, it’s no wonder why so many people are singing its praises.
Choose a Domain Name and Sign Up for Web Hosting
Before you can create a website using WordPress, you need to take care of a couple of things.
Select the domain name for your website
A domain name is an address people will use to access your site.
For example, we use Facebook.com to access Facebook.
‘Facebook’ is a domain name, and you need one like that to allow visitors to access your WordPress website.
Your domain name should be easy to remember, reflect the purpose and content of your website, and preferably contain keywords related to your business or industry.
For instance, if you are creating a website for fashion, it is best if it contains the keyword ‘fashion’ in it.
If possible, try to register a .com domain since this is the most popular and recognizable extension.
That means, you domain will be YourIdea.com.
Here are some examples of bad and good domain names:
Bad domain name:
- Too long or complex: mybusinesswebsiteincorporatedllc.com
- Hard to spell or remember: bizznesz.com
- Uses numbers or hyphens: 123-biz.com
Good domain name:
- Short and memorable: apple.com
- Descriptive and easy to understand: cooking.com
- Brandable and unique: etsy.com
Before registering a particular domain name, make sure it’s available by using a tool such as Whois Lookup.
This resource will show you if the domain has already been taken and give you alternatives if it has been claimed.
Alternatively, go here and type your domain into the box and click search.
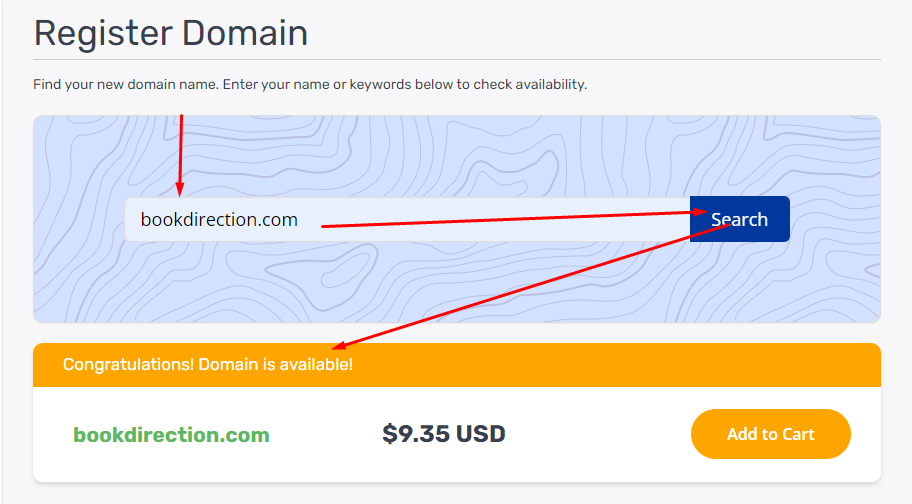
As you can from the example, the suggested name is available, which means i can register it as my own.
But if it is not available, try another idea.
You should also consider other top-level domains (TLDs), such as .net or .org, instead of just relying on .com.
These alternative TLDs may be more suitable for certain types of websites, such as non-profits or educational institutions.
And works incase your preferred domain isn’t available with the .com extension.
To proceed, add the domain to the cart and click checkout.
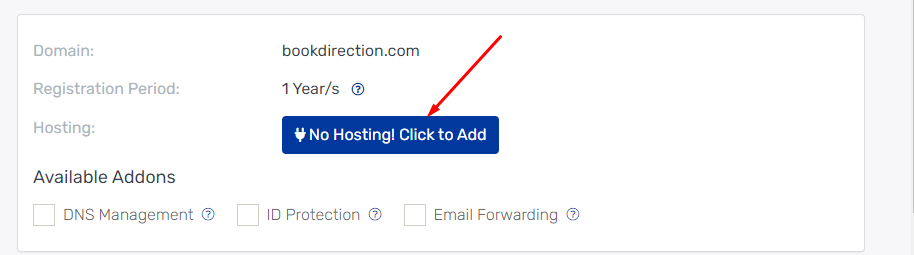
As you can see, it say’s no hosting.
And every domain needs hosting to exist.
So, if you don’t have a web hosting account already, let’s fix this issue.
Related:
- How To Buy A Domain Name: A Step By Step Guide For Beginners
- 11 Expert Tips for Selecting a Memorable Domain Name
Choose a reliable web hosting provider
Once you have a domain name, hosting is the second thing you need.
When choosing a web host, you should consider the company’s reputation, customer service, uptime reliability and cost.
Look for a provider with great reviews from current customers and that offers an uptime guarantee of 99% or higher.
And make sure their customer service team is available 24/7 in case you need help troubleshooting any issues that arise.
Price can also be an important factor in choosing a web host.
Reason being, some providers offer basic packages for free but charge higher fees for advanced features such as unlimited storage space or e-commerce capabilities.
The key is to find the best balance between features and price that fits with your budget and needs.
Consider researching different plans from multiple providers before selecting one to ensure you’re getting the most value for your money.
Sign up for the hosting plan
Once you have identified the right hosting partner, go ahead and get one of their packages.
When selecting a hosting plan, there are many factors that you should consider such as the type of hosting (e.g., shared, VPS, or dedicated), storage space, customer support and price.
Picking from where we left, just click No Hosting and you will be brought to a page like one below?.
From our case here, we are dealing with WordPress hosting, which is a special type of web hosting tailored for WordPress sites.
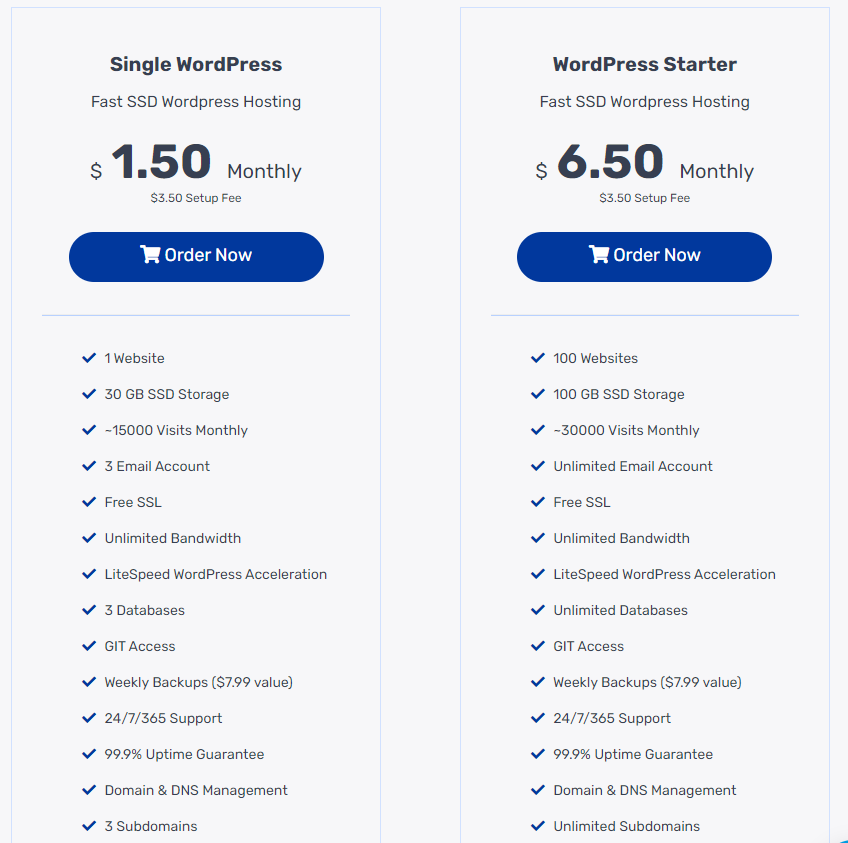
Here, you will find three hosting packages ranging from $1.50 to $10.00 per month.
Each plan comes with its features such as;
- Unlimited Websites
- SSD Storage
- ~100000 Visits Monthly
- Unlimited Email Account
- Free SSL
- Unlimited Bandwidth
- LiteSpeed WordPress Acceleration
- Unlimited Databases
- GIT Access
- Weekly Backups ($7.99 value)
- 24/7/365 Support
- 99.9% Uptime Guarantee
Pick one that fits your budget and needs.
Once you narrow down your choices, select one and sign up for an account by providing the required details.
After signing up for a hosting plan, you can start installing WordPress on your server and begin building your site (we will do that in the next step).
But for now, make sure that the hosting provider you choose offers quality service.
The last thing you want is to experience any issues while creating or running your website.
You should look at their customer reviews online before making any decisions about which host to use for your site.
Install WordPress
The next step to create a website with WordPress is the installation.
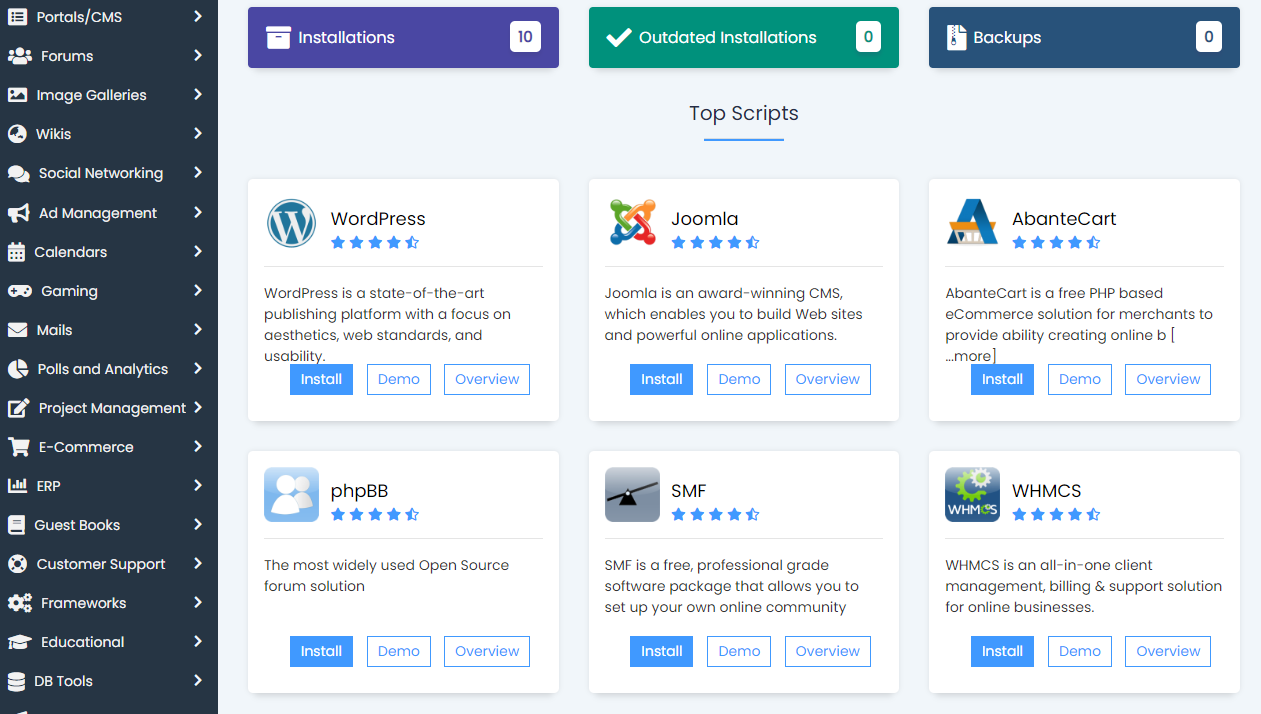
Now, there are several ways to achieve this, but we will look at how to do it using cPanel.
cPanel is actually a user-friendly interface you will get to help manage your hosting account.
So when you finished signing up and paying for your order, Truehost.com will send you cPanel login details into the email you used to create a user account.
When you receive the details, here are the exact steps to install WordPress using cPanel:
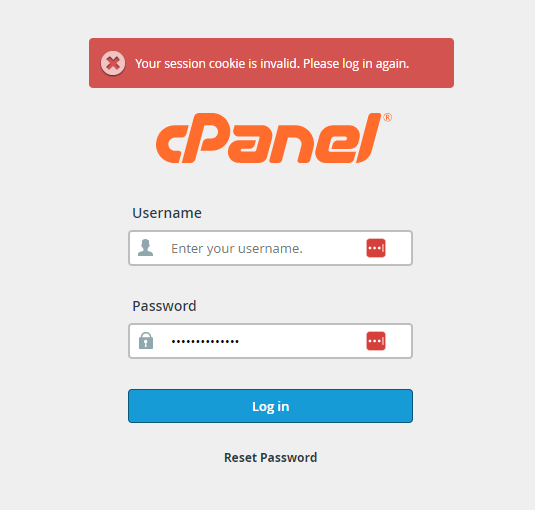
- Log in to your cPanel account. You should have received the login information from your web host when you signed up for hosting.
- Navigate to the “Software” section of cPanel and click on “Softaculous Apps Installer”.
- In the Softaculous interface, click on the “WordPress” icon. You’ll be taken to the WordPress installation page.
- Click on the “Install” button to begin the installation process.
- On the installation page, you’ll need to fill in some basic information, including the domain name, directory (if you want to install WordPress in a subdirectory), and site name.
- Choose the admin username and password. It’s important to use a strong password to secure your site.
- Optionally, you can select a theme for your WordPress site during the installation process. You can always change it later.
- Click the “Install” button to begin the installation process.
- Once the installation is complete, you’ll be given a confirmation page with login details for your WordPress site.
That’s it!
You can now log in to your WordPress site and start customizing it.
Choose a WordPress Theme
Congrats!
You are one step closer to your WordPress website.
What’s remaining is making the site look pretty and reflect your brand.
WordPress themes are pre-designed templates that provide a framework for the overall design of your website.
They determine the look, feel, and layout of your website without having to write any code.
Selecting a theme allows you to customize your site with different fonts, colors, and backgrounds.
When it comes to choosing a theme for your WordPress site, there are many options available.
From free themes to premium themes sold on various marketplaces like Themeforest or ElegantThemes, you’ll be able to find something that meets all of your needs.
When browsing through the selection of available themes, try to think about what kind of look you’re going for and if any specific features must be included in order for the theme to work properly with your content.
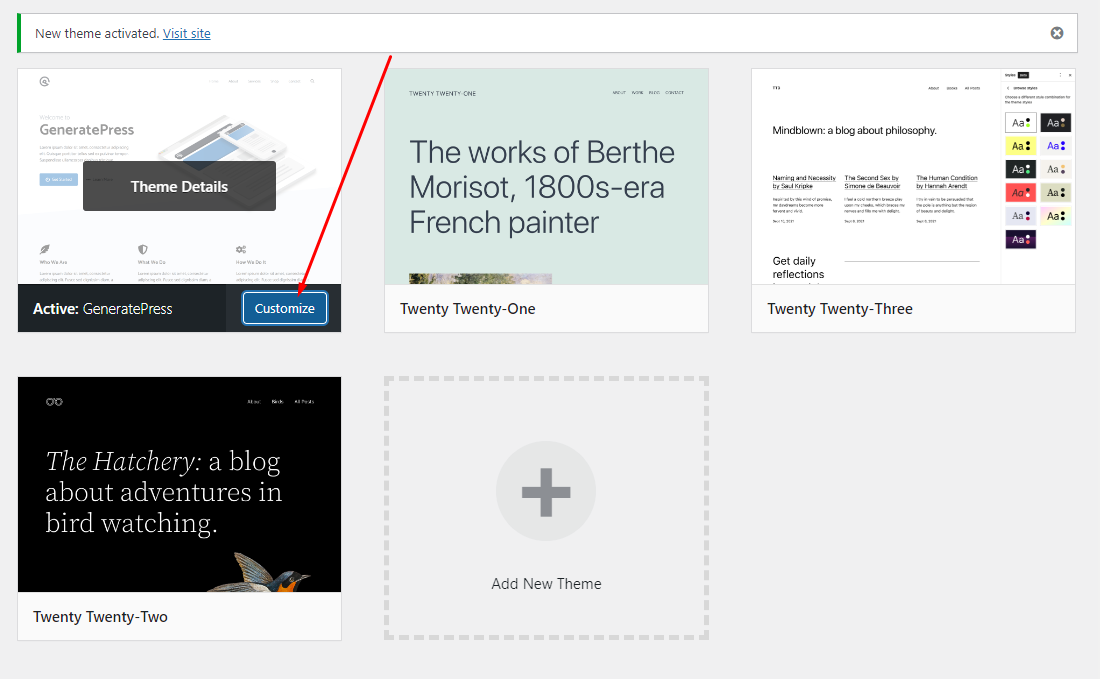
When you find the one you like, here are the steps to install a WordPress theme:
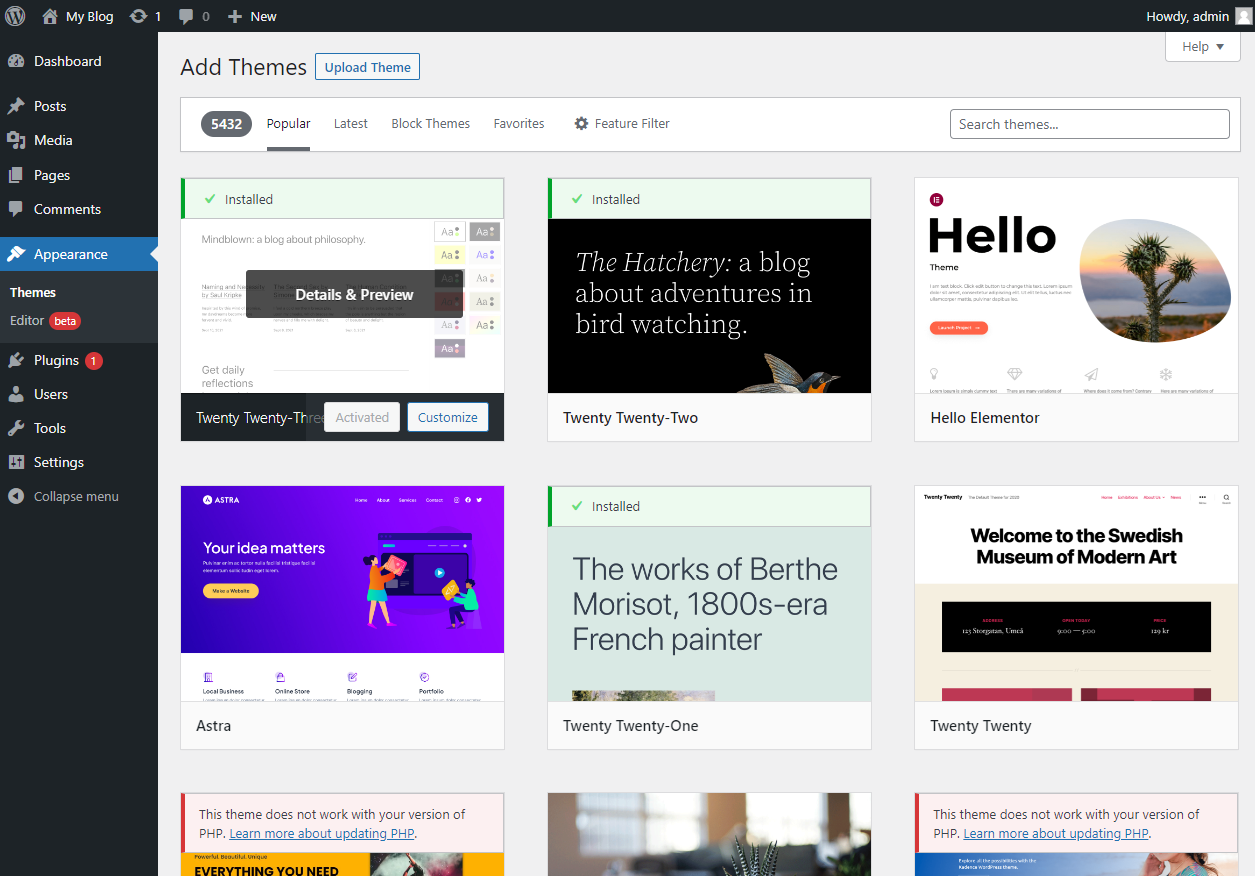
- Log in to your WordPress admin dashboard.
- Click on “Appearance” in the left-hand menu, and then click on “Themes”.
- Click the “Add New” button at the top of the screen.
- You can either search for a theme or upload a theme from your computer. Use the search bar on the right-hand side to search for a theme. To upload a theme, click the “Upload Theme” button at the top of the screen.
- If you’re uploading a theme, select the zip file from your computer and click the “Install Now” button.
- If you’re searching for a theme, browse through the available themes and click the “Install” button for the theme you want.
- Once the theme is installed, click the “Activate” button to activate the theme.
Your new shiny theme is now installed and activated.
And you can now customize it by clicking on “Appearance” in the left-hand menu and then clicking on “Customize”.
Here, you can customize the header, background, menus, and more.
Let’s discuss that in the next step: how to create a website with WordPress.
Customize Your Website
As mentioned earlier, you need to make your site reflect your brand identity.
As such, it is not enough to just install a theme and leave as it it.
You need to customize it.
How?
Upload your logo, images, and other content

If you want your website to look professional and appealing, adding logos and images is a must.
To start the process of adding these items to WordPress, you’ll need to upload them from your computer.
To get started, access the Media Library from your WordPress dashboard.
Here you can click “Add New” to open a dialogue box that will allow you to select one or multiple images from your computer.
Once selected, hit “Open” which will upload all of the images at once into the Media Library.
From here it’s possible to add titles and captions for each file that was uploaded as well as tagging them with keywords so they are easy find later when needed.
Change the color, font, and other settings
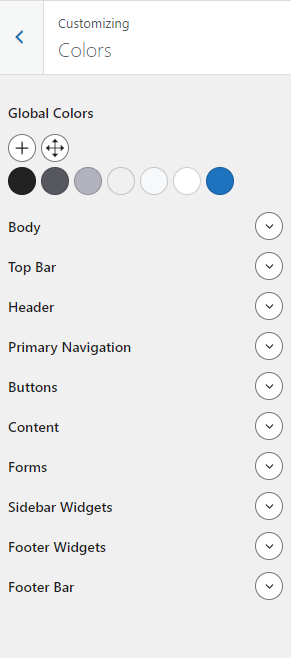
To start customizing your site, you will need to go into the WordPress dashboard.
From there, you can click on “Appearance” and then “Customize.”
This will open the theme customizer page where you can change colors, fonts, backgrounds and more.
You can also easily add widgets to create dynamic content in sidebars or footers of your site.
And if you have coding knowledge or access to a developer, you can modify any part of your website by editing its code directly from the editor section in WordPress.
Set up the navigation menu
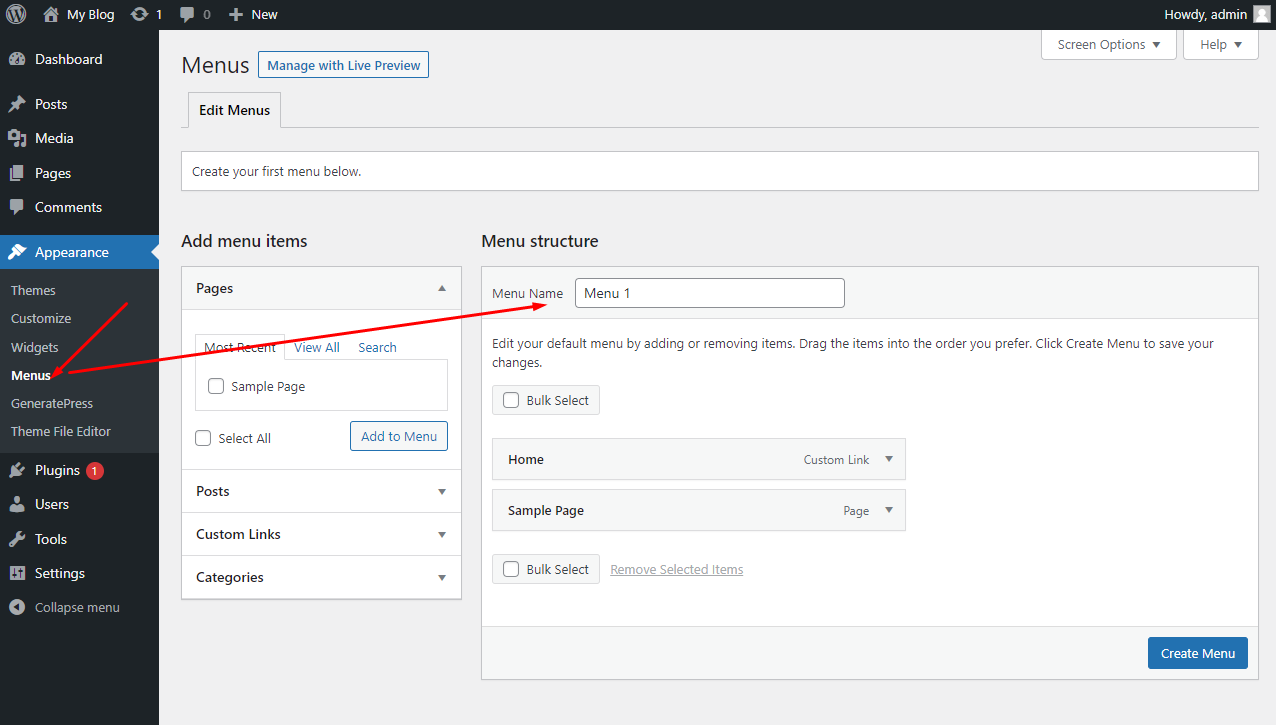
Your navigation menu allows users to quickly and easily move around your site as they browse, so it’s important to get this right.
And the easiest way is to use the Menu option from the Appearance tab in the Dashboard.
From there, you can create a new menu or edit an existing one and add pages, posts, custom links, categories, and even tags.
Once you have finished adding items to your navigation menu, simply click “Save” and your new menu will be immediately visible on all pages of your website.
Install WordPress Plugins
The next step to create a website with WordPress is plugins.
See, WordPress isn’t 100% off the box.
There are some features you will need but the platform won’t provide.
That’s where plugins comes in.
A plugin is a piece of software that you can use to extend the functionality of WordPress.
Choose plugins to add additional features
Installing plugins is a great way to add additional features to your website.
They can extend the functionality of WordPress significantly and make it easy for you to do more with your website without needing any coding knowledge.
Before installing a plugin, research and select one that will meet your needs, as there are many options available and not all plugins are created equal.
When selecting a plugin, look for ones that have been regularly updated by the developers, as this indicates that they are actively maintained and supported.
Check user reviews to get an idea of what other people think of the plugin before you download it.
Remember, some plugins are also available in premium versions with extra features which may be worth considering if you need more features than those offered in the free version.
That said, here’s a list of essential must-have WordPress plugins:
- Yoast SEO: A powerful plugin that helps you optimize your website for search engines, including keyword optimization, meta descriptions, and XML sitemaps.
- Jetpack: A suite of tools to enhance your website’s performance, including security, backups, and site stats.
- Contact Form 7: A popular plugin for creating and managing contact forms on your website.
- WPForms: A drag-and-drop form builder plugin that allows you to create any type of form, including contact forms, surveys, and polls.
- Akismet: A plugin that filters out spam comments from your website.
- WooCommerce: A comprehensive eCommerce solution for WordPress that enables you to sell products and services on your website.
- UpdraftPlus: A backup plugin that creates automatic backups of your website, allowing you to restore it in case of a crash.
- W3 Total Cache: A caching plugin that improves your website’s performance and speed.
- MonsterInsights: A Google Analytics plugin that helps you track your website’s performance and user behavior.
- Smush: A plugin that optimizes and compresses images on your website to improve its speed and performance.
Install and activate the plugins
Follow these steps to install a WordPress plugin:
- Log in to your WordPress admin dashboard.
- Click on “Plugins” in the left-hand menu, and then click on “Add New”.
- You can either search for a plugin or upload a plugin from your computer. To search for a plugin, use the search bar on the right-hand side. To upload a plugin, click the “Upload Plugin” button at the top of the screen.
- If you’re uploading a plugin, select the zip file from your computer and click the “Install Now” button.
- If you’re searching for a plugin, browse through the available plugins and click the “Install Now” button for the plugin you want.
- Once the plugin is installed, click the “Activate” button to activate the plugin.
- If necessary, configure the plugin settings by clicking on “Settings” or “Configure” next to the plugin name.
Add Essential Pages
These pages are the cornerstone of your site and help create definition, understanding and structure.
When creating essential pages, keep in mind that they should be properly titled and serve a purpose.
Your Home page should explain what your website is about and provide a welcoming introduction to visitors.
The About Us page should tell readers who you are, why you created this website, what services or products you offer and how visitors can contact you.
You may also want to include a Terms & Conditions page if applicable as well as additional informational pages such as FAQs or Contact Us form.
Once your essential pages have been created, make sure these links appear on all webpages throughout your site so that visitors can access them at any time for more information about your business or organization.
The better way to do this is to add these pages on your menu.
Publish Content
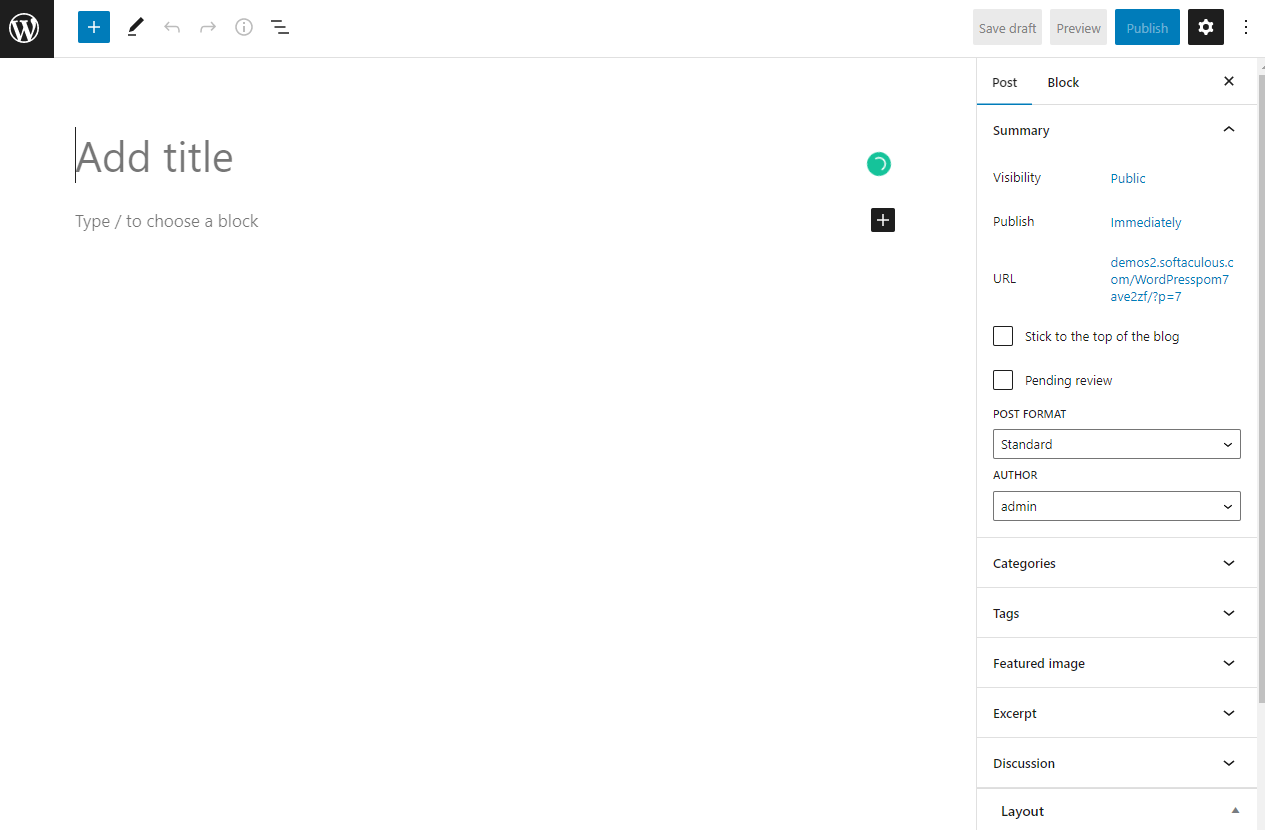
Publishing content is the key to success.
It can be anything from blog posts and pages to photos and videos.
Publishing content allows users to engage with readers, promote their brand and gain visibility in search engine rankings.
And can either be a post or page for their website.
Posts are typically used for short-term updates while pages are better suited for long-term information such as contact details or company information.
When writing posts or pages, make sure youinclude relevant keywords so potential readers can find them through search engines like Google or Bing.
Once the post or page has been written, you have the option of previewing it before hitting publish.
Drive Traffic To Your Blog

One of the most important steps in creating a website with WordPress is learning how to drive traffic to your blog.
A well-crafted SEO strategy, content marketing campaigns, and social media outreach are all key elements for boosting visitor count and increasing brand visibility.
Search engine optimization (SEO) should be a priority when optimizing your blog.
It helps users find your content more easily by utilizing keywords that accurately describe the topics covered on each page.
- Building backlinks from other websites will help strengthen your SEO ranking and attract organic visitors from across the web.
Content marketing is also an effective strategy for promoting your blog posts and driving viewership.
Platforms like YouTube, Facebook Ads, Twitter Ads, and others have powerful advertising capabilities that can reach large audiences with minimal effort or cost.
Final Thoughts
Creating a website with WordPress can seem overwhelming at first, but once you have the basics down, it’s actually quite simple.
The key is to break down each step into small, manageable tasks and work through them one by one.
With this step-by-step guide in hand, you should now have all the information you need to get started creating a beautiful website with WordPress.
When setting up your website with WordPress, pay attention to all of the details such as choosing the right hosting provider, selecting a theme that matches your vision for your site and adding content that will help attract visitors.
As long as you take your time and consider all of these steps carefully, then chances are that you will end up with an impressive website at the end of the process.
Related: