Domain RegistrationFind and register the perfect domain for your website.
 .COM DomainChoose a widely recognized domain to build global credibility.
 Domain TransferSeamless domain transfers with zero downtime and complete control.
 All TLDsFind and register your perfect domain. Choose from local and global extensions.
 SSL CertificatesKeep your website safe with reliable SSL Certificates that protect customer data and build trust.
 whoisCheck domain ownership details, expiration dates, and registrar information.
 US DomainRegister a .US domain and build trust in the USA.
 Web HostingEverything your website needs to run smoothly
 WordPress HostingWordPress hosting that just works
 Windows HostingReliable hosting for Windows environments
 Reseller HostingTurn hosting into your business
 Email HostingEmail that looks professional and works anywhere
 cPanel HostingFull control of your hosting with cPanel
 Affiliate ProgramJoin as a partner and earn commissions on every referral you send our way.
 Vps HostingScalable virtual servers that expand as you need.
 Dedicated ServersGet complete access and full control over your dedicated physical server.
 Managed vpsNot tech-savvy? We will take care of everything with our fully managed VPS hosting for you.
 AI Website BuilderCreate stunning websites in seconds with AI.
 Online ShopSet up a professional online store. No coding required.
 Web design serviceGet a tailored website designed to match your brand and support your goals.
 BlogFind helpful guides on web hosting, online selling, digital marketing, and more.
 Contact USYou can reach us anytime, day or night, through chat or email.
 SupportBrowse helpful guides and answers for all of our services.
OpenClaw is an AI agent framework that lets you run autonomous agents capable of executing terminal commands, reading and writing files, connecting to messaging platforms, and integrating with AI model providers.
You give the agent a task through a connected channel, and it acts: running scripts, interacting with APIs, browsing, and writing without you managing each step manually.
For Windows users, local installation has real appeal. No cloud bill, no provisioning delay, and full control over the runtime environment. For testing, prototyping, or personal automation projects, it is a perfectly reasonable starting point.
That said, local installation on Windows comes with some compromise worth knowing before you start.
Your PC needs to stay powered on for the agent to remain available, plus Windows updates can occasionally affect dependencies, and you’ll be responsible for ongoing maintenance as your setup evolves.
If you plan to run OpenClaw around the clock or use it for production workloads, hosting it on a VPS is often the more practical option.
Our Truehost OpenClaw VPS Hosting gives you a pre-configured, always-on instance with no dependency conflicts, no machine uptime concerns, and no Windows update roulette. But if local is what you need, this guide covers every step.
Prerequisites:
These are the system requirements for OpenClaw on Windows 10 and 11:
- Operating system: Windows 10 version 20H2 or later, or Windows 11, fully up-to-date before you start
- Node.js: If you are starting fresh, install Node 24.
- Git: Required for source installs and some integrations
- PowerShell: With administrator privileges available
- Storage: At least 20 GB of free
Because OpenClaw can execute commands and access files, it’s recommended to install it in an isolated environment, such as a dedicated Windows user account, virtual machine, or test machine, instead of your primary computer.
Option 1: Install OpenClaw on Windows Using Windows Hub (Easiest)
Windows Hub is the official native desktop companion app for OpenClaw on Windows 10 and 11. It is a WinUI application, and it behaves like a proper Windows app, not a terminal session with a thin wrapper around it.
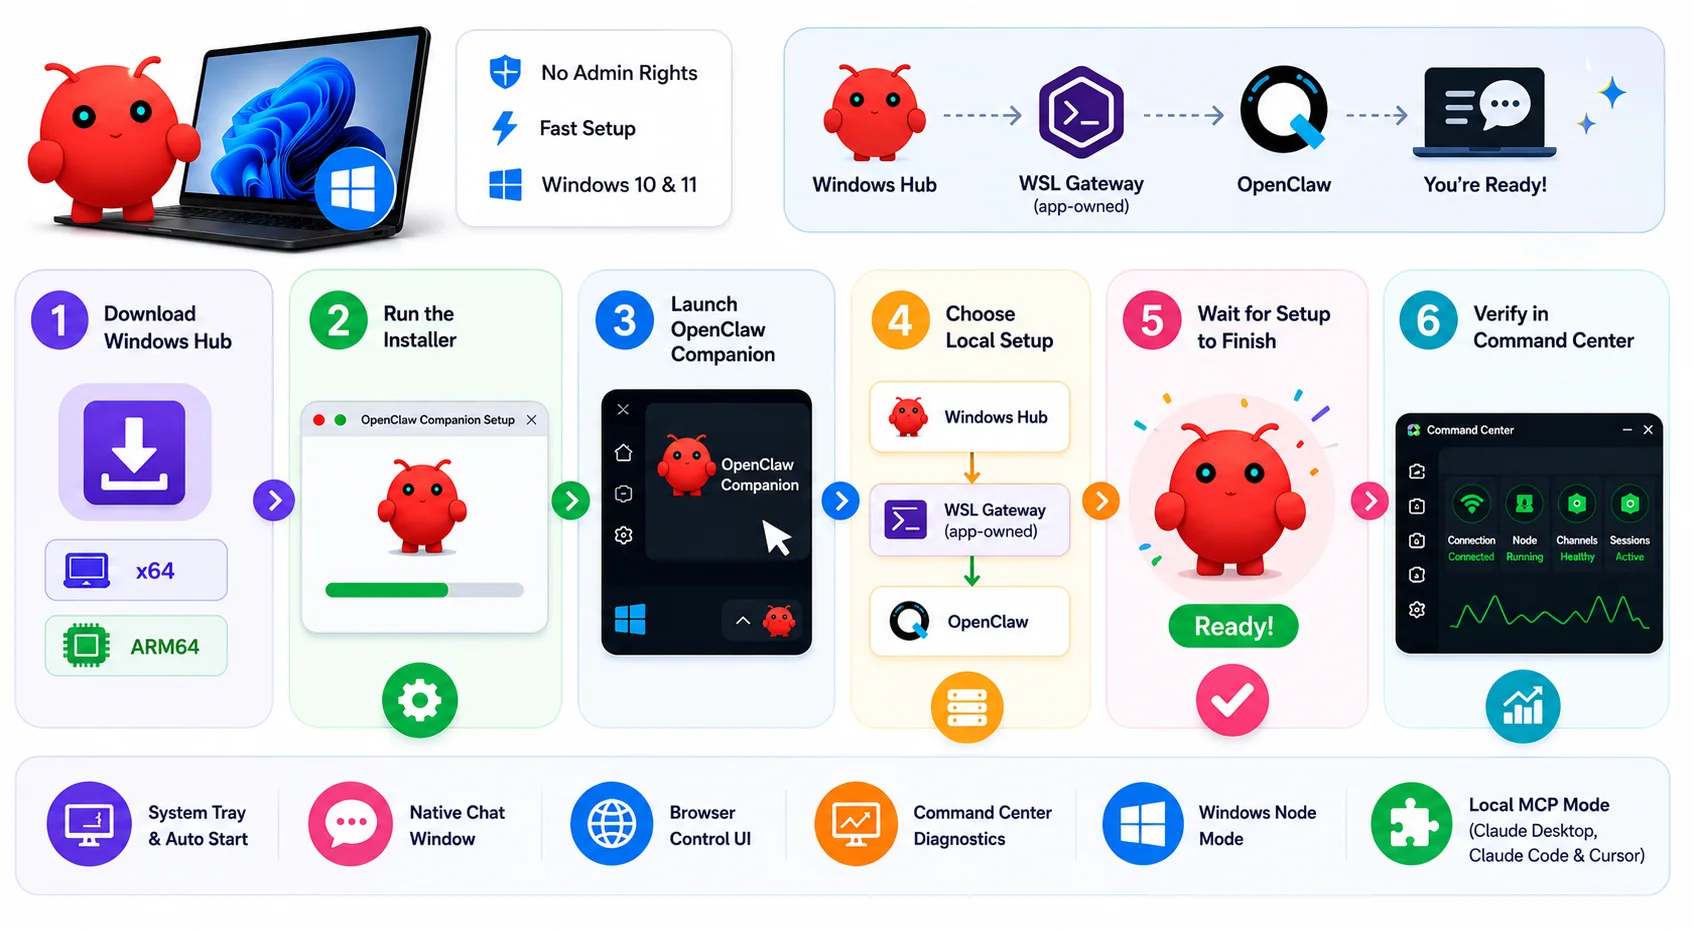
It installs without administrator privileges, ships with signed x64 and ARM64 installers, and supports Windows 10 20H2 and Windows 11.
The setup provisions an app-owned WSL Gateway, an isolated distro that does not touch or interfere with any Ubuntu installation you already have.
How to Install Windows Hub
- Go to the Windows Hub releases page and download the installer that matches your machine:
OpenClawCompanion-Setup-x64.exefor standard Intel/AMD machinesOpenClawCompanion-Setup-arm64.exefor ARM devices
- Open the downloaded installer and complete the installation. Administrator privileges are not required.
- Launch OpenClaw Companion from the Start menu or system tray. On first launch, the app opens setup automatically.
- Choose Set up locally. Windows Hub automatically provisions its own WSL Gateway, installs OpenClaw inside it, and pairs everything with the desktop application. If you already have Ubuntu installed through WSL, it won’t be modified.
- Watch the tray icon. When it turns green, the setup is complete.
- Open Command Center from the tray to confirm: connection status, pairing, node status, and channel health are all visible there.
Windows Hub includes the following:
- Tray status and launch-at-login
- A native chat window and access to the browser Control UI
- Command Center diagnostics covering sessions, channels, usage, and nodes
- Windows node mode (the agent can control canvas, screen, camera, notifications, device status, and talk through your Windows machine)
- Local MCP mode, which lets applications like Claude Desktop, Claude Code, and Cursor access Windows capabilities without requiring a full gateway running in the background.
Option 2: Install OpenClaw on Windows via PowerShell (CLI Method)
If you prefer working from the command line, the PowerShell installer provides a quick way to install OpenClaw without using the Windows Hub application.
The installer downloads the required components, launches the onboarding wizard, and configures your local environment in just a few commands.
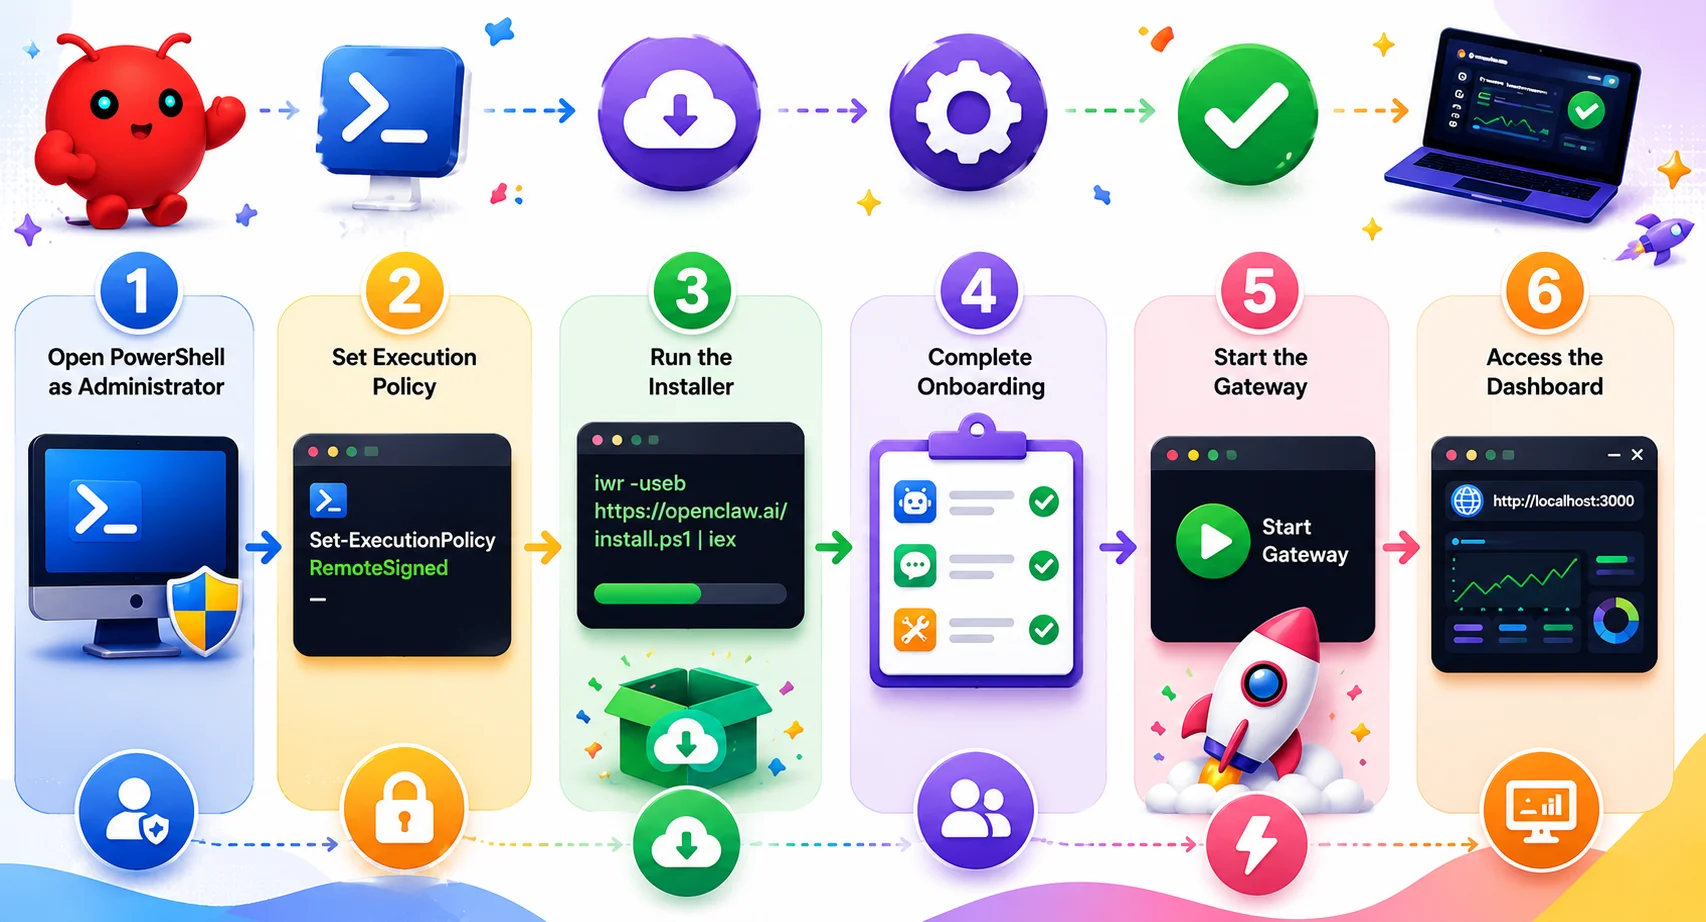
Step-by-Step PowerShell Installation
Step 1: Open PowerShell as Administrator
Open the Start menu, search for PowerShell, then right-click Windows PowerShell and select Run as administrator.
Step 2: Set the execution policy
Windows blocks unsigned scripts by default. Run the following command to allow the installer to execute:
Set-ExecutionPolicy RemoteSigned -Scope CurrentUserConfirm when prompted. This allows the OpenClaw installer to run without being flagged.
Step 3: Run the installer
iwr -useb https://openclaw.ai/install.ps1 | iexThe script detects your OS, installs Node.js if it is missing or outdated, downloads OpenClaw, and launches onboarding automatically.
Step 4: Complete the onboarding wizard
The wizard walks you through choosing an AI model provider (Claude, OpenAI, local models, or others), selecting a messaging channel (WhatsApp and Telegram are the most common), and enabling any skills you want active from the start.
Use arrow keys to navigate and Enter to confirm.
Step 5: Start the Gateway
Once onboarding is complete, the wizard prompts you to start the Gateway. Your dashboard URL appears under the Control UI block. Copy it and open it in your browser.
Step 6: Access the Dashboard
Open the dashboard URL in your browser to verify that OpenClaw is running and that your services are connected successfully.
Optional: Install without onboarding
For CI environments or manual configuration:
& ([scriptblock]::Create((iwr -useb https://openclaw.ai/install.ps1))) -NoOnboardOpenClaw also creates a managed startup task that automatically restarts the Gateway after Windows reboots.
It runs in the background without displaying a console window, and if Windows policies prevent Scheduled Tasks from being created, it automatically falls back to a Startup folder login item.
The PowerShell method is the fastest native path. No Linux knowledge required, configuration is largely automatic, and you can be running within a few minutes.
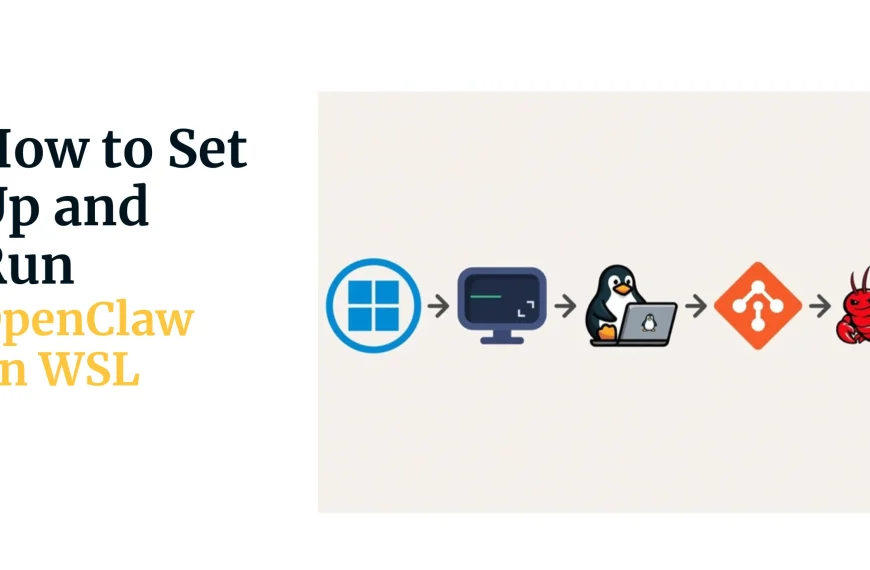
Option 3: Install OpenClaw on Windows via WSL2 (Most Stable)
The official OpenClaw documentation recommends WSL2 for the most Linux-compatible Gateway runtime on Windows.
The reasoning is practical, because OpenClaw behaves like a Linux server application. Running it inside WSL2 gives it a real Linux environment, systemd process management, and none of the Windows dependency quirks that surface over time.
If you’re planning to run OpenClaw beyond occasional testing, this method is worth setting up correctly from the start.
Step-by-Step WSL2 Installation
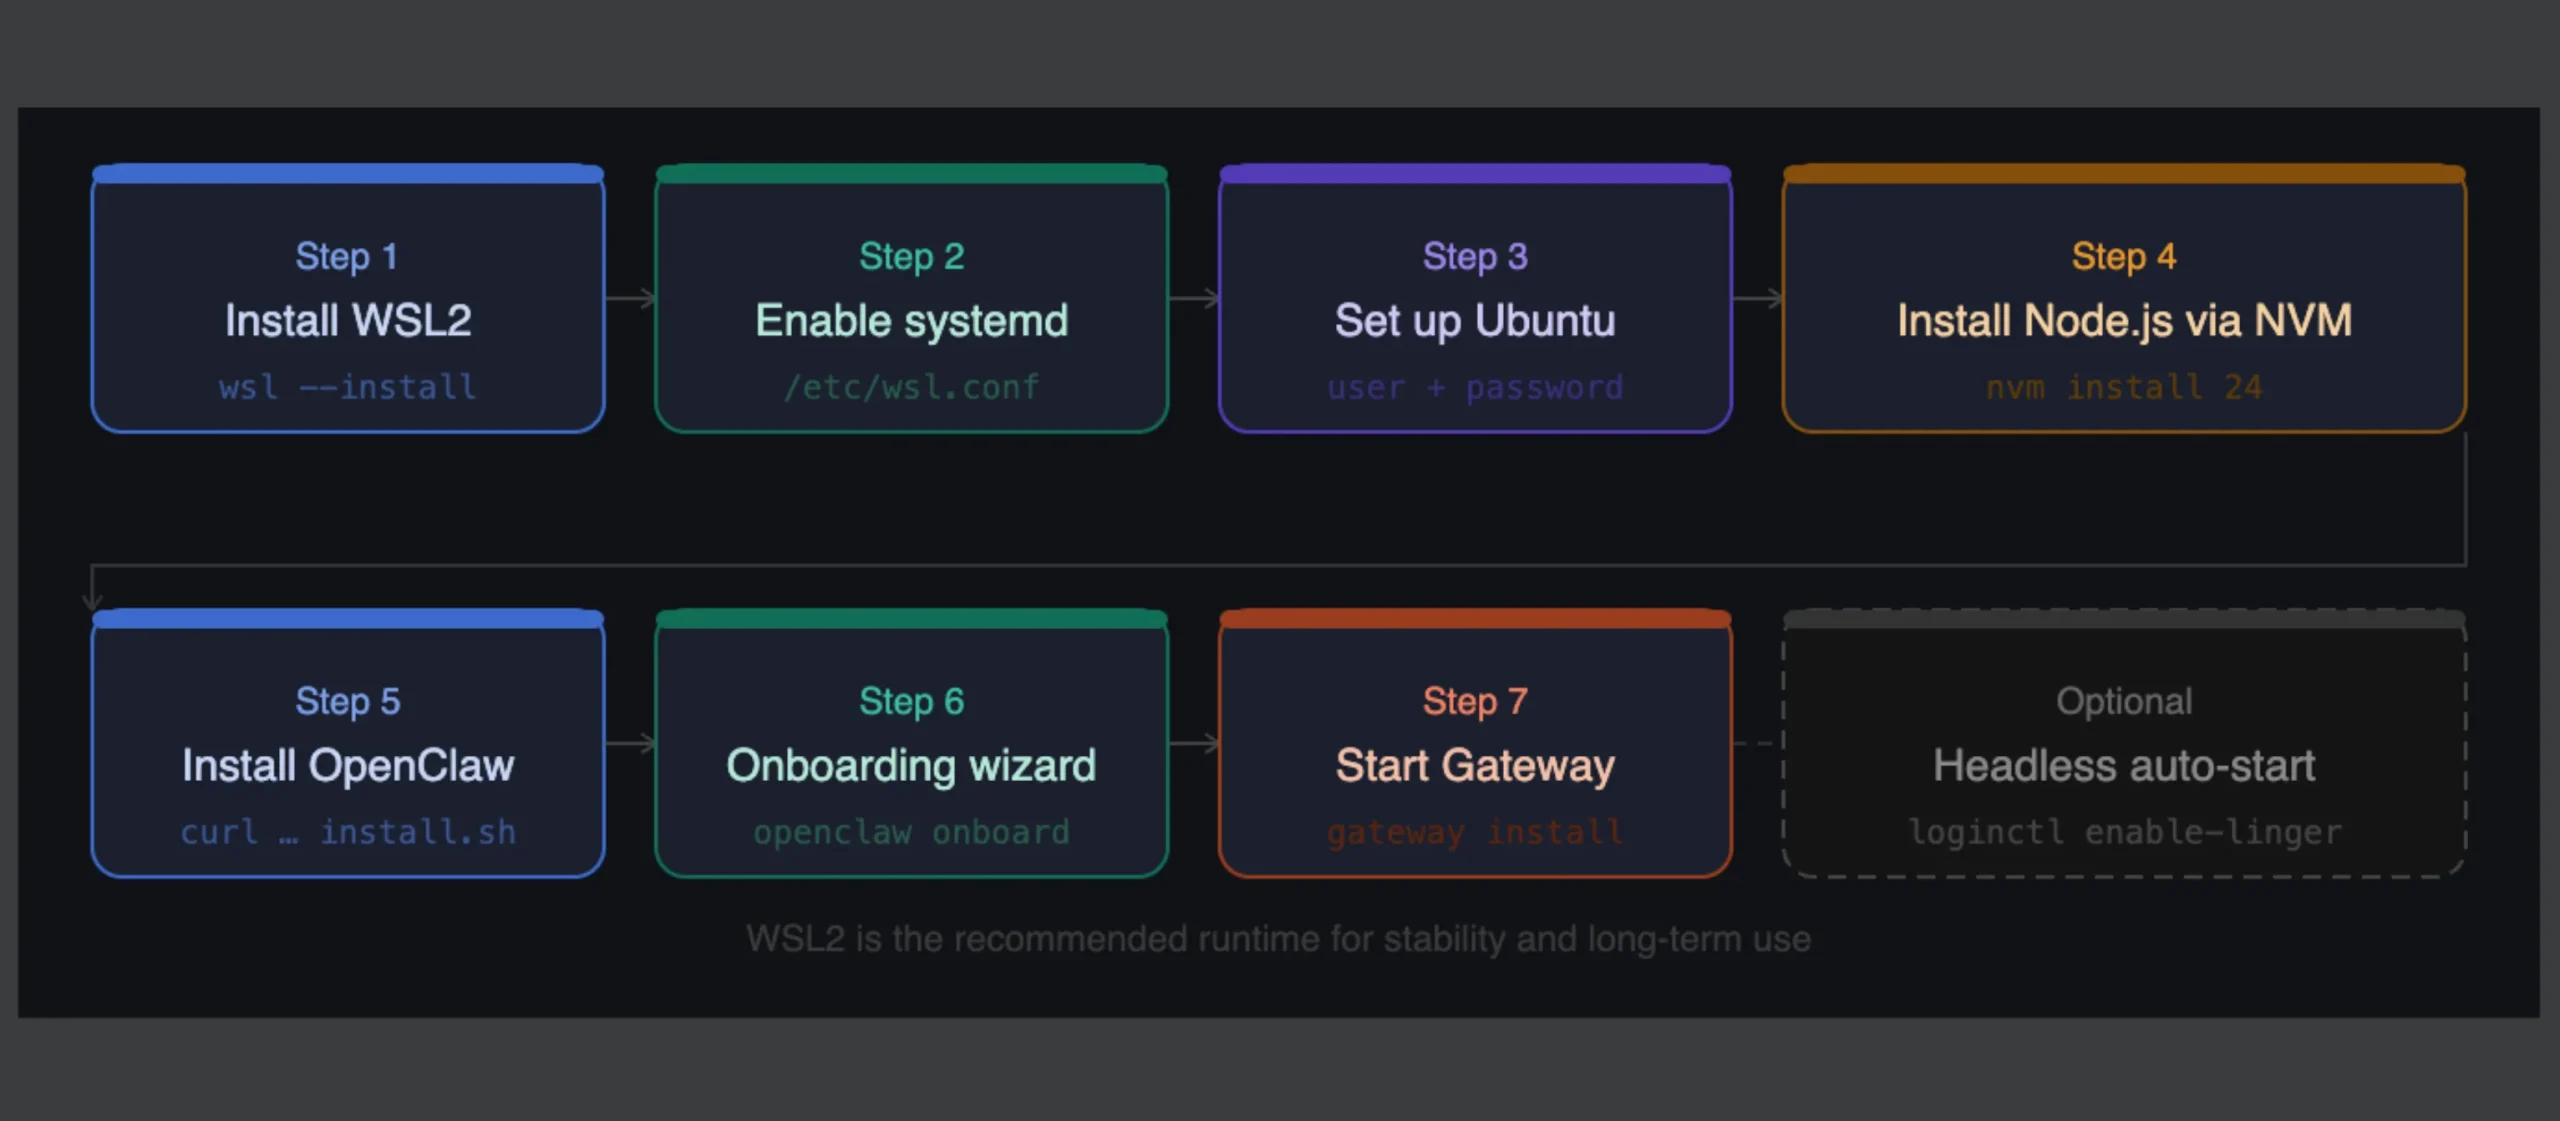
Step 1: Install WSL2
Open PowerShell as Administrator and check if WSL2 is already present:
wsl --statusIf it is not installed:
wsl --installRestart your computer when prompted. This installs WSL2 with Ubuntu by default. Afterward, confirm installed distros:
wsl --list -vStep 2: Enable systemd inside WSL
To avoid gateway failures later, inside your WSL Ubuntu terminal, run:
sudo tee /etc/wsl.conf >/dev/null <<'EOF'
[boot]
systemd=true
EOF
Then restart WSL from PowerShell:
wsl --shutdownReopen your Ubuntu terminal.
Step 3: Set up Ubuntu
On first launch, Ubuntu asks you to create a Linux username and password. These are separate from your Windows credentials. Keep a record of them somewhere accessible.
Step 4: Install Node.js via NVM
The recommended way to install Node.js is through NVM (Node Version Manager). It makes upgrading or switching Node.js versions much easier later.
Inside the Ubuntu terminal:
curl -o- https://raw.githubusercontent.com/nvm-sh/nvm/v0.39.7/install.sh | bashClose and reopen the terminal, then install the recommended Node version:
nvm install 24 && nvm use 24Verify: node -v should show v24.x.x or higher.
Step 5: Install OpenClaw
Run the official installation script:
curl -fsSL https://openclaw.ai/install.sh | bashIf curl is not present: sudo apt install curl, then run the line above again.
Step 6: Run the onboarding wizard
openclaw onboardUse the same choices as the PowerShell method for AI model provider, messaging channel, and skills.
Step 7: Start and install the Gateway
openclaw gateway install
openclaw gateway status
Auto-Start Before Windows Login (Headless Setup)
If you want OpenClaw running before anyone signs in to Windows, such as for an always-on AI agent, you’ll need to configure a headless setup.
Inside WSL:
sudo apt-get install -y dbus-x11
sudo loginctl enable-linger "$(whoami)"
openclaw gateway install
This installs dbus-launch, a small utility that starts a D-Bus session. D-Bus is Linux’s messaging system that lets services communicate with each other.
Normally, Linux user services stop when the user logs out. enable-linger tells systemd: “Keep this user’s background services running even when nobody is logged in.” Without this, the OpenClaw Gateway would shut down whenever the user session ends.
Then it installs the Gateway as a systemd user service. Instead of manually running openclaw gateway every time, systemd can automatically start and restart it.
Next, create a Windows Scheduled Task that launches your WSL distribution automatically at startup.
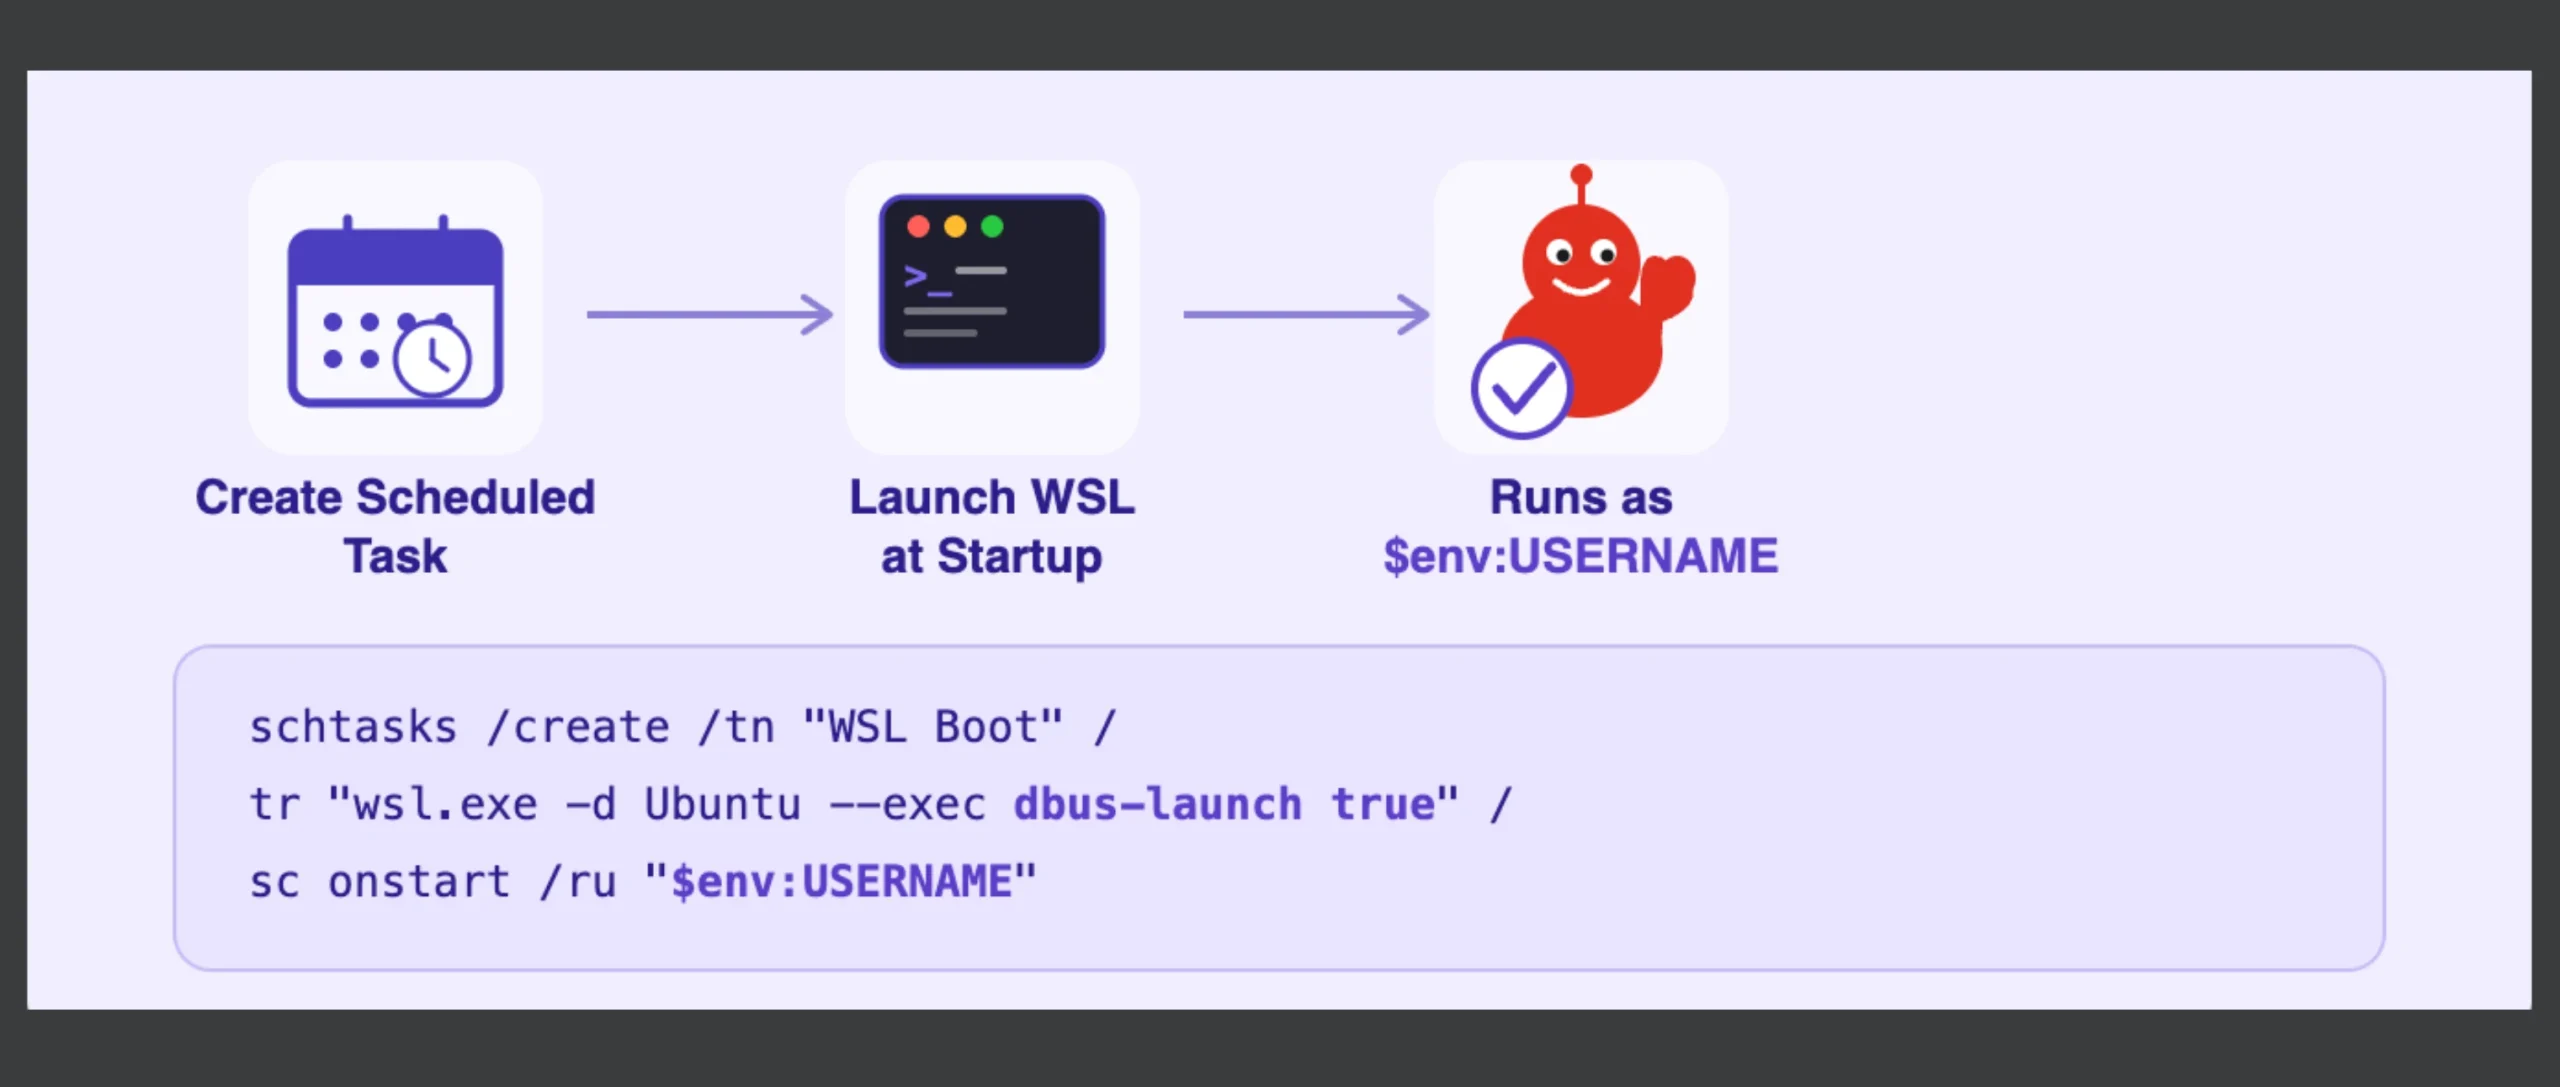
Make sure the task runs as $env:USERNAME instead of the SYSTEM account, since WSL distributions are tied to individual Windows user accounts.
If you’re running WSL 2.6.1.0 or later, use dbus-launch true when creating the scheduled task. This works around a known issue where WSL may shut down shortly after startup before the Gateway has a chance to initialize.
If your Linux distribution uses a name other than Ubuntu, replace it with the correct name returned by:
wsl --list --verboseAfter restarting Windows, verify that the Gateway service is enabled:
systemctl --user is-enabled openclaw-gateway.serviceThen confirm it’s running:
systemctl --user status openclaw-gateway.service --no-pagerIf the service shows as active (running), your OpenClaw Gateway is configured to start automatically whenever Windows boots.
Accessing Windows Files from WSL
One advantage of WSL2 is that you can work with files stored on your Windows drives without copying them into Linux.
For example, your Windows C: drive is available at:
/mnt/c/This allows OpenClaw to access Windows files while continuing to run inside the Linux environment.
After Installation: First Steps
This is what to do next to confirm everything is solid before you put the agent to work.
1. Verify the install
openclaw --version
openclaw doctor
openclaw --version confirms the CLI is accessible. openclaw doctor checks your environment for missing dependencies or misconfigurations and tells you specifically what to fix.
Do this before anything else. It catches problems before they become hard-to-trace runtime failures.
2. Connect your AI model
OpenClaw needs an API key for whichever model provider you chose during onboarding.
Find config.yaml or .env in your OpenClaw directory and add your key and model preferences.
Supported providers include OpenAI (GPT-4o and others), Anthropic Claude, local models via Ollama, and most major providers.
3. Connect a messaging channel
Without a channel, the agent has no way to receive instructions.
WhatsApp and Telegram are the most common. Each platform generates either a bot token or a QR code during setup.
4. Access the dashboard
Open your browser and go to http://localhost:18789 (or whichever port your setup uses). The dashboard shows connected services, active sessions, and logs.
5. Test end-to-end
Send a simple test command through your connected messaging app asking it to list files in a directory or confirm it can reach the internet. A working response means everything is connected properly.
Securing OpenClaw on Windows
OpenClaw executes commands and accesses files on your machine by design. That capability requires deliberate security choices, so treat it the way you would a server-side application.
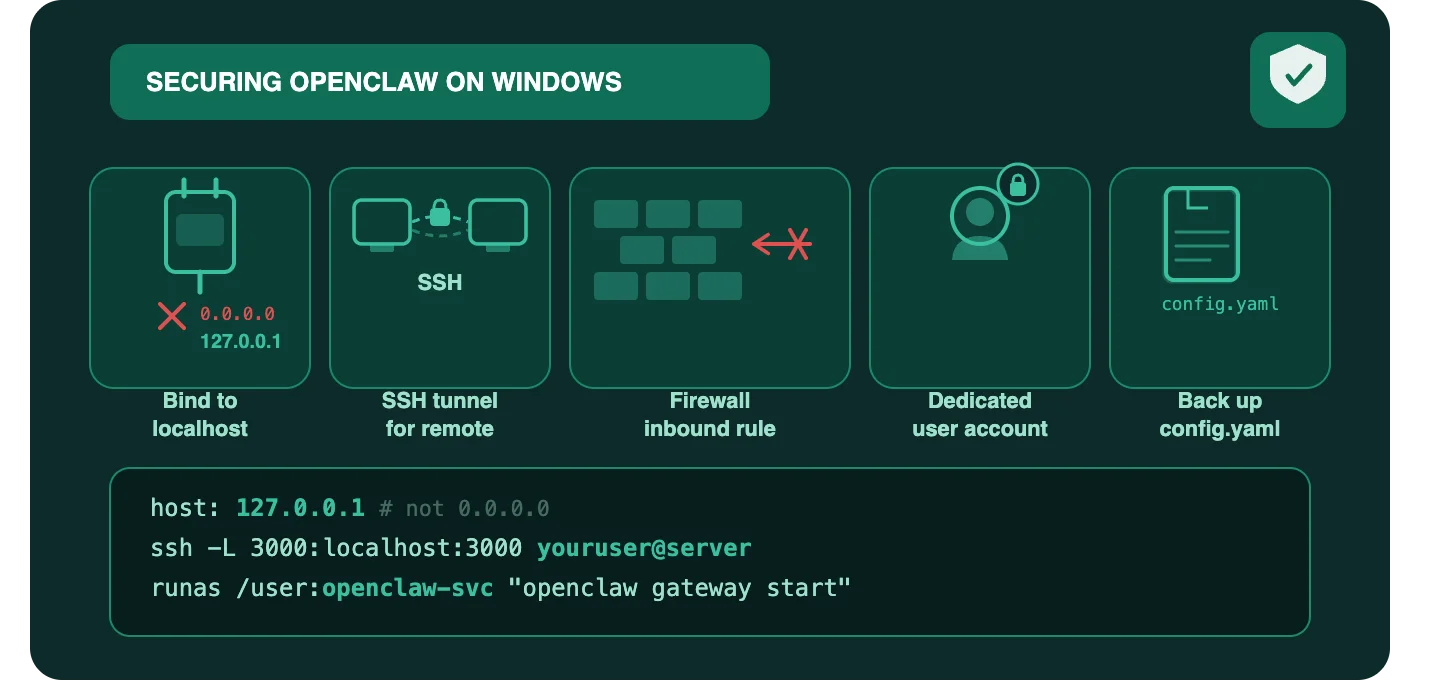
a. Bind to localhost, not all interfaces
Check your config file. The host should be set to 127.0.0.1, not 0.0.0.0. If it is set to 0.0.0.0, OpenClaw is reachable from every network interface on your machine, and not just your local browser.
b. Use SSH tunnels for remote access
If you need to reach your instance from another device, do it through an SSH tunnel rather than exposing the port directly:
ssh -L 3000:localhost:3000 youruser@your-server-ipc. Set a Windows Firewall inbound rule
In Windows Defender Firewall with Advanced Security, create an inbound rule for OpenClaw’s port (TCP) and restrict it to the local subnet only. Block all external inbound connections to that port.
d. Run under a dedicated Windows user account
Do not run OpenClaw under your admin account. Create a limited user account specifically for it.
If something goes wrong, or if the agent is ever manipulated into doing something unintended, the damage is contained to what that account can access.
e. Back up config.yaml securely
config.yaml (or .env) holds your API keys, channel tokens, and preferences. Back it up somewhere secure and separate from the OpenClaw directory itself. It is what gets you back online quickly after a reinstall or machine migration.
Troubleshooting Common Issues on Windows 10 and 11
Even with a successful installation, you may occasionally run into configuration or environment issues. Most are direct to resolve once you know what to look for.
openclaw not foundafter install
If Windows reports that openclaw isn’t recognized as a command, it’s usually because the executable isn’t available in your system’s PATH.
First, close and reopen your terminal, then try running the command again. If the problem persists, verify that OpenClaw was installed correctly and confirm that its installation directory has been added to your PATH environment variable.
- Node version errors
OpenClaw requires Node.js v22 or later, with v24 as the recommended. Check your version with node -v. If it is below 22, install the correct version via NVM (in WSL) or directly from nodejs.org (on native Windows), then restart your terminal.
- Execution policy errors
Re-run Set-ExecutionPolicy RemoteSigned -Scope CurrentUser and confirm when prompted.
- WSL systemd not running
If services inside WSL2 fail, systemd may not be enabled. Add [boot] / systemd=true to /etc/wsl.conf, run wsl --shutdown from PowerShell and reopen your Ubuntu terminal.
- Gateway not starting
Usually caused by incomplete onboarding or a missing dependency. Re-run openclaw onboard and go through the wizard fully.
- Tray icon missing in Windows Hub
Open Task Manager and look for OpenClaw.Tray.WinUI.exe. If it is running but the icon is not visible, open the hidden tray-icons area in Windows and pin it. If the process is not running at all, launch OpenClaw Companion from the Start menu.
For setup failures, check the log at:
notepad "$env:LOCALAPPDATA\OpenClawTray\Logs\Setup\easy-setup-latest.txt"OpenClaw on Windows 10 and 11 FAQs
Is OpenClaw free to use?
Yes. OpenClaw is open-source and free to download and run. The costs come from the AI model providers you connect. OpenAI and Anthropic charge per token, while local models via Ollama are free to run. Infrastructure costs (your machine’s electricity, or a VPS subscription) are separate.
Can I run OpenClaw on Windows 10 Home?
Yes, with caveats. Windows 10 Home supports WSL2 as of version 2004 (build 19041), so the WSL2 installation method works. Some enterprise features like Hyper-V are not available on Home, but WSL2 does not require Hyper-V on modern builds. Make sure your Windows 10 is on version 20H2 or later.
What happens to my OpenClaw instance when my Windows machine restarts?
On native Windows, OpenClaw uses a Scheduled Task to restart the Gateway on login. If you set it up with NSSM as a service, it restarts automatically before login. On WSL2 with the headless auto-start configuration covered in this guide, the scheduled task boots your WSL distro, and the Gateway starts via systemd. Without any of these configured, the agent goes offline and stays offline until you manually restart it.
Is WSL2 required for OpenClaw on Windows 11?
No. You can run OpenClaw natively on Windows 11 via Windows Hub or the PowerShell installer without setting up WSL2 yourself. However, WSL2 is the recommended gateway runtime because it provides a more stable Linux-compatible environment.
When Local Installation Stops Making Sense
Getting OpenClaw on Windows 10 and 11 running is genuinely doable. Keeping it running reliably over weeks and months is a different challenge.
Windows updates are unpredictable. Major updates have a history of resetting PATH variables, breaking Node.js installations, and interfering with WSL2 network configuration.
If you close your laptop, lose power, or restart for any reason, your OpenClaw instance goes offline.
Dependency drift compounds over time too.
A VPS eliminates many of these challenges by providing dedicated resources, reliable uptime, and a stable environment designed for long-running applications. And someone else maintains the underlying infrastructure.
That is specifically what our Truehost OpenClaw VPS hosting is built for, with AMD-virtualized instances pre-configured with Ubuntu, the OpenClaw orchestration engine, Python runtimes, and Playwright browser frameworks.
Plans start at $11/month when billed triennially, for 1 vCPU, 2 GB RAM, and 50 GB NVMe storage with 4 TB bandwidth. The next tier at $17/month triennial billing doubles the cores, RAM, and storage, plus 6 TB bandwidth.