Domain RegistrationFind and register the perfect domain for your website.
 .COM DomainChoose a widely recognized domain to build global credibility.
 Domain TransferSeamless domain transfers with zero downtime and complete control.
 All TLDsFind and register your perfect domain. Choose from local and global extensions.
 SSL CertificatesKeep your website safe with reliable SSL Certificates that protect customer data and build trust.
 whoisCheck domain ownership details, expiration dates, and registrar information.
 US DomainRegister a .US domain and build trust in the USA.
 Web HostingEverything your website needs to run smoothly
 WordPress HostingWordPress hosting that just works
 Windows HostingReliable hosting for Windows environments
 Reseller HostingTurn hosting into your business
 Email HostingEmail that looks professional and works anywhere
 cPanel HostingFull control of your hosting with cPanel
 Affiliate ProgramJoin as a partner and earn commissions on every referral you send our way.
 Vps HostingScalable virtual servers that expand as you need.
 Dedicated ServersGet complete access and full control over your dedicated physical server.
 Managed vpsNot tech-savvy? We will take care of everything with our fully managed VPS hosting for you.
 AI Website BuilderCreate stunning websites in seconds with AI.
 Online ShopSet up a professional online store. No coding required.
 Web design serviceGet a tailored website designed to match your brand and support your goals.
 BlogFind helpful guides on web hosting, online selling, digital marketing, and more.
 Contact USYou can reach us anytime, day or night, through chat or email.
 SupportBrowse helpful guides and answers for all of our services.
A small side project can sit fine on Supabase’s free tier for weeks. Then, after a week of no traffic, the project pauses on its own. That pause breaks a webhook receiver or a demo link overnight.
Some developers also hit the two-project cap while building something new. Self-hosting Supabase on your own VPS removes both limits at once.
You get full control over your data and no surprise usage charges. In return, you take on backups, updates, and security yourself.
This guide walks through the whole process, not just the install command. By the end, you will have a working, production-ready Supabase instance on your own server.
VPS Requirements for Self-Hosted Supabase
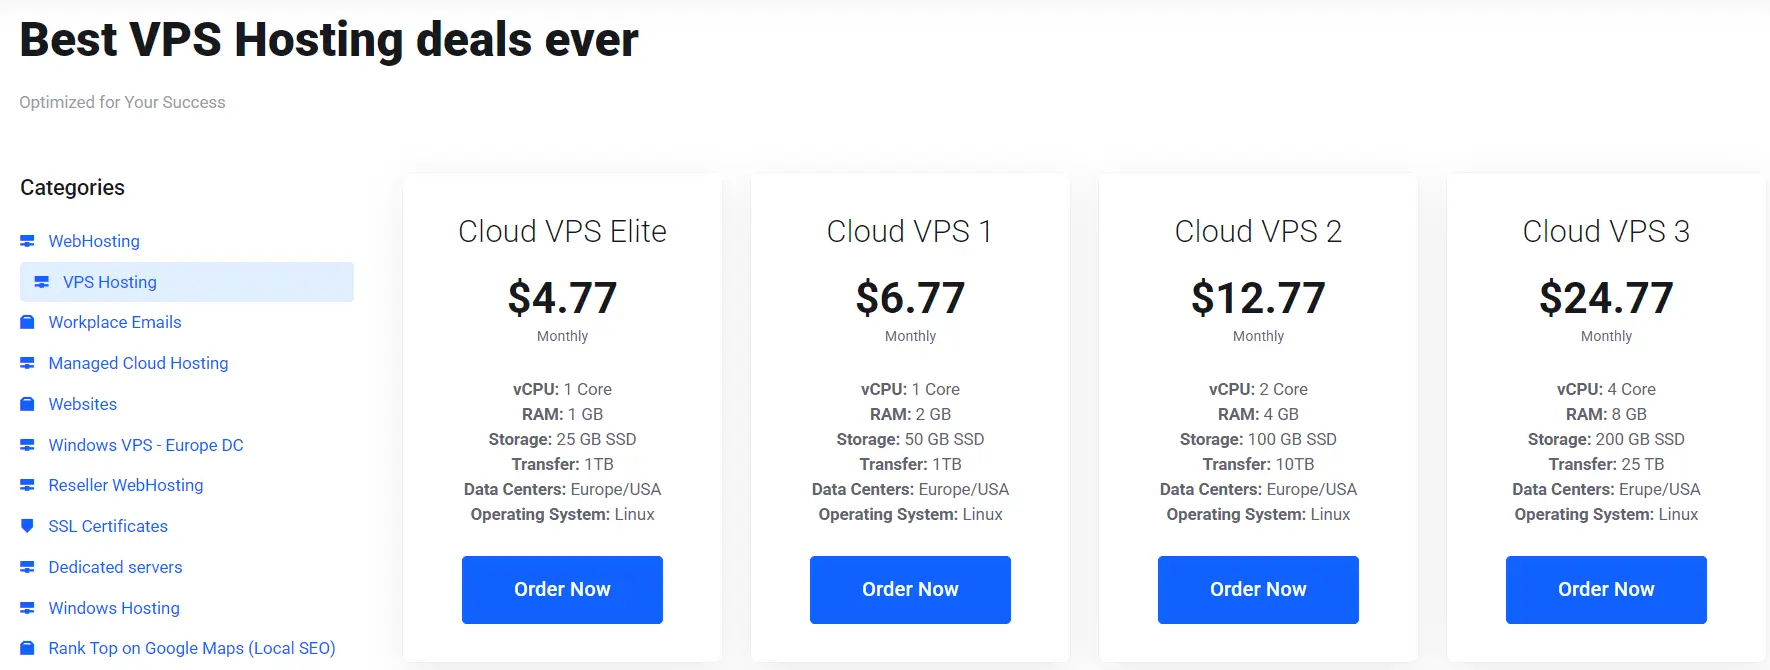
Supabase runs about a dozen Docker containers at the same time. Postgres, Auth, Storage, Realtime, and Studio each need their own share of memory.
For that reason, RAM tends to be the tightest resource, not CPU. The minimum spec from the official docs is 4 GB of RAM. Add 2 CPU cores and 40 GB of SSD storage.
For anything meant to stay online for real users, aim higher. Supabase recommends 8 GB of RAM, 4 CPU cores, and 80 GB or more of SSD storage.
If your VPS is smaller, you can trim the stack down. Remove services like Realtime, Storage, imgproxy, or Edge Runtime from docker-compose.yml if you do not need them.
Logs and Analytics, powered by Logflare and Vector, stay off by default. Turn those on only if you plan to use them, since they add extra load.
Step 1: Preparing Your VPS Before Installing Supabase
Start with a clean VPS running Ubuntu 24.04 LTS, or another supported Linux distribution.
Debian, RHEL, CentOS, and Fedora all work with the official setup script. Update your system packages first, so nothing conflicts with the install later.
Install Git if your VPS does not already have it. Set up a firewall with UFW before opening anything to the internet.
Allow SSH, HTTP, and HTTPS traffic, and block everything else by default.
Add fail2ban on top of that, so repeated failed SSH logins get blocked automatically. These two steps take a few minutes and save you real trouble later.
Step 2: Installing Supabase with Docker Compose
There are two paths into a working Supabase install. One is fast and mostly automatic.
The other gives you full control over every step. Pick whichever fits your comfort level with Linux and Docker.
I) Quick Start Install (Linux, Fastest Path)
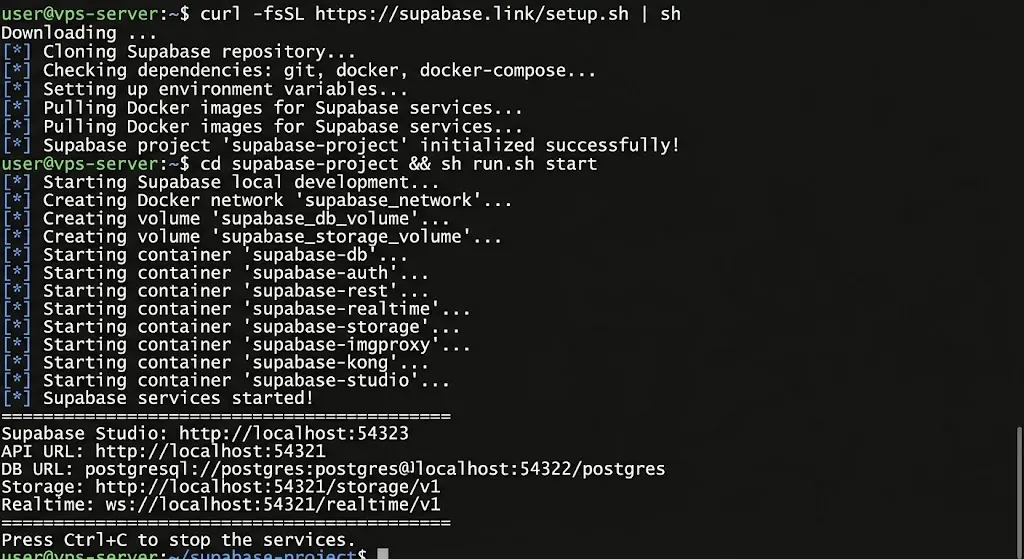
Run this single command on your VPS:
curl -fsSL https://supabase.link/setup.sh | shThis script does a lot of work on its own. It installs Docker if your VPS does not already have it.
It sparsely clones the Docker folder from Supabase’s repository, so you skip the full codebase. It generates every secret and password you need, along with a random dashboard password.
The script also asks for your core URLs and writes them into your .env file. Since it is just a shell script, you can open and read it before running it.
Add -y to the command if you want it to run without any prompts. Once it finishes, start the stack with this command:
cd supabase-project && sh run.sh startFor most people setting this up on a fresh VPS, this is the path to take. It removes most of the small mistakes that trip up a manual install.
II) Manual Install (Any OS, Full Control)
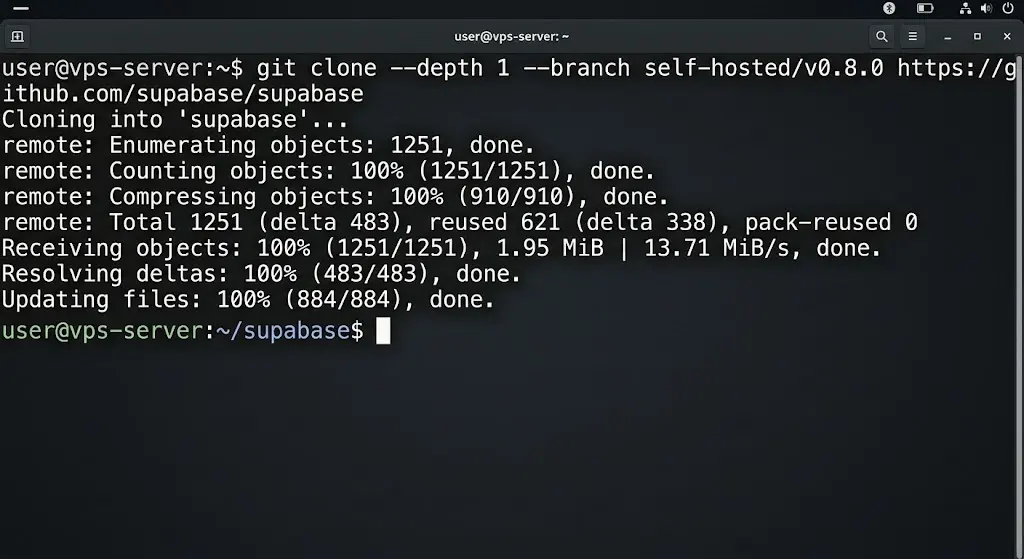
If you want to see and control every file, clone the repository yourself. Pin your clone to a specific release tag, rather than the main branch:
git clone --depth 1 --branch self-hosted/v0.8.0 https://github.com/supabase/supabaseCreate a new project folder, then copy the Docker configuration into it. Copy .env.example to .env, since that file contains all the settings Supabase needs.
Record your version in a file named .supabase-version. Doing this lets the update script upgrade your install cleanly later on.
Run docker compose pull to fetch every image before your first start. If you run Docker in rootless mode, edit .env and set DOCKER_SOCKET_LOCATION. Skip that step, and the vector container will exit without warning.
III) Generating Secrets and Setting the Dashboard Password
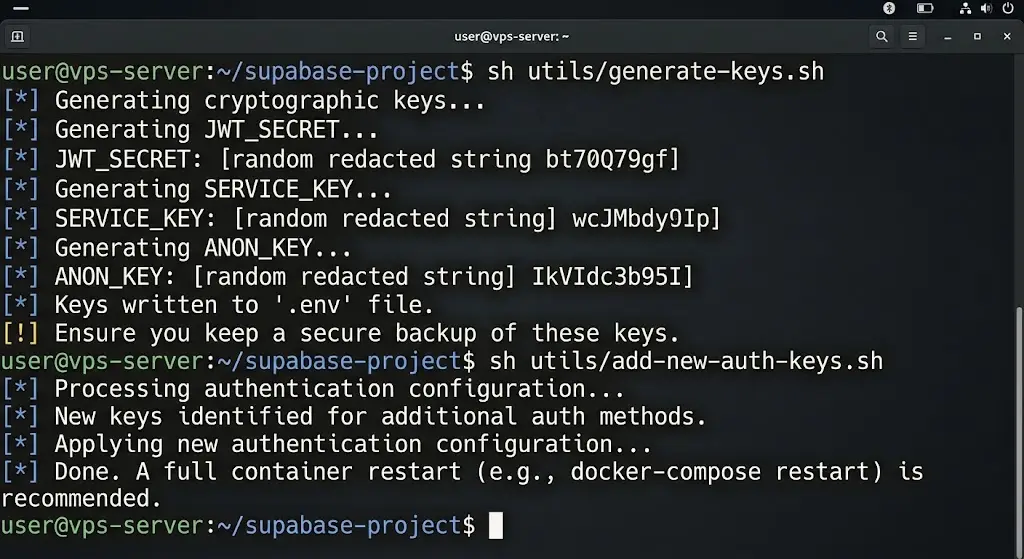
Never launch Supabase using the placeholder values from .env.example. Generate real secrets with this command:
sh utils/generate-keys.shRight after that, run the following script to add your new API keys:
sh utils/add-new-auth-keys.shThis sets up your JWT signing pair and your API keys together. Before you start the stack, set DASHBOARD_PASSWORD and, if you want, DASHBOARD_USERNAME.
Studio sits behind HTTP basic authentication from the moment it becomes reachable. A weak or default password here defeats the point of locking it down.
IV) Configuring the Core URLs
Three variables in .env control how your Supabase instance gets reached.SUPABASE_PUBLIC_URL, API_EXTERNAL_URL, and SITE_URL each need to match your actual domain or IP.
By default, the API gateway listens on port 8000. Once you add a reverse proxy, that address moves to a clean HTTPS domain instead.
Skipping this step is one of the most common reasons auth redirects break later. Take a moment here before moving on to the next step.
V) Starting the Stack and Verifying Health
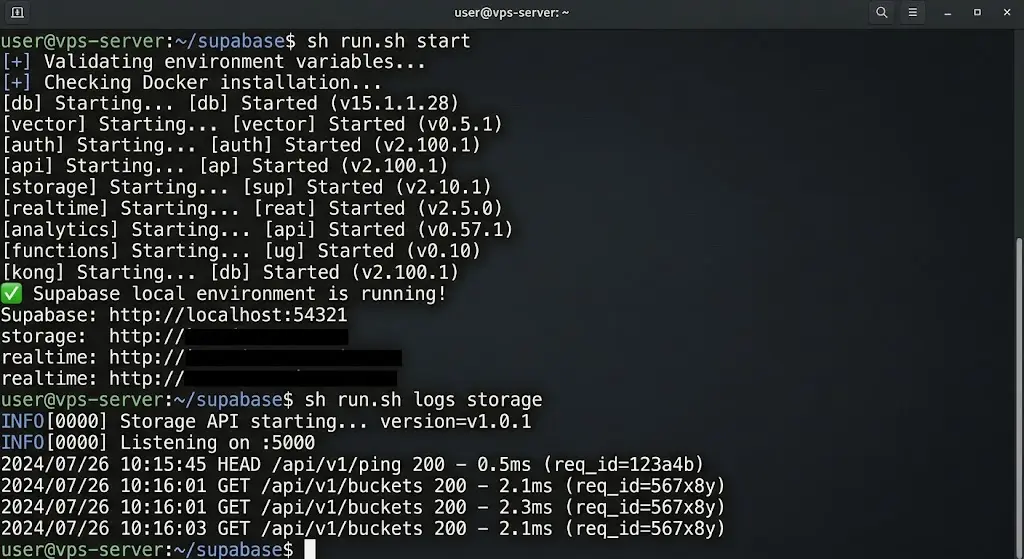
Start everything with this command:
sh run.sh startThis command waits until all services report as healthy before it finishes. Check the status of your containers at any time with docker compose ps.
Every service should show a “Up (healthy)” status within a minute or so. If something looks off, view its logs directly with a command like this:
sh run.sh logs storageThat single command usually points you straight to the actual problem.
Step 3: Configuring Studio, Authentication, and Access
By default, Studio sits behind the HTTP basic auth credentials you set earlier.
Auth email flows, like magic links and password resets, need real SMTP configuration. Without it, those emails never send, and users get stuck at sign-up. Set SMTP_HOST, SMTP_PORT, SMTP_USER, SMTP_PASS, and SMTP_SENDER_NAME inside your .env file.
Restart your services after saving those values, so the change takes effect. If you plan to use the Studio AI Assistant, add your own OPENAI_API_KEY, too.
That step stays optional and only affects that one feature. Something else helps here: your API keys live in .env, not a dashboard. View them anytime with this command:
sh run.sh secretsStep 4: Setting Up HTTPS with a Reverse Proxy
Supabase runs over plain HTTP right out of the box. For any real deployment, especially one using OAuth providers, that is not good enough.
Place a reverse proxy, like Caddy or Nginx, in front of the API gateway. Point your domain’s DNS records at your VPS IP address first.
Then issue a TLS certificate through your reverse proxy of choice. Once HTTPS is live, update SUPABASE_PUBLIC_URL to your new HTTPS domain.
That single change moves your instance off the raw port 8000 address for good.
Step 5: Backing Up and Updating Self-Hosted Supabase
Self-hosting drops one convenience you get with the managed plan: automatic backups. You now own that responsibility completely, so plan for it early.
A simple pg_dump cron job that writes to storage off your server works well. Test your restore process at least once, rather than blindly trusting backups.
Updates are handled by a script called update.sh, which cleanly merges a newer release. It uses a three-way merge, so your custom settings stay intact where possible.
You can also update a single service on its own, like Studio. Change that service’s image tag in docker-compose.yml, pull it, then recreate just that container.
Troubleshooting Common Self-Hosted Supabase Issues
Even a clean install runs into a few recurring problems. Here are the ones that show up most often, along with fixes.
1) A Container Shows “Unhealthy” After Editing .env
This usually happens after changing POSTGRES_PASSWORD once the database has already started.
Other services do not always pick up that change smoothly. Fix it by running the password rotation script instead of editing the value by hand:
sh utils/db-passwd.shRecreate your stack afterward, and the unhealthy status should clear.
2) Studio Stays Unhealthy While Other Services Are Healthy
Studio’s own health check depends on the analytics service being healthy first.
A failing analytics container blocks Studio, even if Studio itself works fine. Check the analytics logs before assuming Studio is the actual problem:
sh run.sh logs analytics3) Storage API Uploads Fail or Show Unhealthy
This is almost always a networking issue between containers, not a broken install. Inside a container, localhost does not point to other services the way it does on your host machine.
When debugging from inside one container, reference other services by their container name instead.
4) API Gateway Fails to Start With an Entrypoint Error
If your repository was cloned or edited on Windows, watch for CRLF line endings.
Those line endings can silently break the gateway’s entrypoint script. Re-clone the repository on a Linux machine, or normalize the Docker folder to LF endings.
5) “Exec Format Error” on Container Startup
This error shows up when a cached image was built for the wrong CPU type.
It happens most often when moving a setup between ARM and x86 servers. Remove the cached image, then pull it again to fetch the correct build:
docker image rm [image name]6) Auth Emails Never Arrive
This is not a bug. Self-hosted Supabase ships with no SMTP relay configured by default. Set your SMTP variables in .env, then restart all services so the change takes effect.
7) Port 8000 Already in Use
This happens often on a VPS already running another web service. Either change the exposed port in a compose override, or stop the conflicting service first.
FAQs
Can I self-host Supabase for free?
The software itself costs nothing to run. You still pay for the VPS hosting. That usually runs between $ 12 and $ 25 per month for a small production instance.
Is self-hosted Supabase production-ready?
Yes, with a few conditions. You need enough RAM, a real backup routine, HTTPS via a reverse proxy, and a working SMTP server for auth emails. Skip any of those, and you are running something closer to a demo than a production service.
What is the difference between Supabase Cloud and self-hosted Supabase?
Supabase Cloud handles backups, scaling, updates, and uptime for you, for a monthly fee. Self-hosting hands you full control over the same stack, along with full responsibility for keeping it running.
Which VPS provider works best for self-hosted Supabase?
Truehost VPS offers root access, sufficient RAM, and SSD storage will work.
Set up Self-hosted Supabase Today
You now have a full path from a bare VPS to a running Supabase instance. Along the way, you set up Docker, generated secrets, configured HTTPS, and learned what to check when something breaks.
Self-hosting trades a monthly cloud bill for direct control over your own data. It also hands you the job of backups, updates, and troubleshooting from that point on.
Before you move any real project to this setup, size your VPS correctly. Start with at least 4 GB of RAM for testing and 8 GB for anything that stays live.
Once your instance is stable, connect it to your application and start building on top of it.