Domain RegistrationFind and register the perfect domain for your website.
 .COM DomainChoose a widely recognized domain to build global credibility.
 Domain TransferSeamless domain transfers with zero downtime and complete control.
 All TLDsFind and register your perfect domain. Choose from local and global extensions.
 SSL CertificatesKeep your website safe with reliable SSL Certificates that protect customer data and build trust.
 whoisCheck domain ownership details, expiration dates, and registrar information.
 US DomainRegister a .US domain and build trust in the USA.
 Web HostingEverything your website needs to run smoothly
 WordPress HostingWordPress hosting that just works
 Windows HostingReliable hosting for Windows environments
 Reseller HostingTurn hosting into your business
 Email HostingEmail that looks professional and works anywhere
 cPanel HostingFull control of your hosting with cPanel
 Affiliate ProgramJoin as a partner and earn commissions on every referral you send our way.
 Vps HostingScalable virtual servers that expand as you need.
 Dedicated ServersGet complete access and full control over your dedicated physical server.
 Managed vpsNot tech-savvy? We will take care of everything with our fully managed VPS hosting for you.
 AI Website BuilderCreate stunning websites in seconds with AI.
 Online ShopSet up a professional online store. No coding required.
 Web design serviceGet a tailored website designed to match your brand and support your goals.
 BlogFind helpful guides on web hosting, online selling, digital marketing, and more.
 Contact USYou can reach us anytime, day or night, through chat or email.
 SupportBrowse helpful guides and answers for all of our services.
Running n8n on a VPS puts you in full control of your automations, your data, and the execution environment. Everything runs on a server you own.
Instead of watching costs climb with usage, you pay one flat monthly fee. You scale your automations freely as your needs grow.
This guide covers how to run n8n on a VPS: provisioning the server, installing n8n with Docker, and locking it down with basic security practices.
By the end, you’ll have a working n8n instance and a clear path to production.
What You Need Before Installing n8n
Before you begin, make sure you have:
- A VPS running Ubuntu 22.04 or 24.04 LTS
- Minimum 2GB RAM (4GB or more recommended for comfortable use)
- Root access
- A domain name (optional, but recommended for production use)
- Basic comfort working in the terminal
Why these numbers? n8n’s own documentation lists 1 vCPU and 2GB RAM as the bare minimum. That’s enough to test the platform on SQLite.
It is not enough once you add real workflows, a database, and a reverse proxy. Most hosting guides now recommend 4GB RAM and 2 vCPUs as a safer production starting point.
Step 1: Create Your VPS Server (Truehost)
Log into your Truehost account and go to the VPS ordering page.
- Select Ubuntu 24.04 as your OS image
- Choose a plan that meets the 2GB RAM minimum, we’d recommend the 4GB tier if you’re planning any real workload
- Complete your order and wait for provisioning
- Check your welcome email or dashboard for your server IP, root username, and password
Example: if you order a 4GB plan today, provisioning is usually finished within a few minutes, and your credentials land in your inbox almost immediately.
Step 2: Connect to Your Server Using SSH
Open your terminal if you’re on Mac or Linux. If you’re on Windows, use PuTTY or the built-in Windows Terminal; both work the same way for this step.
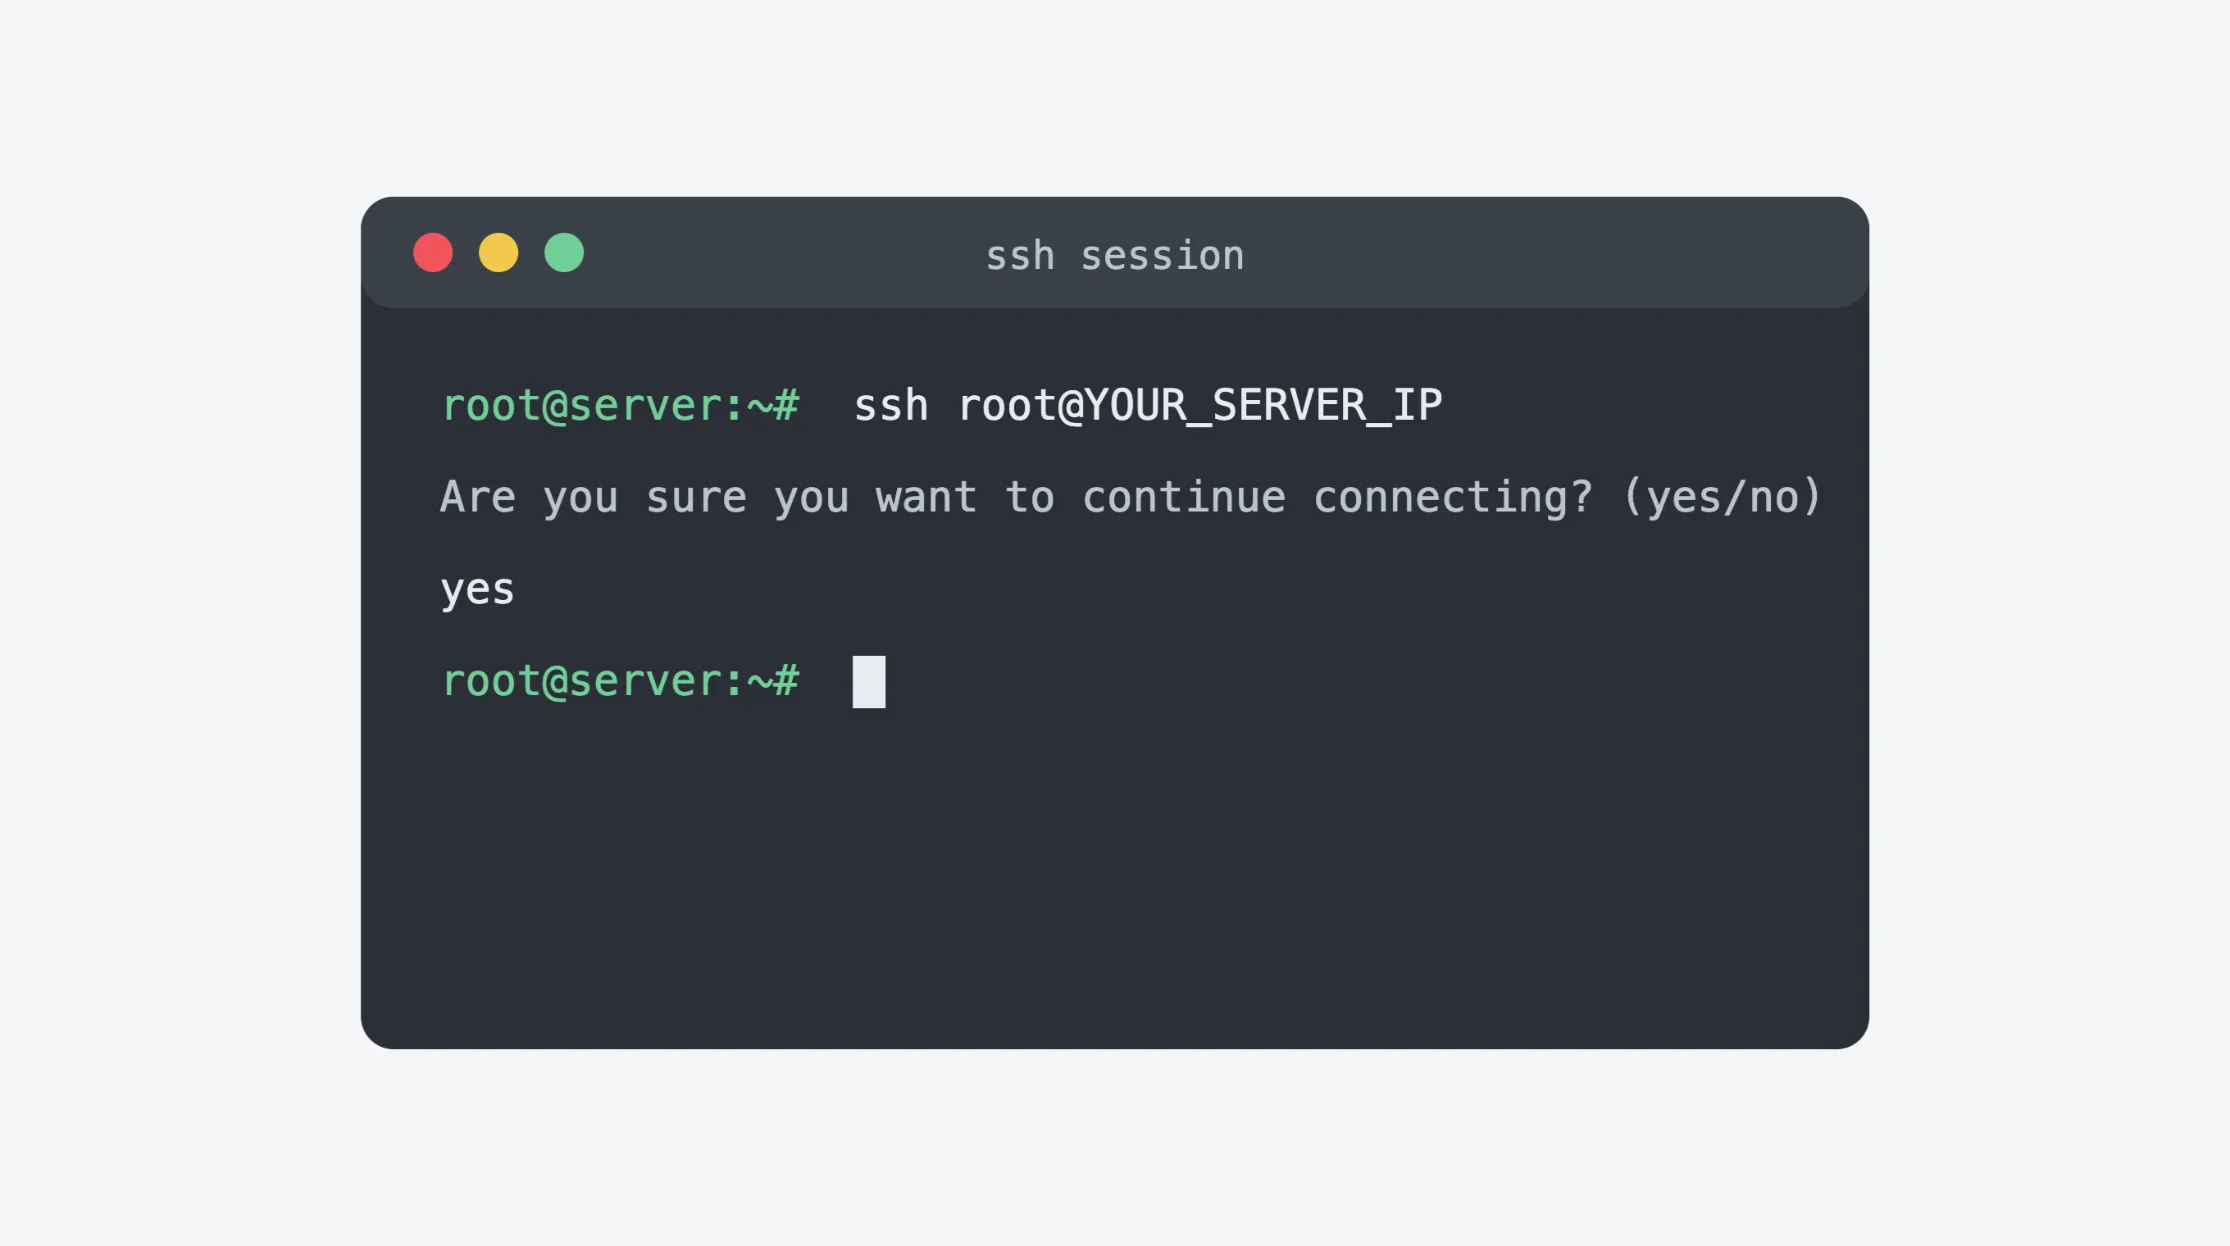
Run this command, replacing the placeholder with your real server IP:
ssh root@YOUR_SERVER_IP
Worked example: if your server IP is 102.130.45.12, you’d type ssh [email protected].
A successful connection drops you into a prompt that looks like this:
root@server:~#
The first time you connect, you’ll see a fingerprint prompt. Type yes and press Enter. This is normal; it just confirms you trust this server.
Step 3: Create a Non-Root User
Everything from here on should run as a regular user, not root. So this account needs to exist before any real setup work happens.
Create the user and add it to the sudo group:
adduser yourname
usermod -aG sudo yourname
Then switch to the new user and test sudo access:
su - yourname
sudo whoami
If it returns root, sudo access is working correctly.
This one step limits the blast radius if your credentials are ever compromised. There’s no reason to keep working as root once the account exists.
Step 4: Update the Server
Run:
sudo apt update && sudo apt upgrade -y
This pulls the latest security patches and package versions before you install anything new.
Depending on how fresh your server image is, this can take a few minutes. Let it finish before moving on.
Step 5: Enable a Firewall
Install UFW:
sudo apt install ufw
Allow the ports you need:
sudo ufw allow 22
sudo ufw allow 5678
If you plan to set up a reverse proxy later, you’ll also open 80 and 443 at that stage, not now. Keep the firewall as tight as possible until you need more.
Enable it:
sudo ufw enable
Check the status:
sudo ufw status
You should see port 22 and 5678 listed as ALLOW. Locking the server down before Docker or n8n exposes anything is a small step that prevents a lot of headaches later.
Step 6: Install Docker
Install Docker using apt:
sudo apt install docker.io -y
Enable and start the service:
sudo systemctl enable docker
sudo systemctl start docker
Verify the install:
docker --version
A quick note on install methods:
apt install docker.iois the older, simpler route, and it still works fine for this use case. Docker’s own install script (get.docker.com) is the more current best-practice method and usually pulls a newer Docker version. Either approach gets n8n running, pick whichever you’re more comfortable with.
Step 7: Launch n8n
Run this command to start n8n in interactive mode:
docker run -it --rm \
  -p 5678:5678 \
  -v ~/.n8n:/home/node/.n8n \
  n8nio/n8n
Here’s what each flag does:
-it --rm: runs interactively and removes the container automatically when you stop it-p 5678:5678: exposes n8n’s port so you can reach it from your browser-v ~/.n8n:/home/node/.n8n: persists your workflow data outside the container, so it survives restartsn8nio/n8n: pulls the official n8n image from Docker Hub
The first time you run this, Docker pulls the image, then starts the container. You’ll see log output as n8n boots up.
This interactive mode is just for verifying everything works. You’ll switch to detached mode in the tips section below, so n8n keeps running after you close the terminal.
Step 8: Access the n8n Interface
Open your browser and go to:
http://YOUR_SERVER_IP:5678
Worked example: with the IP from earlier, that’s http://102.130.45.12:5678.
On first load, n8n asks you to set up an owner account, your name, email, and password. This creates the admin account for your instance.
Once that’s done, you’ll land on the n8n dashboard, ready to build your first workflow.
If your browser can’t connect, double-check that your VPS firewall isn’t blocking port 5678. We’ll cover this in more depth in the security section below.
Practical Tips for Running n8n on a VPS
Run in Detached Mode
For anything beyond testing, run n8n in detached mode so it keeps running after you close your terminal session:
docker run -d \
  -p 5678:5678 \
  -v ~/.n8n:/home/node/.n8n \
  --name n8n \
  n8nio/n8n
Check that it’s running:
docker ps
View the logs at any time:
docker logs n8n
Monitor Resource Usage
Use htop to watch CPU and RAM in real time:
sudo apt install htop
htop
Watch for spikes during workflow runs, especially with parallel executions or large data payloads.
If you see recurring high RAM usage, or workflows start timing out, that’s your signal to upgrade to a bigger plan. n8n idles around 100MB of RAM but can spike to 1–2GB during heavy execution, so don’t wait until things break to size up.
Use Persistent Volumes
Reuse the same -v ~/.n8n:/home/node/.n8n flag from earlier every time you start the container.
Without it, your workflows, credentials, and settings disappear the moment the container restarts or gets removed. This single flag is the difference between a durable setup and a fragile one.
Secure the Dashboard (for production use)
Running n8n on a bare IP with no HTTPS is fine for testing. It is not fine for production.
- Point your domain’s DNS to your VPS using an A record in Cloudflare
- Set up a reverse proxy, Nginx or Traefik, using a
docker-compose.ymlfile, to serve n8n over HTTPS - Enable Cloudflare’s proxy and SSL for an extra layer of protection
- Set the
WEBHOOK_URLenvironment variable to match your domain, so webhooks resolve correctly
If you’d rather skip the domain setup for now, basic auth or IP allowlisting is a lighter-weight alternative that still keeps random visitors out of your dashboard.
Troubleshooting Common Issues
Container not starting
Check the logs first:
docker logs n8n
The usual culprits are missing environment variables or volume permission issues. Fix the specific error the logs point to, then restart the container.
Port already in use
Check what’s occupying port 5678:
sudo netstat -tuln | grep 5678
Either stop the competing process, or remap the port in your docker-compose.yml, for example, 5679:5678, and restart.
Permission errors on the n8n directory
Fix ownership on the volume:
sudo chown -R 1000:1000 ~/.n8n
n8n’s container runs as user ID 1000 by default, so this usually resolves permission errors right away.
Memory issues or sluggish performance
n8n gets memory-hungry as your workflows grow, especially with parallel executions.
If your instance starts crashing or slowing down, treat it as a resource-tier signal, not just a bug to patch. It’s usually telling you it’s time to move up a plan.
Webhook not receiving data
Work through this checklist:
- Confirm your firewall allows port 443 (or 80)
- Confirm your domain points to the VPS, and Nginx is running:
sudo systemctl status nginx - Verify the
WEBHOOK_URLenvironment variable indocker-compose.ymlmatches your domain
Dashboard not loading
- Confirm the container is running:
docker ps - Confirm your firewall allows the required ports, 22, 80, 443, and 5678 if it’s still exposed directly
Security Best Practices
Protect API Keys
Never hardcode credentials in your scripts or workflow nodes.
Use environment variables or Docker secrets instead. This one habit prevents a huge share of accidental credential leaks.
Update Your Server Regularly
Re-run the same update command from Step 4:
sudo apt update && sudo apt upgrade -y
A weekly or monthly cadence is a reasonable baseline for most setups.
Backup Your Workflows
Automation becomes mission-critical fast. Treat backups as non-optional, not a nice-to-have.
Back up:
- Your workflows
- Your credentials
- The full
.n8nconfig directory
A simple periodic tarball of the .n8n volume works well. n8n’s own export CLI is another solid option if you want workflow-level backups.
n8n on a VPS FAQs
Is n8n free to self-host?
Yes. The self-hosted Community Edition runs under n8n’s Sustainable Use License, which is free for internal business use, personal projects, and running your own automations, including commercially. It’s only restricted if you plan to resell n8n as a hosted service to third-party customers.
What are the minimum VPS specs for n8n?
n8n’s official minimum is 1 vCPU and 2GB RAM, with 20GB of storage. That’s fine for testing. For production use with real workflows and a proper database, most guides recommend 4GB RAM and 2 or more vCPUs.
Do I need Docker to run n8n, or can I install it manually?
Docker is the recommended path, and it’s what this guide walks through. You can also install n8n directly via npm on a server running Node.js, but you’ll manage dependencies and upgrades yourself instead of just pulling a new image tag.
How do I add a custom domain to my n8n instance?
Point an A record from your domain to your VPS IP, then set up a reverse proxy like Nginx or Traefik to serve n8n over HTTPS. Don’t forget to update the WEBHOOK_URL environment variable to match.
How do I update n8n once it’s running?
Pull the latest image and recreate your container:
docker pull n8nio/n8n
docker stop n8n && docker rm n8n
docker run -d -p 5678:5678 -v ~/.n8n:/home/node/.n8n --name n8n n8nio/n8n
Your workflow data stays intact because it lives in the persistent volume, not the container.
Get Started with Truehost
Self-managing a VPS gives you full control over your n8n instance. But provisioning, securing, and maintaining that server is still on you; every update, every firewall rule, every backup.
That’s where a properly specced, ready-to-provision server makes the difference. At Truehost, our VPS plans ship with Ubuntu 24.04 images, root access from the start, and the uptime your automations need to keep running without interruption.
If you’d rather skip the manual setup entirely, we also run dedicated N8n Starter, Pro, and Business hosting tiers, similar in spirit to our OpenClaw hosting tiers, with n8n pre-installed, queue mode configured, and 100+ ready-made workflows included out of the box.
Plans start from $6.77/month , scaling up to 8GB RAM and 4 vCPUs on the Business tier for heavier automation loads.
Whether you build it yourself step by step, or launch one of our pre-configured plans, you now know how to run n8n on a VPS from start to finish.
Deploy an n8n-ready VPS on Truehost and have your automations running today.