Domain RegistrationFind and register the perfect domain for your website.
 .COM DomainChoose a widely recognized domain to build global credibility.
 All TLDsFind and register your perfect domain. Choose from local and global extensions.
 whoisCheck domain ownership details, expiration dates, and registrar information.
 US DomainRegister a .US domain and build trust in the USA.
 Web HostingEverything your website needs to run smoothly
 WordPress HostingWordPress hosting that just works
 Windows HostingReliable hosting for Windows environments
 Reseller HostingTurn hosting into your business
 Email HostingEmail that looks professional and works anywhere
 cPanel HostingFull control of your hosting with cPanel
 Affiliate ProgramJoin as a partner and earn commissions on every referral you send our way.
 Vps HostingScalable virtual servers that expand as you need.
 Dedicated ServersGet complete access and full control over your dedicated physical server.
 Managed vpsNot tech-savvy? We will take care of everything with our fully managed VPS hosting for you.
If you want to learn how to update your cPanel version to make your web hosting better and safer, we got you covered!

cPanel is a handy control panel that makes managing your website a breeze.
But just like any software, it needs regular updates to keep everything running smoothly and securely.
In this article, we’ll walk you through how to update your cPanel version.
We’ll share why keeping your software up to date is a great idea and give you easy step-by-step instructions to make the whole process a piece of cake.
Whether you’re a pro at web stuff or just getting started, this guide will help you keep your hosting platform in top shape!
Understanding cPanel Updates
What is cPanel?
So, what’s this cPanel thing all about?
Well, cPanel is a super handy tool that helps you manage your website.
Think of it as your online control center!
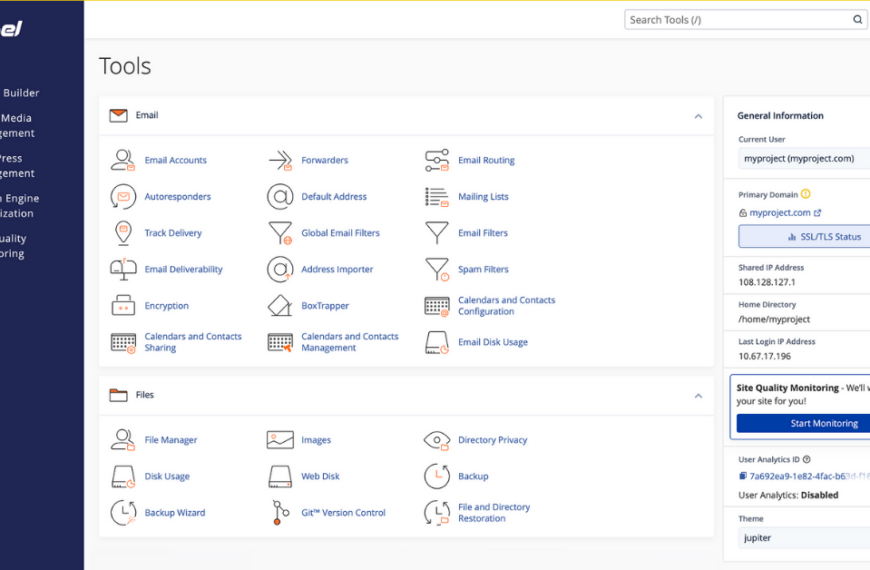
It’s designed for Linux and gives you a friendly interface where you can do all sorts of things like uploading files, managing databases, creating email accounts, and even setting up your domains—all from one dashboard.
Whether you’re a beginner or a pro, cPanel makes website management a breeze!
Why Update cPanel?
You might wonder, “Why do I need to update cPanel to a newer version?” Great question!
Here are some good reasons:
Security Enhancements: Keeping cPanel updated helps fix any security holes, keeping your website safe from unwanted visitors.
New Features: Updates often bring cool new tools and functionalities that make your life easier and your site even better.
Performance Improvements: Each update can help cPanel run faster and smoother, which means quicker load times for your site. Who doesn’t love that?
Bug Fixes: Updates also fix pesky bugs and issues, making everything run more smoothly and reducing downtime.
Types of cPanel Updates
Now, let’s talk about the types of cPanel updates:
Automatic Updates: These updates happen automatically without you having to lift a finger!
This way, your cPanel is always up-to-date with the latest features and security fixes.
Manual Updates: Prefer to have a little more control? You can also choose to manually start updates whenever you want.
It’s all about what works best for you!
Getting Ready for the Update
Before you dive into updating cPanel, let’s make sure you’re all set for a smooth ride.
Here’s what to do:
Check Your cPanel License
First things first—make sure your cPanel license is active.
An expired license means you can’t access the latest features.
Just log in to your cPanel account and head to the “Account Information” section to check your status.
If it’s expired, no worries! You can renew it through your cPanel provider or right on the cPanel website.
Follow their steps, and you’ll be good to go!
Backup Your Data
Backing up your data is super important! It keeps your files, databases, and settings safe in case anything goes wrong during the update.
Here’s how to create a full cPanel backup:
1. Log in to your cPanel account.
2. Go to the “Backup” section.
3. Choose “Download a Full Account Backup.”
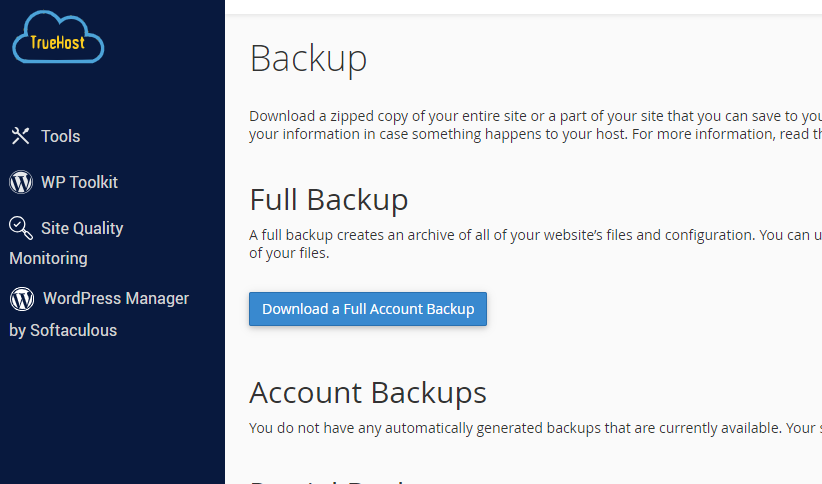
4. Pick where you want to save it (like your home directory or a remote FTP server).
5. Click “Generate Backup” and wait for it to finish. Don’t forget to download the backup file to your computer!
Check System Requirements
Before updating, take a peek at the system requirements for the new cPanel version.
You can usually find this info on the cPanel website or in the release notes.
Make sure your server meets the minimum requirements to avoid any hiccups.
Also, check if your server has enough CPU, RAM, and disk space.
If it looks a bit low, consider upgrading before you hit that update button.
How to Update cPanel Automatically
Updating cPanel automatically keeps your server secure and running smoothly.
Let’s dive into how to do this.
Using WHM (Web Host Manager)
Finding Update Preferences:
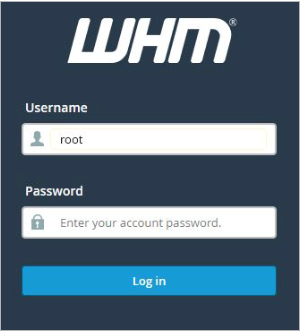
Log in to your WHM account as the root user.
Look for “Update Preferences” in the left menu or go to Server Configuration > Update Preferences.
Setting Up Automatic Updates:
On the Update Preferences page, you’ll see how to manage updates. You can pick automatic updates, manual updates, or none at all.
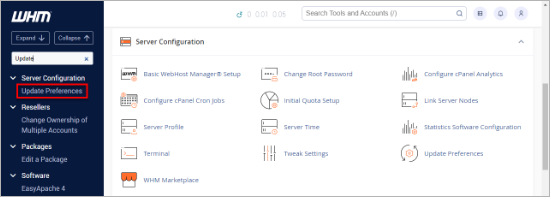
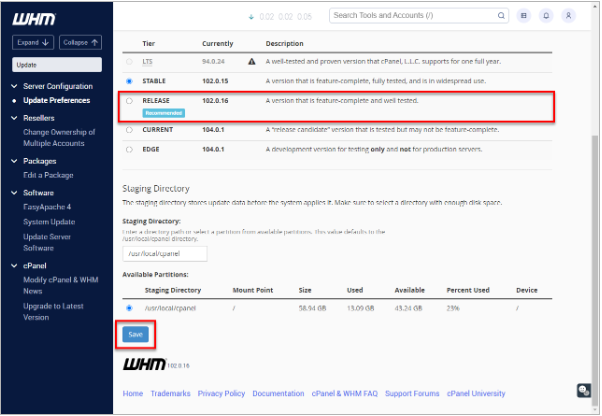
Choosing Update Tiers:
Here are your options:
STABLE: Best for production; offers tested features.
RELEASE: A nice mix of new features and stability.
CURRENT: Has the latest features but might be a bit shaky.
EDGE: The newest updates but less stable—great for testing!
Once you choose your tier, click Save to lock in those changes.
Enabling Automatic Updates
Make Sure Automatic Updates Are On:
Check the box for automatic updates on the Update Preferences page.
This way, cPanel will check for updates every night at midnight if there are any for your chosen tier.
Double-Check Your Settings:
After saving, go back to the Update Preferences page to ensure everything is set up correctly.
You can also peek at the logs to see if updates are happening as planned.
How to Update cPanel Manually
Updating cPanel manually gives you the power to decide when and how to keep your server up-to-date.
Here is a simple guide:
Accessing WHM
Login to WHM:
First, open your web browser and type in your WHM URL, usually something like https://your-server-ip:2087.
Then, enter your root username and password to log in.
Locating the Update cPanel Section:
Once you’re in, look for the cPanel section on the left sidebar and click on Upgrade to Latest Version to get to the update page.
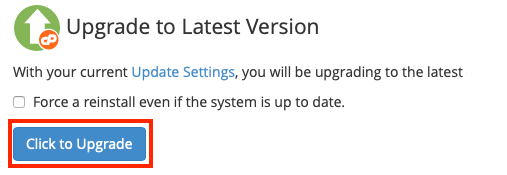
Initiating the Update
Step-by-Step Guide to Manually Update cPanel:
In the Upgrade to Latest Version section, you’ll find options to update.
If your settings allow it, just hit the Upgrade button to start the update process!
Using Command Line for Manual Updates
Prefer using the command line? You can update cPanel by typing this command as the root user:
/usr/local/cpanel/scripts/upcp
This will take care of everything for you!
Monitoring the Update Process:
You can keep an eye on the update progress in WHM or the command line.
Just a heads up, the update might take a bit longer, depending on your server’s power and the update size.
Verifying the Update
Once the update is done, check your new cPanel version by going to WHM > Server Information.
You’ll see the current cPanel version right at the top.
Finally, make sure everything’s running well!
Head to WHM > Service Status to confirm that all services are up and working smoothly.
Post-Update Checklist
So, you’ve just updated cPanel—awesome!
Now, let’s make sure everything is running smoothly and securely.
Here’s a friendly checklist to guide you through the process:
Testing Functionality
Check if All cPanel Features are Working:
First things first, log in to your cPanel account.
Go ahead and explore the different features, like file management, database management, and email settings.
Make sure everything is working as it should—no hiccups allowed!
Website and Email Functionality:
Pop over to your website and check that all the pages load perfectly.
Look out for any broken links or missing content—those little gremlins can sneak in!
Send and receive some test emails to ensure your email accounts are doing their job.
Don’t forget to check email forwarding, autoresponders, and any other email features you use.
Security Checks
Running Security Scans:
Time to play detective! Use some security tools or plugins to give your server and websites a thorough scan.
We want to catch any vulnerabilities, malware, or strange activity that might’ve popped up during the update.
Firewall and Security Settings:
Double-check that your firewall settings are still spot on.
Look for any sneaky changes that might have slipped in during the update that could put your server at risk.
Take a peek at your security settings in WHM, including SSH settings and cPHulk settings, just to be safe.
Optimizing Performance
Reviewing Performance Settings:
After updating, it’s a great idea to check your server’s performance settings.
Look at things like caching, PHP settings, and how resources are allocated.
We want everything to run as smoothly as possible!
Making Necessary Adjustments:
If you notice any slowdowns, don’t worry! Here are some tweaks you can consider:
Increase PHP memory limits.
Adjust the number of concurrent connections.
Optimize database settings for better performance.
Keep an eye on your server’s performance metrics, and don’t hesitate to make more adjustments if needed!
Conclusion
Keeping your cPanel updated is crucial for ensuring your web hosting is secure, efficient, and loaded with new features.
Regularly update your cPanel version to protect your server from vulnerabilities and enhance your management experience.
Make updates a routine part of your server care to keep everything running smoothly.
For more assistance, explore cPanel Documentation or connect with support and community forums for personalized help.
Staying updated is a smart strategy for effective web hosting management!