Domain RegistrationFind and register the perfect domain for your website.
 .COM DomainChoose a widely recognized domain to build global credibility.
 Domain TransferSeamless domain transfers with zero downtime and complete control.
 All TLDsFind and register your perfect domain. Choose from local and global extensions.
 SSL CertificatesKeep your website safe with reliable SSL Certificates that protect customer data and build trust.
 whoisCheck domain ownership details, expiration dates, and registrar information.
 US DomainRegister a .US domain and build trust in the USA.
 Web HostingEverything your website needs to run smoothly
 WordPress HostingWordPress hosting that just works
 Windows HostingReliable hosting for Windows environments
 Reseller HostingTurn hosting into your business
 Email HostingEmail that looks professional and works anywhere
 cPanel HostingFull control of your hosting with cPanel
 Affiliate ProgramJoin as a partner and earn commissions on every referral you send our way.
 Vps HostingScalable virtual servers that expand as you need.
 Dedicated ServersGet complete access and full control over your dedicated physical server.
 Managed vpsNot tech-savvy? We will take care of everything with our fully managed VPS hosting for you.
 AI Website BuilderCreate stunning websites in seconds with AI.
 Online ShopSet up a professional online store. No coding required.
 Web design serviceGet a tailored website designed to match your brand and support your goals.
 BlogFind helpful guides on web hosting, online selling, digital marketing, and more.
 Contact USYou can reach us anytime, day or night, through chat or email.
 SupportBrowse helpful guides and answers for all of our services.
You just bought a VPS. You have an IP address and a password sitting in your inbox.
Now you need to actually get into that server from your Windows machine, and nothing on screen tells you where to click.
Most guides skip straight to PuTTY, as if every Windows user still needs a separate program to open a connection.
That habit is outdated. Windows now ships with SSH built in, so you can skip the download step in most cases.
This guide walks through both routes. Use the built-in method if you want the fastest path.
Use PuTTY if your setup calls for it, or if you prefer a graphical tool. Either way, you will be connected within a few minutes.
What You Need Before You Connect
Before opening any terminal, gather four pieces of information. Your VPS provider usually sends these in a welcome email, or you can find them in your hosting dashboard.
- IP address: the unique address of your server, something like
192.168.1.1 - SSH port: usually 22 unless your provider changed it for security reasons
- Username: often root, though some providers set up a different account by default
- Password or private key: whichever method your provider set up for login
Check that your VPS is fully running before you try to connect. A server that just finished provisioning may still need a few minutes to boot properly.
One more note on the username. Many providers disable direct root login by default. If root does not work, look for a separate username in your welcome email instead.
Windows 10, from build 1809 onward, and Windows 11 both include an SSH client out of the box. That means you likely do not need to install anything for the first method below.
Method 1: Connect Using Windows’ Built-In SSH Client
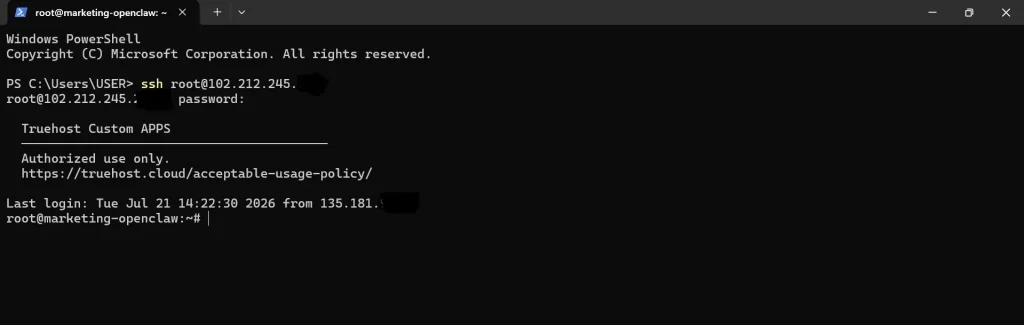
This is the fastest way to connect for most people, and it needs no download at all.
1) Open a Terminal
Search for Windows Terminal in your Start menu and open it. PowerShell and Command Prompt work too, so use whichever one you already have open if you prefer.
Windows Terminal is worth using if you have not tried it yet. It supports tabs, better fonts, and a cleaner layout than the older Command Prompt window.
2) Run the SSH Command
Type the following command, swapping in your own username and IP address:
ssh username@your_vps_ipOn your first connection, you will see a message about the authenticity of the host. This is normal and appears only once per server. Type yes and press Enter to continue.
Next, you will be asked for your password. Type it in, then press Enter. No characters will appear on screen while you type. That is expected behavior, not a bug.
3) Confirm You’re Connected
Once login succeeds, your prompt should change to something like username@hostname:~$. That change confirms you are now inside your server’s command line.
From here, you can run commands directly on your VPS, the same way you would on a local machine.
Method 2: Connect Using PuTTY
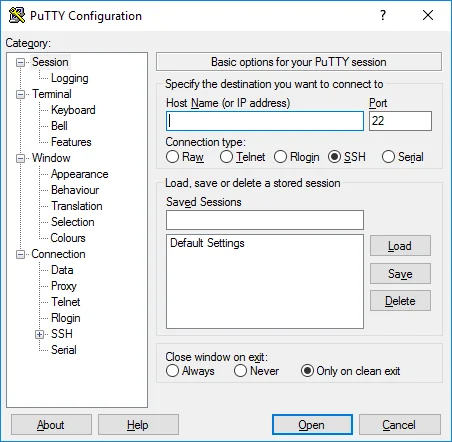
PuTTY remains a solid choice, especially if you are used to a graphical interface or need features the native client does not offer as easily.
1) Download and Install PuTTY
Go to the official site at putty.org and download the installer from there. Avoid third-party download sites, since modified installers sometimes carry malware.
Run the installer and follow the prompts. The setup takes less than a minute on most machines.
2) Configure the Session
Open PuTTY once installation finishes. On the Session screen, type your VPS IP address into the Host Name field. Leave the Port set to 22 unless your provider told you otherwise.
Make sure Connection Type is set to SSH. Then, if you plan to reconnect later, type a name under Saved Sessions and click Save. This saves you from retyping the IP every time.
3) Accept the Host Key and Log In
Click Open. On your first connection, PuTTY will show a security alert about the server’s key. This is expected, so click Yes to trust it.
A terminal window will open and ask for your username, then your password. Type each one, press Enter, and you should land on your server’s command line.
Connecting with SSH Keys Instead of a Password
Passwords work, but keys are safer and faster once set up. A key pair replaces typing a password with a cryptographic proof of identity.
I) Generate a Key Pair on Windows
Open a terminal and run this command:
ssh-keygen -t ed25519Press Enter to accept the default file location. You can also set a passphrase for extra protection, though this step is optional.
Your key pair will save inside a folder called .ssh in your user directory, usually at C:\Users\yourname\.ssh.
II) Copy the Public Key to the VPS
If your Windows setup includes ssh-copy-id, run it with your username and IP address, and it will handle the rest.
If that command is not available, you can paste the key manually instead. Open the public key file, copy its contents, then paste it into the authorized_keys file on your server.
III) Using a Key with PuTTY
PuTTY needs its own key format, so you cannot use the raw key file directly. Open PuTTYgen, load your private key, then save it as a .ppk file.
Back in PuTTY, go to Connection, then SSH, then Auth. Browse to your .ppk file and select it there. Your next login will use the key instead of a password.
IV) Skipping the Password Prompt for Good
Test your key by connecting once more. If login succeeds without a password prompt, your key setup worked correctly.
At that point, you can disable password authentication on the server itself. This step closes off a common target for automated attacks, so it is worth doing once the keys work.
Saving Time on Repeat Connections
Typing the full command or reopening PuTTY’s dialog every time gets old fast. Both methods offer a shortcut.
1) Using an SSH Config File
Create a file named config inside your .ssh folder, with no file extension. Add an entry like this:
Host myvps

    HostName your_vps_ip

    User username
Save the file. From now on, typing ssh myvps will connect you without needing the full command each time.
2) Saved Sessions in PuTTY
If you saved a session earlier, open PuTTY, select that saved name from the list, and click Load. Then click Open to connect right away.
This small step turns a multi-field form into a single click.
Fixing Common Connection Errors on Windows
Even with the right steps, something can still go wrong. Here are the errors you are most likely to run into, and what causes each one.
I) “ssh is not recognized as an internal or external command”
This appears on older Windows versions where the SSH client is not enabled. Go to Settings, then Apps, then Optional Features, and add OpenSSH Client from the list.
II) Connection Timed Out
A timeout usually points to a firewall silently dropping your request. Check both sides: your VPS firewall settings, such as UFW or iptables, and your Windows Defender Firewall outbound rules.
III) Connection Refused
This differs from a timeout. Your request reached the server, but nothing answered on that port. The SSH service may be stopped, or listening on a different port than you expect.
IV) Permission Denied (publickey)
This error means your key was not accepted. Check that you selected the right key file, that its permissions are set correctly, and that the matching public key sits in authorized_keys on the server.
V) Permission Denied (password)
Sometimes this is a simple typo in your password. Other times, the server has password login disabled entirely, and only key-based login will work.
VI) “WARNING: REMOTE HOST IDENTIFICATION HAS CHANGED”
This shows up when the server’s host key no longer matches what your computer remembers. It often follows a server reinstall or an IP address reuse.
Do not ignore this warning without checking first. If you are certain the change is expected, you can remove the old entry from your known_hosts file and reconnect.
VII) Network Is Unreachable
This points to a local network issue rather than a problem with your server. Run a quick ping test to another site to confirm your own connection is working.
VIII) PuTTY “Network Error: Software Caused Connection Abort”
This usually appears after a session sits idle for too long. Go to Connection in PuTTY’s settings and turn on keepalive packets to prevent the drop.
IX) “Too Many Authentication Failures”
This happens when several SSH keys are loaded, and the server rejects too many attempts before reaching the correct one. Add IdentitiesOnly yes to your config file, or specify the key directly with the -i flag.
X) Server Not Actually Ready Yet
Sometimes nothing is broken at all. A newly created VPS can take a few minutes to finish booting, so a failed first attempt is often just early timing.
FAQs
What is the default SSH port for a VPS?
Port 22 is the default across almost every provider. Some setups change it for added security, so check your welcome email if 22 does not work.
Is it safe to log in as root over SSH?
It works, but it carries more risk than using a limited account. Many admins create a separate user with sudo access and disable direct root login afterward.
What’s the actual difference between PuTTY and OpenSSH?
OpenSSH is built into Windows and works from any terminal without installing extra software. PuTTY is a separate program with its own interface, useful if you prefer a graphical tool or need specific PuTTY features.
How do I find my VPS IP address and login details if I lost the welcome email?
Log in to your hosting provider’s dashboard and look for your server’s overview page. Most dashboards list the IP address, username, and a way to reset your password if needed.
You’re In, Here’s What to Do Next
You now have a working connection to your VPS, through either the native Windows client or PuTTY. That part is done.
The next step is locking the server down. Disable password login once your keys are confirmed working, set up a basic firewall, and create a separate user account instead of relying on root for daily tasks.
A freshly connected server is still an open door until you close off the obvious risks. If you want a walkthrough for hardening a new VPS after your first login, check our server security checklist next.