Managing a cluttered Gmail inbox can feel overwhelming, especially when you’re dealing with hundreds or thousands of existing emails.
Fortunately, Gmail’s filter feature allows you to organize your inbox efficiently by applying rules not only to incoming messages but also to emails already sitting in your mailbox.
Whether you want to label, archive, delete, or categorize existing emails, this guide will walk you through the process of applying filters retroactively in Gmail.
What Are Gmail Filters?
Gmail filters are automation rules that help you manage your emails by sorting them based on specific criteria—such as sender, keywords, subject lines, or even attachment status.
While filters are typically applied to new incoming emails, Gmail also offers a way to run these rules on existing messages, saving you from manually sorting through your inbox.
This retroactive application is perfect for decluttering, prioritizing important messages, or organizing emails you’ve accumulated over time.
Why Apply Filters to Existing Emails?
Before we get into the “how,” let’s explore the “why.” Applying filters to existing Gmail emails can:
- Declutter Your Inbox: Move old promotional emails or newsletters to specific folders or trash them entirely.
- Prioritize Important Messages: Automatically label or star emails from key contacts like your boss or clients.
- Save Time: Avoid manually sorting through hundreds of messages by letting Gmail do the work.
- Maintain Consistency: Ensure your inbox organization aligns with rules you’ve set for new emails.
Now, let’s get to the practical steps.
Step-by-Step Guide: Applying a Filter to Existing Mail in Gmail
Here’s how you can create a filter and apply it to emails already in your Gmail account. This process involves creating or editing a filter and then instructing Gmail to retroactively apply it to matching conversations.
Step 1: Access Gmail and Navigate to the Filter Creation Tool
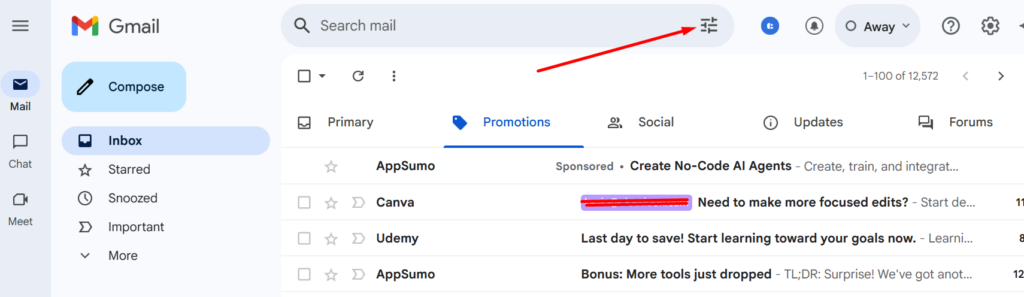
- Open Gmail: Log in to your Gmail account via a web browser (this process works best on desktop).
- Go to the Search Bar: At the top of your inbox, locate the search bar.
- Open Search Options: Click the small downward arrow (or filter icon) on the right side of the search bar to reveal advanced search options.
Step 2: Define Your Filter Criteria

In the search options window, specify the criteria for the emails you want to filter. Gmail offers several fields to refine your search, such as:
- From: Enter an email address (e.g., “boss@company.com”) to filter messages from a specific sender.
- To: Filter emails sent to a particular address (useful if you manage multiple aliases).
- Subject or Keywords: Type words like “invoice” or “newsletter” to target specific topics.
- Has the Words: Include additional keywords present in the email body.
- Doesn’t Have: Exclude emails with certain words.
- Has Attachment: Check this box to filter emails with files attached.
For example, to filter all existing emails from a specific newsletter, you might enter “newsletter@domain.com” in the “From” field. Once you’ve set your criteria, click the blue “Search” button to test it and ensure the right emails appear.
Step 3: Create the Filter
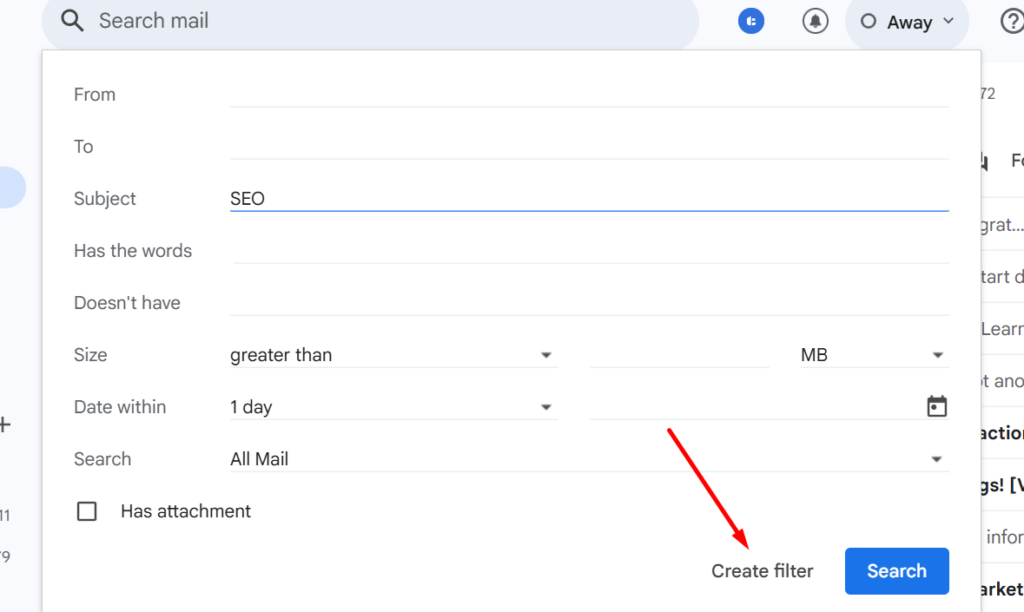
- Click “Create Filter”: After confirming your search results, click “Create Filter” at the bottom right of the search options window.
- Choose Actions: A new window will appear where you can decide what Gmail should do with matching emails. Options include:
- Skip the Inbox (Archive it): Remove emails from your inbox and archive them.
- Mark as Read: Mark emails as read to reduce visual clutter.
- Star It: Highlight important emails with a star.
- Apply the Label: Assign a label (e.g., “Work,” “Personal”)—you can choose an existing label or create a new one.
- Delete It: Send matching emails to the trash.
- Forward It: Send emails to another address (only applies to new emails, not existing ones).
Step 4: Apply the Filter to Existing Emails
Here’s the key step for retroactive application:
- Check the Box: In the same “Create Filter” window, look for the option labeled “Also apply filter to [X] matching conversations” (the number reflects how many emails match your criteria).
- Confirm: Click the blue “Create Filter” button to save the filter and apply it to both existing and future emails.
Gmail will immediately process all existing emails that match your criteria, applying the actions you selected. For instance, if you chose to apply a “Promotions” label and archive, all matching emails will be labeled and removed from your inbox.
Read also: How to Create Hostinger Email Filters
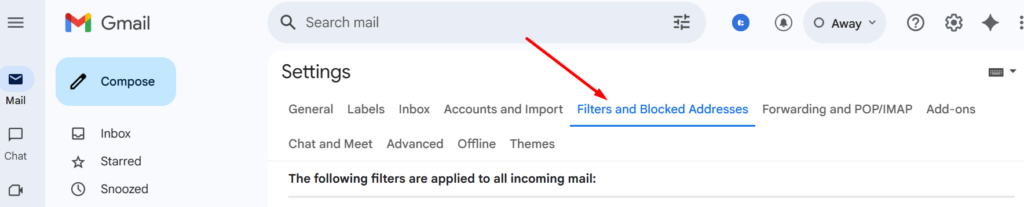
Editing an Existing Filter to Apply to Old Emails
If you’ve already created a filter but forgot to apply it to existing emails, don’t worry—you can edit it to include them. Here’s how:
- Go to Settings: Click the gear icon in the top-right corner of Gmail, then select “See All Settings.”
- Navigate to Filters: Click the “Filters and Blocked Addresses” tab.
- Find Your Filter: Scroll to locate the filter you want to edit, then click “Edit” next to it.
- Refine Criteria (if Needed): Adjust the search terms if necessary, then click “Continue.”
- Apply to Existing Emails: Check the “Also apply filter to [X] matching conversations” box, then click “Update Filter.”
This will retroactively apply the updated filter to all matching emails in your inbox.
Read also: A Complete List of Email Providers That Start with M
Tips for Effective Filter Management
- Test Your Criteria: Before applying a filter to existing emails, use the search function to preview which messages will be affected. This prevents accidental deletions or mislabeling.
- Combine Actions: You can select multiple actions (e.g., label and archive) for a single filter to maximize efficiency.
- Use Labels Wisely: Pair filters with Gmail labels to create a folder-like system for easy navigation.
- Regularly Review Filters: As your email habits change, revisit the “Filters and Blocked Addresses” tab to edit or delete outdated rules.
- Be Cautious with “Delete It”: Double-check your criteria to avoid losing important emails.
Read also: Gmail Filters & Wildcards: Everything You Need to Know (+ Tips)
Common Use Cases for Retroactive Filters
Here are some practical examples of applying Gmail filters to existing emails:
- Organizing Newsletters: Filter all emails from “subscriptions@domain.com,” apply a “Newsletters” label, and archive them.
- Cleaning Up Spam: Target emails with words like “unsubscribe” or “offer,” then delete or archive them.
- Work Emails: Label and star emails from your team or boss for quick access.
- Old Attachments: Filter emails with attachments older than a year (use “before:2024/04/10” in the search bar) and move them to a “Documents” label.
Limitations to Keep in Mind
- One Filter at a Time: Gmail doesn’t offer a built-in way to apply all existing filters to your entire inbox simultaneously. You must edit and apply each filter individually.
- Forwarding Limitation: The “Forward It” action only works for new emails, not existing ones.
- No Undo Button: Once a filter is applied (e.g., deleting emails), you’ll need to recover them from the Trash manually if needed, so proceed carefully.
Read also: 15+ Advanced Gmail Filters to Crush Your Inbox Chaos
Conclusion
Applying filters to existing emails in Gmail is a powerful way to regain control of your inbox, whether you’re tackling years of clutter or simply refining your organization system.
Defining criteria, creating a filter, and checking the retroactive application box—you can streamline your email management in minutes.
Yes, Gmail’s filter functionality remains a robust tool for both new and seasoned users, so take advantage of it to keep your inbox working for you, not against you.
Ready to start? Open Gmail now and experiment with your first retroactive filter—your inbox will thank you!
Read also:
- Latest Mail.com Settings for Outlook (100% Working)
- #7 Best Small Business Mailing Systems
- How to Show More Than 50 Emails in Gmail