This will be a writeup on steps to take to install SSL from 3rd party authories such as Comodo SSL, DigiCert (Image credit: DigiCert), Entrust Datacard, GeoTrust,RapidSSL.
Prerequisites
- ssh access
- ssl from 3rd party
- OpenSSL installed on the vps
- A way to view the key, text editor of choice
Certificate configuration
1: SSH into the VPS, replace the IP with your VPS IP and check you have openssl instlled(Comes preinstalled in centos)
ssh [email protected]
openssl version
2: Generate private key and CSR, you will store them to a location that you can remember.Don’t forget to replace your_domain with your actual domain name.
openssl req -new -newkey rsa:2048 -nodes -keyout your_domain.key -out your_domain.csrBreakdown
- openssl which activates the OpenSSL software
- req is used to indicate that we want a CSR
- -new –newkey that generates a new key
- rsa:2048 generates a 2048-bit RSA mathematical key
- –nodes – no DES, meaning do not encrypt the private key in a PKCS#12 file
- –keyout which is used indicate the domain you’re generating a key for
- –out for specifiying the name of the file your CSR will be saved as
3: Enter details as prompted, below is an example of the fields
Country Name (2 letter code) [XX]:US(KE)
State or Province Name (full name) []:Example(Nairobi)
Locality Name (eg, city) [Default City]:Example (Nairobi)
Organization Name (eg, company) [Default Company Ltd]:Example Inc(Truehost)
Organizational Unit Name (eg, section) []:Example Dept(ICT)
Common Name (eg, your name or your server's hostname) []:your_domain_or_ip(example.com)
Email Address []:[email protected]([email protected])
There are optional fields , you can press enter to leave them blank
A challange password []:
An optional company name []:
4: Request for SSL
We will submit the csr as part of the ssl request. You can locate the csr and copy its content for use
ls *.csr
sudo vim your_domain.csr
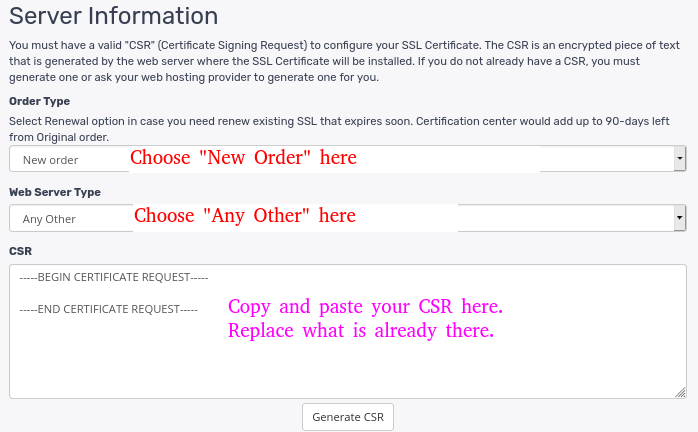
We will copy the content of the file and use it in the form to request for the ssl from CA, depending on where you have purchsed the SSL. If you have purchase ssl from Truehost please follow the steps below.
Optional steps for configuring SSL from Truehost Client area
- Login to your client area/account.
- Click “Services” on the top menu and choose “My Services” on the drop-down menu.
- Click on the SSL product that you wish to install on your domain.
- Click “Configure now”

- On the next page, fill in the request details as indicated below.

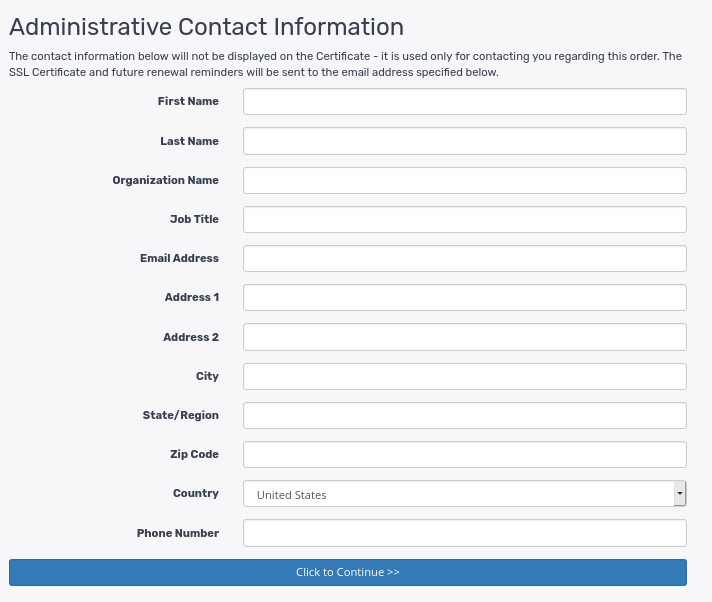
- Fill in contact details, and click to continue.

P.S: If you find that the information is auto-filled by default, ensure you fill in the job type section e.g admin or administrator.
- We will be using HTTP as our validation option.Change the DVC method th HTTP then click continue. In the next page click go back to client area we will need to get the content of the txt file to upload. You will create the appropriate directories as folllows in the document root.Document root is the folder where your website files reside. For this documentation, we shall assume our document root is /var/www/html
mkdir -p /var/www/html/.well-known/pki-validationThis will create the folders called .well-known and pki-validation. Inside the pki-validation we will create the file name give on the certificate, eg 743CF24C78852EB59234FEA12A9F.txt
cd /var/www/html/.well-known/pki-validation
sudo vim 743CF24C78852EB59234FEA12A9F.txt
inside it we add the content given, for instance
26927639FB8AA0533BE97E79890ACB240A397638B32E671D44ED0BF77A
sectigo.com
t0770366001665499704
Note the .txt name and the content will differ from the above.
In the end we should be able to see the constent of the file when we vist the url http://your_domain.com/.well-known/pki-validation/743CF24C78852EB59234FEA12A9F.txt on browser. If all is good,click on the revalidate to send SSL request to the CA.
We can now install the SSl once the CA certifies your request
Certificate Installation
With the SSL verified, we now have the needed content to install the ssl. We will create files to copy our Certificate(CRT) and Intermediate/Chain files.
Navigate to the directory where you are saving your Certificates, will use /etc/ssl/certs
sudo vim /etc/ssl/certs/certificate.crtWe will copy the content of our certificate(CRT) to the file and save.
Now we create a file to save content of our Installation/Chain files.
sudo vim /etc/ssl/certs/intermediate.crtYou can prefix the .crt names with your domain name for easy identification.
With the contents save we can proced and enable ssl on our virtual host config
<VirtualHost *:80>
   ServerName yourdomain.com
   ServerAlias www.yourdomain.com
   Redirect / https://yourdomain.com
</VirtualHost>

<VirtualHost _default_:443>
   ServerName yourdomain.com
   ServerAlias www.yourdomain.com
   DocumentRoot /usr/local/apache2/htdocs
   DirectoryIndex index.html
   SSLEngine On
   SSLCertificateFile /etc/ssl/certs/certificate.crt
   SSLCertificateKeyFile /etc/ssl/certs/your_domain.key
   SSLCertificateChainFile /etc/ssl/certs/intermediate.crt
# etc...
</VirtualHost>- SSLEngine on
- SSLCertificateFile – The path of your certificate file.
- SSLCertificateKeyFile – The path of your key file.
- SSLCertificateChainFile– The intermediate certificate file.
Test appache config before restart then if everthing is okay proceed and restart.
httpd -t
systemctl restart httpd
Now you can test your SSL connection.


Leave A Comment?