Domain RegistrationFind and register the perfect domain for your website.
 .COM DomainChoose a widely recognized domain to build global credibility.
 Domain TransferSeamless domain transfers with zero downtime and complete control.
 All TLDsFind and register your perfect domain. Choose from local and global extensions.
 SSL CertificatesKeep your website safe with reliable SSL Certificates that protect customer data and build trust.
 whoisCheck domain ownership details, expiration dates, and registrar information.
 US DomainRegister a .US domain and build trust in the USA.
 Web HostingEverything your website needs to run smoothly
 WordPress HostingWordPress hosting that just works
 Windows HostingReliable hosting for Windows environments
 Reseller HostingTurn hosting into your business
 Email HostingEmail that looks professional and works anywhere
 cPanel HostingFull control of your hosting with cPanel
 Affiliate ProgramJoin as a partner and earn commissions on every referral you send our way.
 Vps HostingScalable virtual servers that expand as you need.
 Dedicated ServersGet complete access and full control over your dedicated physical server.
 Managed vpsNot tech-savvy? We will take care of everything with our fully managed VPS hosting for you.
 AI Website BuilderCreate stunning websites in seconds with AI.
 Online ShopSet up a professional online store. No coding required.
 Web design serviceGet a tailored website designed to match your brand and support your goals.
 BlogFind helpful guides on web hosting, online selling, digital marketing, and more.
 Contact USYou can reach us anytime, day or night, through chat or email.
 SupportBrowse helpful guides and answers for all of our services.
Your smart home can already turn on lights and adjust your thermostat. But it can’t troubleshoot a failing sensor.
It can’t explain why your automation stopped working. It can’t reason through a problem and act on it.
That’s the gap an Openclaw Home Assistant setup closes.
Running OpenClaw inside Home Assistant gives you an AI layer that reasons, troubleshoots, and takes action.
It’s not another chatbot bolted onto your dashboard. It’s an agent that understands your devices and does something useful with that knowledge.
There are three ways to set this up:
- An add-on route, built directly into Home Assistant OS.
- A standalone + HACS integration route, for more flexibility.
- A standalone Docker + MCP route, for better isolation and security.
This guide covers all three. You’ll learn how to set each one up, how to activate OpenClaw as your conversation agent, the security basics you need, what it costs to run, and answers to common questions.
Ways to Use OpenClaw With Home Assistant
Before you install anything, decide which route fits your setup. Each one trades off simplicity against flexibility and isolation.
Option A: Add-on route
Install OpenClaw directly inside Home Assistant OS, through the add-on (now called ‘app’) store. Everything runs in one place. No external server needed.
This is best for most users. It’s self-contained and quick to set up.
Option B: Standalone + integration route
Run OpenClaw anywhere: a VPS, a Docker container, or your local network. Connect it to Home Assistant through a HACS custom integration with auto-discovery.
This suits you if you’re already hosting OpenClaw elsewhere. It’s also the better pick if you want more flexibility or plan to scale.
Option C: Standalone Docker + MCP route
Run OpenClaw in Docker on a separate host. Connect it through MCP (Model Context Protocol) instead of the HACS integration.
This route keeps OpenClaw fully decoupled from Home Assistant. Security-conscious users tend to prefer it, since the agent sits outside your Home Assistant trust boundary entirely.
One-line steer: if you want the fastest setup, pick Option A. If you already run OpenClaw elsewhere, pick Option B. If isolation is your top priority, pick Option C.
Installing OpenClaw as a Home Assistant Add-on
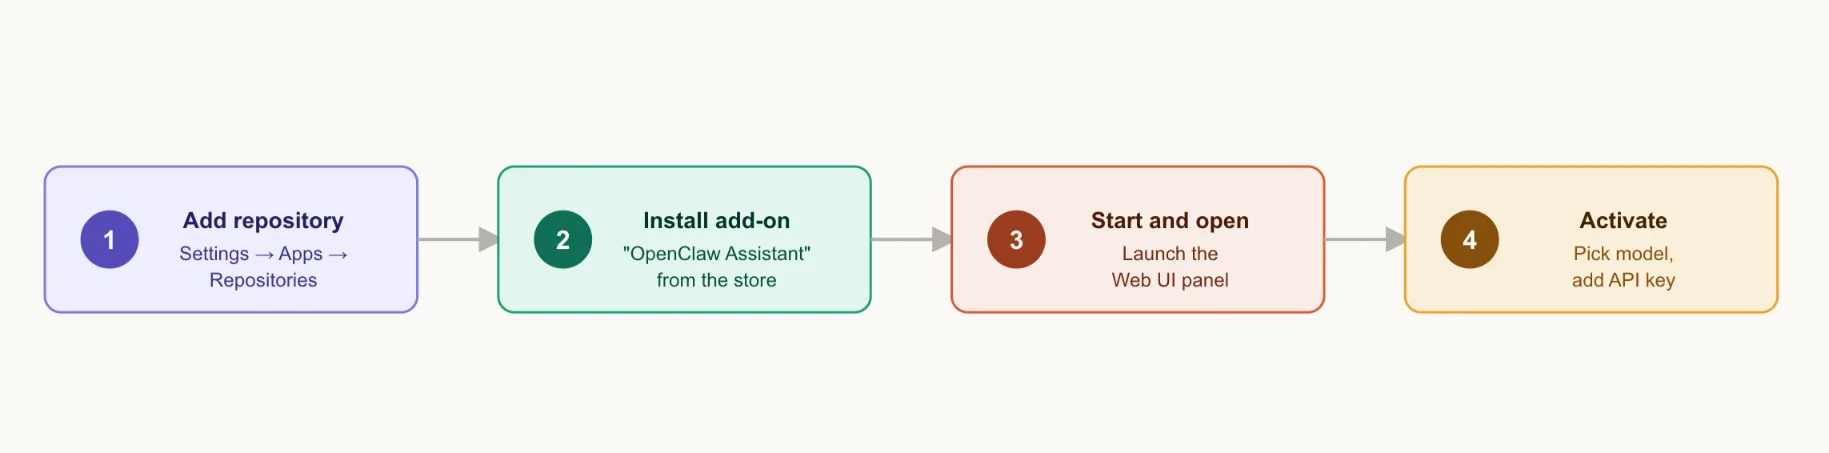
This is the simplest path. Everything lives inside your existing Home Assistant OS install.
- Add the OpenClaw repository under Settings → Add-ons (Apps) → Repositories.
- Install ‘OpenClaw Assistant’ from the store.
- Start the add-on and open its Web UI/panel.
- Select an AI model and add an API key in Settings. This activates the assistant.
- Confirm architecture compatibility (amd64, aarch64/Raspberry Pi 4-5, armv7/Raspberry Pi 3).
A quick note on cost before you pick a model. Local models via Ollama keep monthly costs near zero. Hosted models add ongoing token spend. Decide upfront which fits your budget.
A Raspberry Pi 4 with 4 GB RAM can run Home Assistant OS and OpenClaw at the same time, with room to spare.
If you’re managing 50+ devices, or want to run local LLM inference alongside OpenClaw, step up to a Pi 5 with 8 GB RAM.
Terminology note: Home Assistant renamed ‘Add-ons’ to ‘Apps’ in the 2026.2 release. The change is meant to reduce confusion for newcomers who used to struggle telling add-ons and integrations apart. Nothing about how they function changed. Only the label did. Use ‘Apps’ if you’re on a current version, and ‘Add-ons’ if you haven’t updated yet.
Connecting OpenClaw via HACS Integration
If you’re running OpenClaw somewhere other than your Home Assistant box, this is your route.
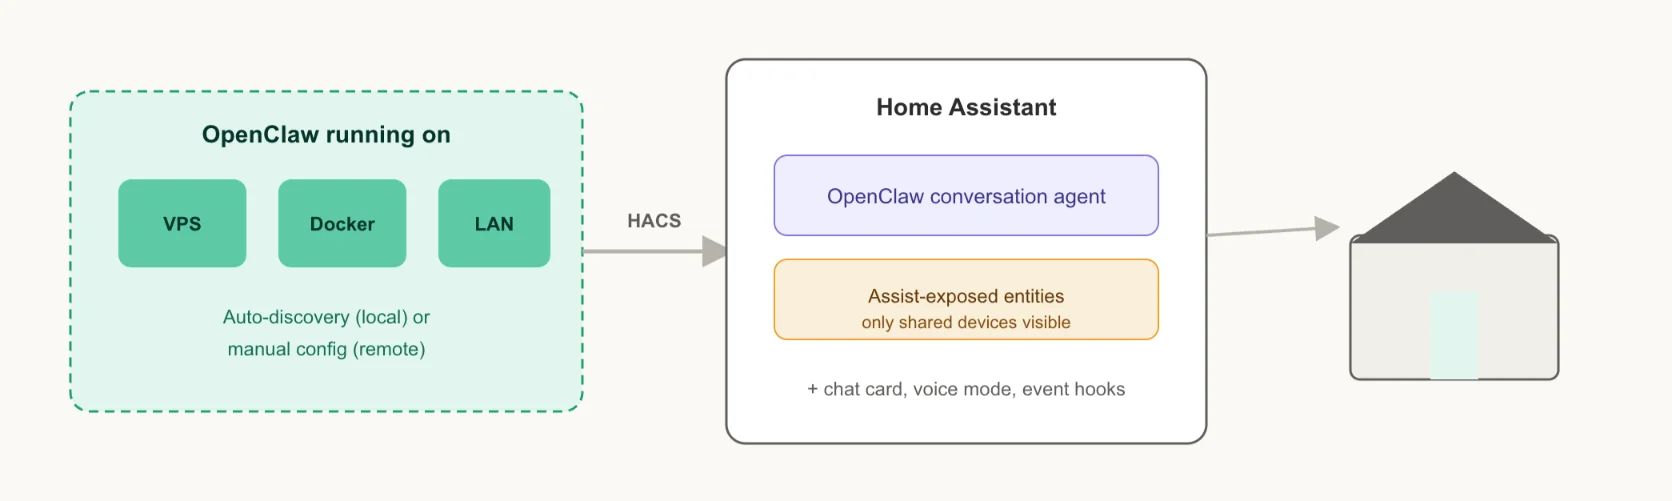
- Add a custom repository in HACS → Integrations.
- Install the OpenClaw conversation/chat integration.
- Restart Home Assistant.
- Add the integration under Settings → Devices & Services. Use auto-discovery for a local gateway, or manual configuration for remote, VPS, or Docker setups.
- Configure Assist-exposed entities, so OpenClaw only accesses the devices you’ve explicitly shared.
This route doesn’t require an add-on at all.
If you have OpenClaw running anywhere else a separate server, a VPS, a Docker container, or another machine on your LAN this integration connects to it through the manual configuration flow.
Once connected, a few extras are worth turning on:
- A Lovelace chat card, so you can message OpenClaw straight from your dashboard.
- Voice mode, for hands-free interaction.
- Event hooks, so automations can react to OpenClaw’s responses.
Running OpenClaw Standalone via Docker + MCP
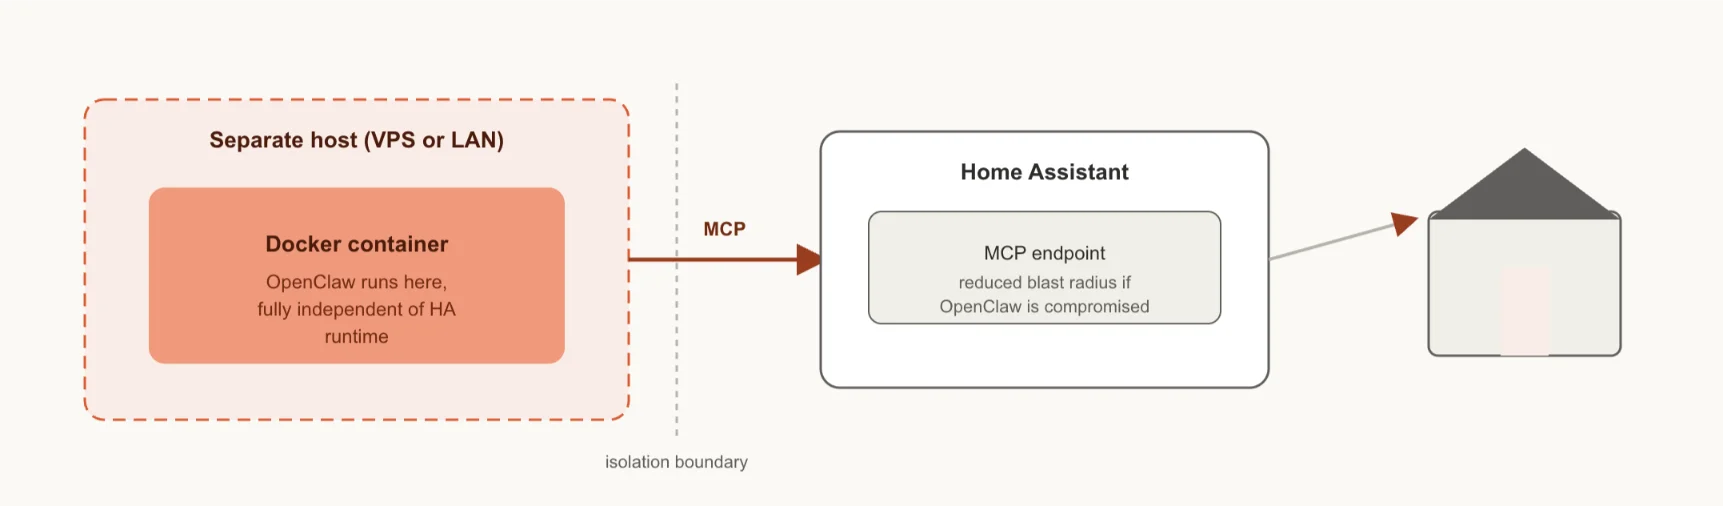
This route keeps OpenClaw fully outside your Home Assistant instance. It takes more setup, but it gives you the strongest isolation of the three.
- Deploy OpenClaw in Docker on a separate host, a VPS, or a LAN machine, not the Home Assistant box itself.
- Set up the MCP server/connection instead of the HACS integration.
- Connect Home Assistant to the MCP endpoint.
- Confirm isolation. OpenClaw should operate independently of Home Assistant’s runtime, which reduces blast radius if something is compromised.
Here’s how the connection works under the hood. Home Assistant exposes its devices through a built-in MCP server.
OpenClaw runs as an autonomous agent, using a skill that lets it speak Home Assistant’s MCP dialect.
Why pick this over Option B? The HACS integration and the add-on both put OpenClaw inside your Home Assistant trust boundary.
Running it in Docker on a separate host takes more setup, but gives you better blast-radius isolation when something goes wrong.
Choose this route when isolation is your priority, when you want to scale OpenClaw separately from Home Assistant, or when you’re building a security-first setup from the start.
Setting Up OpenClaw as Your Conversation Agent (Assist)
Once OpenClaw is installed through any of the three routes, activate it as your conversation agent.
Go to Settings → Voice Assistants → Assist pipeline. Select OpenClaw as the conversation agent for that pipeline.
This unlocks something meaningful. Voice and text commands now route through OpenClaw’s reasoning, instead of Home Assistant’s default agent.
Here’s what that looks like in practice:
- Ask it to summarize what your automations did today.
- Ask it to troubleshoot a sensor that’s throwing errors.
- Ask it to explain why a device went offline.
This isn’t a Google Assistant or Alexa replacement. Latency runs slower, and failure modes are weirder.
Give OpenClaw tasks, not chit-chat. It’s built to reason through problems, not to make small talk.
Basic Security Best Practices
An OpenClaw home assistant setup gives an AI agent real authority over your home. Treat that authority carefully.
- Bind the gateway to localhost or your internal network only. Don’t expose it to the open internet.
- Use a strong, random authentication token.
- Store API keys securely, never in plain text config files you might share or commit.
- Review exposed entities regularly. Apply least privilege on the Assist pipeline, only share what OpenClaw needs.
- Name your access token something identifiable, like
openclaw-bridge. That way, if you ever need to revoke it, you know what stops working.
One risk deserves special attention: prompt injection. Sensors, calendar entries, and other inputs can carry hidden instructions that OpenClaw might act on without you noticing.
That token carries the same authority over your house that you have. Treat all inbound data as untrusted, and limit what OpenClaw is allowed to act on.
If in doubt, isolate first and expand access later. It’s easier to widen permissions than to undo damage from an over-permissioned agent.
Cost and Hosting
Your monthly cost depends on three variables: the model you run, where OpenClaw lives, and how much you scale.
Model cost
- Local models (via Ollama): near-zero ongoing cost, since inference happens on your own hardware.
- Hosted models: ongoing token spend, which scales with how much you use OpenClaw.
Where to host, if not on the HA box itself
If you’re running Option B or Option C, you need a separate host. Look for:
- Reliable uptime; your assistant is only useful if it’s online.
- Enough CPU and RAM for the model and workload you’re running.
- Proper isolation from your home network, especially for Docker + MCP setups.
A VPS solves all three, without you having to manage a physical machine at home.
We at Truehost built OpenClaw hosting specifically for this. Our plans come pre-configured for OpenClaw, with one-click deployment and no setup fee:
- OpenClaw Starter: $13/month. 1 vCPU, 2 GB RAM, 50 GB NVMe storage, 4 TB bandwidth. Good for lighter setups running a single model.
- OpenClaw Pro: $19/month. 2 vCPU, 4 GB RAM, 100 GB NVMe storage, 6 TB bandwidth. A solid fit for heavier workloads or the Docker + MCP route.
- OpenClaw Business: $24.77/month. 4 vCPU, 8 GB RAM, 200 GB NVMe storage, 8 TB bandwidth. Built for multi-agent setups or larger households running several automations at once.
If you’re going the standalone route, Option B or Option C, you don’t need to manage server setup yourself. Open a Truehost OpenClaw VPS and get a ready-to-go instance in minutes.
Deploy OpenClaw in milliseconds
Three setup paths. One outcome: an AI assistant that reasons and acts inside Home Assistant, instead of just responding to fixed commands.
- Pick the add-on route for the fastest start.
- Pick the HACS integration route if you’re already hosting OpenClaw elsewhere.
- Pick the Docker + MCP route if isolation is most to you.
Whichever route you choose, hosting is the one part you don’t have to figure out alone. Deploy OpenClaw in milliseconds with Truehost, pre-configured, one-click, and ready the moment you need it.
Openclaw as Your Home Assistant FAQs
Do I need to install an add-on and a HACS integration, or just one?
Just one. Pick based on where OpenClaw runs. Use the add-on if it lives inside Home Assistant OS. Use the HACS integration if it runs elsewhere, on a VPS, in Docker, or on your LAN.
Can I use OpenClaw without exposing all my smart home devices to it?
Yes. Configure Assist-exposed entities so OpenClaw only sees the devices you choose. This is a core part of the security setup, not an optional extra.
Does OpenClaw replace Home Assistant’s built-in Assist voice assistant?
Not exactly. OpenClaw becomes your conversation agent within the Assist pipeline. It reasons and acts through Home Assistant’s existing voice and text interface, rather than replacing the whole system.
What hardware do I need to run OpenClaw?
A Raspberry Pi 4 with 4 GB RAM handles Home Assistant OS and OpenClaw together comfortably. Step up to a Pi 5 with 8 GB RAM for 50+ devices or local LLM inference. If you’re hosting standalone, a small VPS covers most setups.
Is OpenClaw free to use?
The software itself is open-source and free. Your ongoing cost comes from either API tokens for a hosted model, or server hosting if you run it standalone. Local models keep that cost close to zero.
Where should I host OpenClaw if not running it directly on my Home Assistant box?
A VPS is the simplest answer. It gives you uptime, dedicated resources, and isolation from your home network. We at Truehost offer pre-configured OpenClaw VPS plans starting at $13/month, with one-click deployment and no setup fee, check out OpenClaw hosting here.