Domain RegistrationFind and register the perfect domain for your website.
 .COM DomainChoose a widely recognized domain to build global credibility.
 Domain TransferSeamless domain transfers with zero downtime and complete control.
 All TLDsFind and register your perfect domain. Choose from local and global extensions.
 SSL CertificatesKeep your website safe with reliable SSL Certificates that protect customer data and build trust.
 whoisCheck domain ownership details, expiration dates, and registrar information.
 US DomainRegister a .US domain and build trust in the USA.
 Web HostingEverything your website needs to run smoothly
 WordPress HostingWordPress hosting that just works
 Windows HostingReliable hosting for Windows environments
 Reseller HostingTurn hosting into your business
 Email HostingEmail that looks professional and works anywhere
 cPanel HostingFull control of your hosting with cPanel
 Affiliate ProgramJoin as a partner and earn commissions on every referral you send our way.
 Vps HostingScalable virtual servers that expand as you need.
 Dedicated ServersGet complete access and full control over your dedicated physical server.
 Managed vpsNot tech-savvy? We will take care of everything with our fully managed VPS hosting for you.
 AI Website BuilderCreate stunning websites in seconds with AI.
 Online ShopSet up a professional online store. No coding required.
 Web design serviceGet a tailored website designed to match your brand and support your goals.
 BlogFind helpful guides on web hosting, online selling, digital marketing, and more.
 Contact USYou can reach us anytime, day or night, through chat or email.
 SupportBrowse helpful guides and answers for all of our services.
A few small things trip up almost everyone installing Openclaw on Debian for the first time.
Installing as root blocks systemd from setting up properly later. A leftover process holds onto port 18789. Node is one version too old, and the CLI just misbehaves without a clear error.
None of these are hard to fix. They’re just easy to miss.
We picked Debian for this guide because it’s a common VPS choice, and its systemd setup is stable and predictable across versions.
You’ll go from a fresh Debian server to a running OpenClaw agent with a systemd daemon and remote access. Budget 15–20 minutes. Add 10 more if you need to install Node from scratch.
Prerequisites
Supported Debian Versions
OpenClaw runs on:
- Debian 12 (Bookworm)
- Debian 13 (Trixie)
If you’re on an older release, you’ll need to set up systemd manually. The steps below assume Bookworm or Trixie.
Minimum System Requirements
- CPU: 1 core (2+ recommended for smoother agent runs)
- RAM: 512 MB baseline, 2–4 GB recommended
- Disk: 200 MB for the app, plus 1–5 GB for workspace and session data
- Network: A stable internet connection
Other Requirements
- Node.js 24 (recommended). Current stable OpenClaw documentation accepts Node 22.22.3+, 24.15+, or 25.9+, but 24 is the safest default.
- An API key from your LLM provider (OpenAI, Anthropic, a free-tier option like Qwen, or others)
- A non-root user account
- Sudo access on that account
Step 1: Updating Your Debian System
Start with a clean update.
sudo apt update
sudo apt upgrade -y
Then install build-essential. Some OpenClaw dependencies compile native modules, including SQLite bindings, and this package gives you the compiler tools they need.
sudo apt install -y build-essential
Check what’s still pending before you move on:
apt list --upgradable
A short list here is fine. Just make sure nothing critical is left hanging.
Step 2: Creating a Dedicated Non-Root User
Don’t install OpenClaw as root.
Root ownership breaks systemd service creation later, and it complicates the onboarding wizard. It’s one of the most common reasons a first install goes sideways.
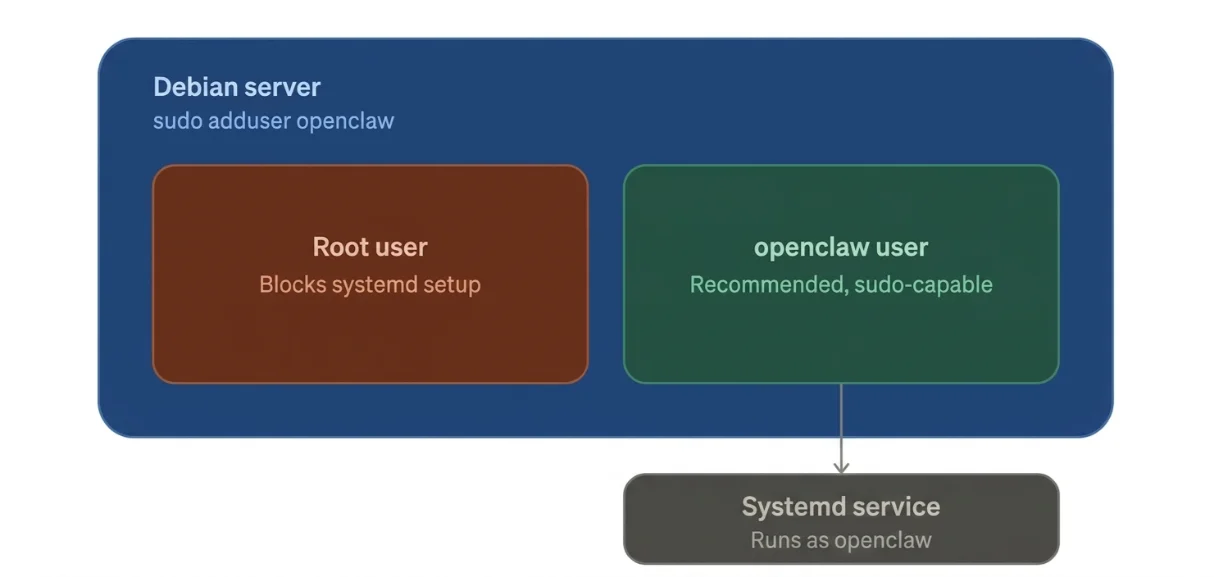
Create a dedicated user instead:
sudo adduser openclaw
Follow the prompts, then switch to that user:
su - openclaw
Everything from here runs as openclaw, not root.
One tip: keep a second terminal open, logged in as your original sudo-capable user. You’ll want it for firewall and systemd steps later without switching back and forth.
Step 3: Installing Node.js 22.19+
Use the NodeSource repository. It’s the most reliable way to get a current, supported Node build on Debian.
curl -fsSL https://deb.nodesource.com/setup_24.x | sudo -E bash -
sudo apt install -y nodejs
This pulls in the signing key and repo config automatically, then installs Node and npm together.
Verify both:
node --version
npm --version
You should see something like v24.15.0 for Node and 11.x for npm.
If the version is too old, remove it and reinstall cleanly:
sudo apt remove -y nodejs
Then repeat the NodeSource steps above with the correct major version.
Alternative: nvm. It’s handy for switching Node versions per project. The catch is that nvm installs to your home directory, and a systemd service run by another mechanism won’t see it on its
PATHunless you pointExecStartat the exact nvm-managed binary path.
Step 4: Installing OpenClaw
You have two paths.
Option A: One-line installer
curl -fsSL https://openclaw.ai/install.sh | bash
You’ll see the installer download, verify, and place the openclaw binary. After it finishes, reload your shell (or open a new terminal) so your PATH picks up the new command.
Option B: Manual npm install
npm install -g openclaw
This installs into your global npm directory. Prefer this option if you’re already managing Node versions carefully with nvm and want OpenClaw tied to that specific version.
Verify the install:
openclaw --version
openclaw --help
which openclaw
Common errors and fixes:
command not found: your shell hasn’t picked up the newPATH. Open a fresh terminal or runsource ~/.bashrc.EACCESpermission error: your npm global directory isn’t owned by your user. Reinstall as theopenclawuser from Step 2, not as root.- Node version error: your Node build is below the minimum. Revisit Step 3.
Step 5: Running the Onboarding Wizard
This is where OpenClaw becomes a running service, not just a CLI.
openclaw onboard --install-daemon
The wizard walks you through:
- Choosing your LLM provider
- Entering your API key
- Confirming the gateway port (18789 by default)
When it finishes, it creates your config file and a systemd unit, so OpenClaw survives reboots without extra work from you.
Step 6: Connecting Your LLM
Your API key gets stored locally and referenced by your config, not hardcoded into your commands.
OpenClaw supports several providers out of the box, including OpenAI and Anthropic, plus community and free-tier options depending on your region.
If you want to switch providers later, you don’t need to redeploy anything:
openclaw config set <provider-setting> <value>
This pattern lets you swap models as pricing or performance changes, without touching your systemd setup at all.
Step 7: Initial Configuration
Your config file lives at ~/.openclaw/openclaw.json, in JSON5 format, so comments and trailing commas are fine.
Key settings to know:
gateway.port: defaults to 18789gateway.bind: controls exposure:loopback(localhost only, the safe default),lan, ortailnetchannels: where you configure Telegram, Discord, WhatsApp, and similar integrations
Confirm everything is running:
systemctl status openclaw
openclaw gateway status
Both should report the service as active.
Connecting Your Domain and SSL
By default, the gateway binds to 127.0.0.1 only. That’s deliberate: it keeps OpenClaw off the public internet until you decide otherwise.
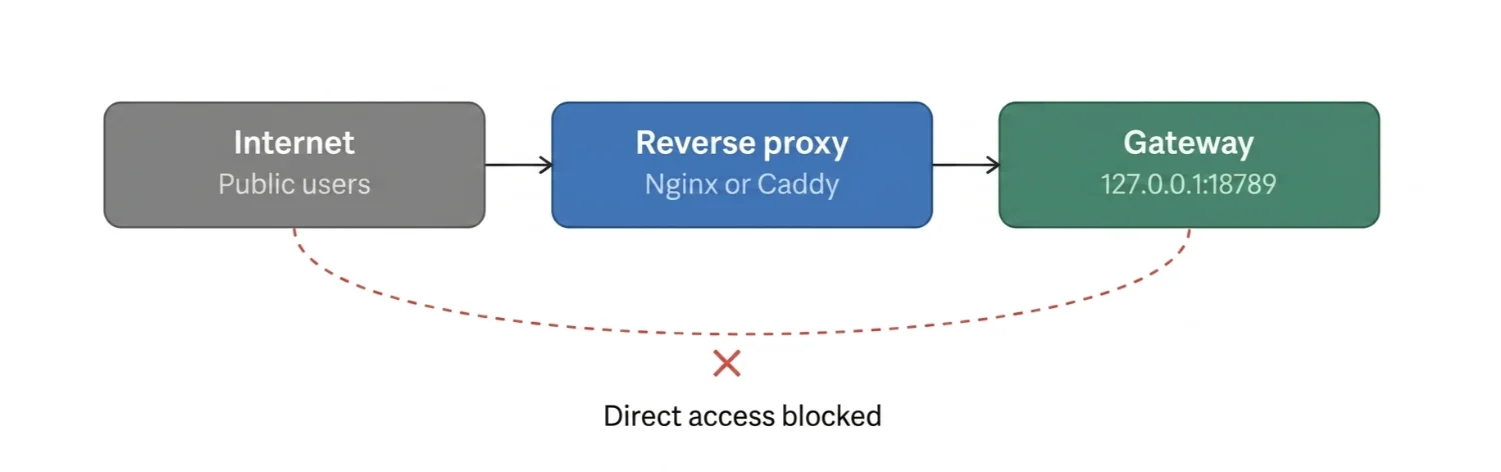
To reach it through a domain, you need a reverse proxy in front of it.
With Nginx, a minimal server block might look like this:
server {
    listen 80;
    server_name yourdomain.com;

    location / {
        proxy_pass http://127.0.0.1:18789;
        proxy_set_header Host $host;
        proxy_set_header Upgrade $http_upgrade;
        proxy_set_header Connection "upgrade";
    }
}
With Caddy, TLS is close to automatic:
yourdomain.com {
    reverse_proxy 127.0.0.1:18789
}
For SSL with Nginx, Certbot handles issuance and renewal:
sudo apt install -y certbot python3-certbot-nginx
sudo certbot --nginx -d yourdomain.com
Certbot sets up auto-renewal by default, so you shouldn’t need to touch it again.
None of this works without a server that stays up and a domain pointed at it. That’s the hosting layer. A Truehost VPS gives you that foundation, with root access and predictable resources for this kind of setup.
Step 8: Advanced Configuration (Optional)
Skills. ClawHub (clawhub.ai) is OpenClaw’s plugin and skills registry, with well over 10,000 published skills. Install one with:
openclaw skills install <skill-name>
OpenClaw picks up new skills automatically on the next agent turn.
Firewall hardening. Use UFW to limit what’s reachable:
sudo ufw allow OpenSSH
sudo ufw allow 80/tcp
sudo ufw allow 443/tcp
sudo ufw enable
Don’t open port 18789 directly. Only allow the ports your reverse proxy needs.
A quick security note. Earlier in 2026, security researchers found tens of thousands of OpenClaw gateways exposed on the public internet with no authentication configured, mostly from
lanor public binding without an auth layer in front. Current versions require authentication for any non-loopback bind, and the wizard sets a gateway token by default. Keep it that way, and don’t expose the gateway directly.
Logging. Set your log level in the config, and follow logs live:
openclaw logs --follow
Performance tuning. For long-running agents, look at context pruning and session or memory limits in your config. Both keep resource use predictable as conversations grow.
Managing the OpenClaw Service
Once it’s running as a systemd service, day-to-day management is simple:
systemctl start openclaw
systemctl stop openclaw
systemctl restart openclaw
systemctl status openclaw
View logs:
journalctl -u openclaw -f
Update to the latest version:
openclaw update
Auto-start on reboot is already handled: the onboarding wizard enabled it when it installed the daemon in Step 5. You can confirm with:
systemctl is-enabled openclaw
Troubleshooting
1) Port 18789 Already in Use
Symptom: You see an EADDRINUSE error on start.
Cause: A leftover process from an unclean shutdown, or another service already using the port.
Diagnosis:
sudo lsof -i :18789
or
sudo ss -tulpn | grep 18789
Fix: Kill the conflicting process, or move OpenClaw to a different port:
openclaw config set gateway.port 28789
If you change the port, update your firewall rules and reverse proxy config to match.
2) Node.js Version Too Low
Symptom: Onboarding fails, or the CLI behaves unpredictably.
Cause: Your system Node build is below the minimum supported version.
Diagnosis:
node --version
Fix: Remove and reinstall via NodeSource (see Step 3).
Edge case: If you’re using nvm, check that the default version is set for new shells:
nvm alias default 24
3) Permission Errors
Symptom: EACCES errors, or “permission denied” writing to config or workspace.
Cause 1: OpenClaw was installed as root but is now running as a regular user an ownership mismatch.
Cause 2: Your npm global directory isn’t owned by your current user.
Fix: Correct ownership, or reinstall as the dedicated openclaw user from Step 2:
sudo chown -R openclaw:openclaw ~/.openclaw
4) Service Won’t Start
Symptom: systemctl status shows failed or inactive.
Diagnosis:
journalctl -u openclaw -e
Common causes: A wrong ExecStart path, missing environment variables, or invalid JSON in your config.
Fix: Validate your config, correct the unit file, then reload and restart:
openclaw config validate
sudo systemctl daemon-reload
sudo systemctl restart openclaw
5) Can’t Access Dashboard Remotely
Symptom: Works fine on localhost, times out from another machine.
Cause: The default loopback binding restricts access to 127.0.0.1 only.
Fix options:
- SSH tunnel: quick and fine for occasional access:
ssh -N -L 18789:127.0.0.1:18789 openclaw@your-server-ip - Tailscale or another VPN: persistent, secure access without exposing anything publicly
- Reverse proxy with auth: for public access; see the SSL section above
Caveat: Don’t switch to lan or 0.0.0.0 binding without authentication in front. That’s the misconfiguration behind most of the exposure incidents mentioned earlier.
6) Firewall Blocking Connections
Symptom: Connection refused or timeout, even though the service is running fine.
Diagnosis:
sudo ufw status
Fix: Allow the specific port you need through UFW. Only open 80 and 443 if you’re proxying — never expose 18789 directly to the internet.
The most common mistake here is opening the gateway port straight to the internet instead of routing through a proxy. Avoid it.
7) Config Changes Not Applied After Edit
Symptom: Edits to openclaw.json don’t seem to take effect.
Cause 1: Some settings need a manual restart to reload.
Cause 2: You edited a stray config file outside ~/.openclaw/.
Cause 3: Invalid JSON5 syntax was silently ignored.
Fix: Validate, then check the live resolved value against the file:
openclaw config validate
openclaw config get gateway.port
sudo systemctl restart openclaw
OpenClaw on Debian FAQs
Is OpenClaw the same as Clawdbot?
Yes. OpenClaw was originally released as Clawdbot, and briefly known as Moltbot, before settling on its current name. Community docs and some tooling still reference the older names.
Is it safe to self-host OpenClaw?
It can be, if you follow the basics: keep the gateway on loopback or behind an authenticated reverse proxy, update regularly, and don’t expose port 18789 directly. Most of the well-documented exposure incidents in 2026 came from skipping these steps, not from the platform itself.
What port does OpenClaw use by default?
Port 18789.
Can I run OpenClaw on a Raspberry Pi?
Yes. A Raspberry Pi 4 or 5 with 4 GB of RAM or more runs OpenClaw comfortably for lighter workloads.
Can I run OpenClaw without root access?
Yes, and it’s the recommended setup. Install and run OpenClaw as a dedicated non-root user, as covered in Step 2.
How do I update OpenClaw to the latest version?
Run openclaw update, then confirm with openclaw --version.
How do I install OpenClaw in terminal?
Use the one-line installer, curl -fsSL https://openclaw.ai/install.sh | bash, or install manually with npm install -g openclaw. Both are covered in Step 4.
How do I reinstall OpenClaw?
Uninstall the existing package (npm uninstall -g openclaw if you used the manual method), then repeat Step 4. Your config in ~/.openclaw/ stays intact unless you delete it separately.
Get OpenClaw Hosting With Truehost
Running OpenClaw well isn’t just about the install. It’s about the server underneath it staying up, at a spec that matches what your agent does day to day.
That means enough RAM for your session and workspace data, NVMe storage that keeps response times snappy, and bandwidth that won’t throttle you mid-conversation.
We built our OpenClaw Hosting plans around that. Every tier ships pre-configured for OpenClaw, with one-click updates and automated installation, so you skip most of the steps in the guide entirely if you’d rather not run them yourself.
If you’re setting up Openclaw on Debian for a real 24/7 deployment, not just a test run, a properly sized VPS is worth the few dollars a month it costs to stop worrying about uptime.