Domain RegistrationFind and register the perfect domain for your website.
 .COM DomainChoose a widely recognized domain to build global credibility.
 All TLDsFind and register your perfect domain. Choose from local and global extensions.
 whoisCheck domain ownership details, expiration dates, and registrar information.
 US DomainRegister a .US domain and build trust in the USA.
 Web HostingEverything your website needs to run smoothly
 WordPress HostingWordPress hosting that just works
 Windows HostingReliable hosting for Windows environments
 Reseller HostingTurn hosting into your business
 Email HostingEmail that looks professional and works anywhere
 cPanel HostingFull control of your hosting with cPanel
 Affiliate ProgramJoin as a partner and earn commissions on every referral you send our way.
 Vps HostingScalable virtual servers that expand as you need.
 Dedicated ServersGet complete access and full control over your dedicated physical server.
 Managed vpsNot tech-savvy? We will take care of everything with our fully managed VPS hosting for you.
Effectively managing your Mail Hostinger emails is of greater significance than ever especially in today’s digital age, and IMAP settings are part of it.
IMAP allows you to retrieve and maintain your emails on the fly at the server, making for a seamless experience with all your devices.
On the other hand, in contrast to conventional email schemes, i.e., POP3, in which the emails are downloaded and deleted from the server, IMAP performs these operations in a syncing manner.
In other words, if you open, delete or sort an email on one device, you will immediately see changes on all other devices.
So, whether you’re using your phone, tablet, or computer, your emails will always stay updated.
For Hostinger customers, the ability to configure and work with IMAP is important to use the most of your email.
Hostinger offers free IMAP, so as soon as you set it up, your mail will be easy to find and organize no matter where you are.
Understanding how to configure IMAP ensures your email experience is smooth and consistent, keeping you connected and organized, whether at home or on the go.
What Is IMAP and Why Should You Use It?
Let’s just say that IMAP is your plug if you’re looking for a better way to manage your email across different devices.
IMAP is the Internet Message Access Protocol, and an active standard to access and interact with your emails directly on a server rather than download to a client machine such as POP3.
POP3 generally retrieves both the user’s emails and to remove them from server sides, while IMAP keeps them on the server, offering a simple structure to be organized irrespective of which device it is.
With IMAP, any changes you make—like marking an email as read or moving it into a folder—are updated across all your devices.
This is perfect for anyone who checks their email on a phone, tablet, and computer because everything stays in sync.
So, whether you’re on the go or sitting at your desk, you won’t have to worry about your email being out of sync.
For Hostinger mail users, IMAP is a game-changer.
There is use of it which helps you access and manage your emails from a place of your choice and remember all messages received and sent.
Moreover, IMAP provides such interesting functionality as searching the emails on the server and sorting them into folders, so it is much easier to manage and find rapidly anything that is necessary.
IMAP Settings for Hostinger Mail
Setting up your Hostinger email account using IMAP is easy, but you’ll need to enter a few important settings to make it work properly.
The following items are needed for incoming and outgoing mail:
| Setting | Details |
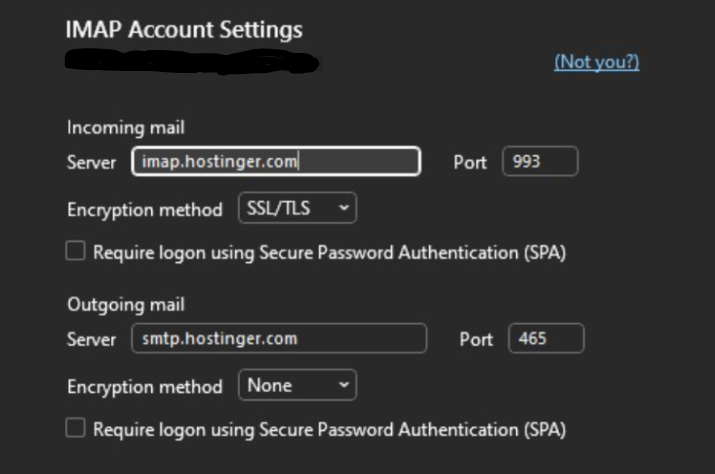
| IMAP Server | imap.hostinger.com |
| IMAP Port | 993 |
| IMAP Security | SSL/TLS |
| SMTP Server | smtp.hostinger.com |
| SMTP Port | 465 (SSL) or 587 (STARTTLS) |
| SMTP Security | SSL/TLS or STARTTLS |
Where to Find These Settings in Your Hostinger Account
You will find all the information you could ever need in your Hostinger account.
Just follow these simple steps:
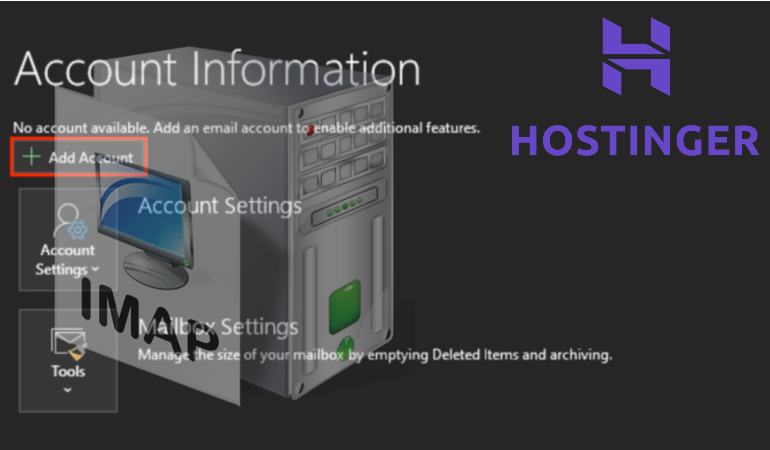
1. Log in to your Hostinger account.
2. Go to the hPanel (the Hostinger control panel).
3. Click on the Emails section.
4. Specify the name of your domain and click Manage under the listed name.
5. On the left side, click Connect Apps & Devices.
6. Scroll down to the Configuration Settings section.
7. Click the arrow to the right of Manual Configuration and access your IMAP and SMTP information.
These options are relevant, as they enable your email client to connect smoothly to Hostinger’s servers allowing you to control your emails on all the devices.
Tip: [encryption or connection issues] you can try using port 587 for SMTP with STARTTLS in place of the previous suggestion .
Now you’re all set!
Enjoy using your Hostinger email.
How to Configure IMAP for Hostinger Email
If you want to access your Hostinger email in other mail services (e.g., Gmail, Outlook, Thunderbird), you need to configure IMAP correctly.
Don’t worry, we’ll walk you through the steps for each one so you can get started without any hassle.
Setting Up IMAP in Gmail
1. Open the Gmail App:
Launch the Gmail app on your phone or device.
2. Add a New Email Account:
Tap the menu icon in the top-left corner.
Go to Settings and select Add account.
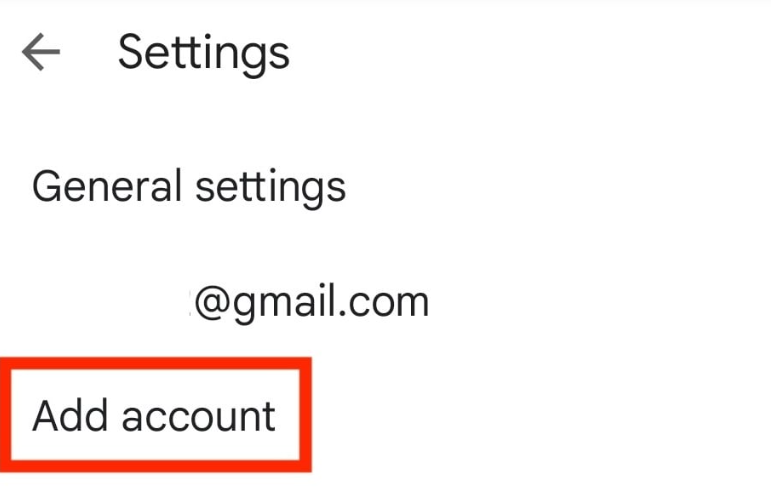
Choose Other as the email provider.
3. Enter Your Email Details:
Type in your Hostinger email address and password.
Tap Next.
4. Configure Server Settings:
For incoming mail, enter:
IMAP Server: imap.hostinger.com
Port: 993
Security type: SSL/TLS
For outgoing mail, enter:
SMTP Server: smtp.hostinger.com
Port: 465 (or 587 for STARTTLS)
Security type: SSL/TLS
5. Finish the Setup:
Tap Next and then complete the setup as instructed.
Setting Up IMAP in Outlook
1. Open Outlook:
Launch the Outlook app on your device.
2. Add a New Account:
Go to File > Add Account.
Select Manual setup or any other server types, and click Next.
3. Choose Account Type:
Select IMAP, then click Next.
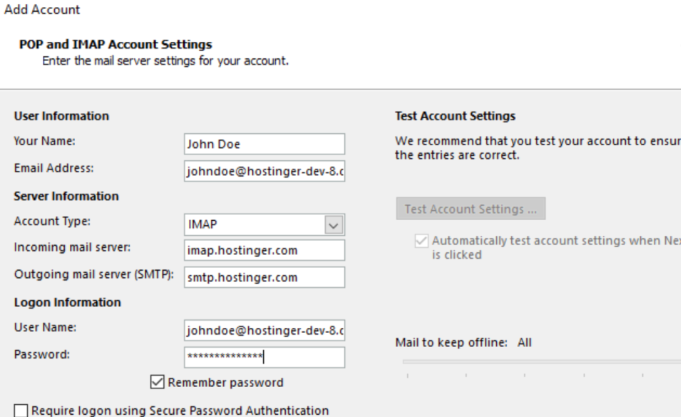
4. Enter Your Information:
Fill in the following details:
Your Name: [Your Name]
Email Address: [Your Hostinger Email]
Account Type: IMAP
Incoming mail server: imap.hostinger.com
Outgoing mail server (SMTP): smtp.hostinger.com
User Name: [Your Hostinger Email]
Password: [Your Email Password]
5. More Settings:
Click More Settings….
In the Outgoing Server, check the “My outgoing server (SMTP) requires authentication” box.
6. Under the Advanced tab:
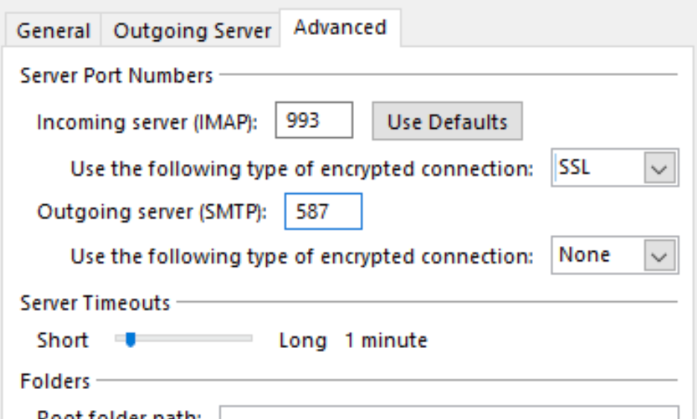
Set the Incoming server (IMAP) to 993 with SSL.
Set Outgoing server (SMTP) as 465, or 587 with STARTTLS defined.
7. Finish Setup:
Click OK, then Next, and finally Finish.
Setting Up IMAP in Thunderbird
1. Open Thunderbird:
Launch Thunderbird on your device.
2. Add a New Account:
Click Menu and choose New Existing Mail Account.
3. Enter Your Information:
Fill in your name, email address, and password.
Upon clicking Continue, Thunderbird will automatically try to set up your account.
4. Manual Configuration (if needed):
IF auto config fails, click Manual config and put:
Incoming Mail (IMAP):
Server: imap.hostinger.com
Port: 993
SSL: SSL/TLS
Authentication: Normal password
Outgoing Mail (SMTP):
Server: smtp.hostinger.com
Port: 465 (or 587 for STARTTLS)
SSL: SSL/TLS
Authentication: Normal password
5. Finish Setup:
Click Done to complete the setup.
Synchronizing Email Across Devices
When compared with local storage of emails (more or less) in conventional storage systems, IMAP stores the emails remotely on a server.
Whatever device you are on, whatever you are doing, any action you take —for example, reading, deleting, or moving an email—is synced and reflects on all devices.

In contrast, however, when you read an email on your mobile (reaching for it, turning it over, tapping the screen), it will be marked “read” at once, when it is read on your PC in the evening, as it will then be marked “not read”.
Pretty handy, right?
Tips for Ensuring All Folders Sync Correctly
Check Email Client Settings: Make sure that all folders are subscribed to be synced by your email client.
Set Sync Frequency: Adjust the synchronization intervals (e.g., 10-30 min), aiming for the best trade-off between update rate and server cost.
Enable Push Notifications: Get real-time email updates for important messages.
Update Your Client: Keep your email app updated for better syncing and fewer bugs.
Monitor Your Connection: A stable internet connection ensures seamless syncing.
Organize Folders: Double-check subfolders are included in your IMAP settings.
Troubleshooting IMAP Issues
IMAP problems such as slow/no email are frustrating.
Here’s how to fix them:
1. Check Internet Connection: Ensure stable Wi-Fi or Ethernet for smooth syncing.
2. Verify IMAP Settings: Specify the right parameters such as imap.hostinger.com (Port 993) and smtp.hostinger.com (Port 465/587).
3. Enable IMAP: To use services such as Gmail, enable IMAP in your account settings.
4. Manage Folder Subscriptions: Subscribe to important folders in your email client.
5. Create a New Profile: Create a new email profile to address possible corruption.
6. Optimize Sync Settings: Adjust sync frequency or unsubscribe from less-used folders.
7. Check Antivirus/Firewall: Temporarily disable them or add email client exceptions.
8. Allow Initial Sync Time: However, the first sync step can be long for big mailboxes.
Wrapping Up
The most important thing is mastering your email with mail Hostinger IMAP.
Efficient management of the email is critical nowadays, especially for personal and professional use.
Mail Hostinger IMAP is an excellent tool providing you with smooth access to your emails on any number of the other computers.
Log in to your Hostinger account, then understand the basics of IMAP, configure proper settings, and be able to troubleshoot some of the usual problems, and you can further maximize your email usage of Hostinger.
IMAP has a lot to offer, such as real-time email synchronisation, easy folder management, and access to your inbox from any device, etc.
On the one side, the characteristics help you to be organized and connected wherever you are.
No matter you are configuring your email on applications, or fixing the syncing, this tutorial includes all the steps, that could help you get the most of IMAP.