Domain RegistrationFind and register the perfect domain for your website.
 .COM DomainChoose a widely recognized domain to build global credibility.
 Domain TransferSeamless domain transfers with zero downtime and complete control.
 All TLDsFind and register your perfect domain. Choose from local and global extensions.
 SSL CertificatesKeep your website safe with reliable SSL Certificates that protect customer data and build trust.
 whoisCheck domain ownership details, expiration dates, and registrar information.
 US DomainRegister a .US domain and build trust in the USA.
 Web HostingEverything your website needs to run smoothly
 WordPress HostingWordPress hosting that just works
 Windows HostingReliable hosting for Windows environments
 Reseller HostingTurn hosting into your business
 Email HostingEmail that looks professional and works anywhere
 cPanel HostingFull control of your hosting with cPanel
 Affiliate ProgramJoin as a partner and earn commissions on every referral you send our way.
 Vps HostingScalable virtual servers that expand as you need.
 Dedicated ServersGet complete access and full control over your dedicated physical server.
 Managed vpsNot tech-savvy? We will take care of everything with our fully managed VPS hosting for you.
 AI Website BuilderCreate stunning websites in seconds with AI.
 Online ShopSet up a professional online store. No coding required.
 Web design serviceGet a tailored website designed to match your brand and support your goals.
 BlogFind helpful guides on web hosting, online selling, digital marketing, and more.
 Contact USYou can reach us anytime, day or night, through chat or email.
 SupportBrowse helpful guides and answers for all of our services.
Professional email is essential for building trust with customers, clients, and partners. Instead of using a generic Gmail address, Google Workspace lets you create custom email addresses like [email protected], giving your business a more professional image while providing access to Gmail, Google Drive, Google Meet, Google Calendar, and other productivity tools.
This article walks you through how to host email on Google Workspace, from purchasing a domain name and verifying ownership to updating your DNS records, creating user accounts, and migrating existing email.
Ready to get started? Get Google Workspace with Truehost and set up professional business email backed by Gmail’s trusted infrastructure, expert support, and a seamless setup experience.
Why Choose Google Workspace for Email Hosting?
- Professional business email addresses on your own domain
- Reliable infrastructure backed by Gmail
- Large mailbox storage compared to many traditional hosts
- Advanced spam and malware protection built in
- Seamless integration with Google Drive, Meet, and Calendar
- Accessible from any device, anywhere
- Scalable as your business and team grow
What You Need Before Hosting Email on Google Workspace
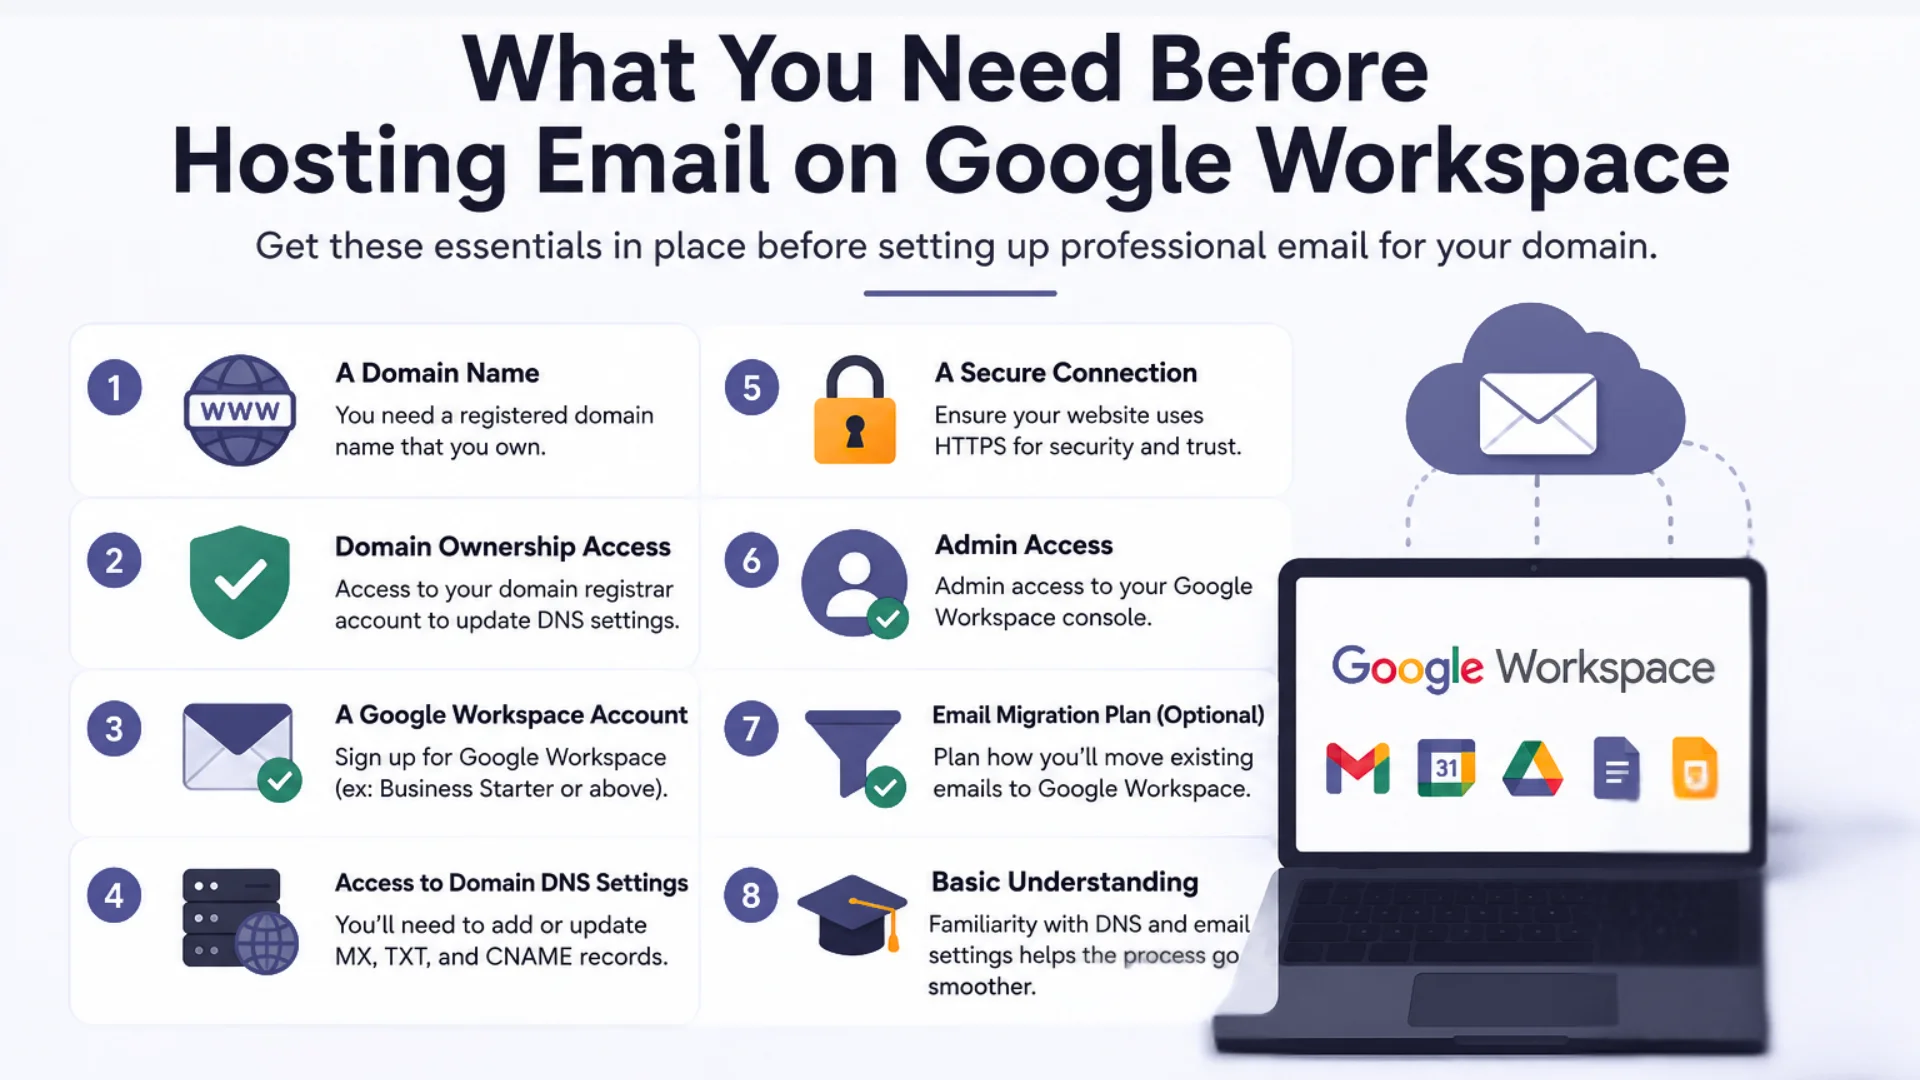
- A registered domain name
- A Google Workspace subscription
- Access to your domain’s DNS settings
- An active internet connection
- A migration plan, if you’re moving from another provider
Step-by-Step Guide to Host Email on Google Workspace
Step 1: Choose the Right Google Workspace Plan
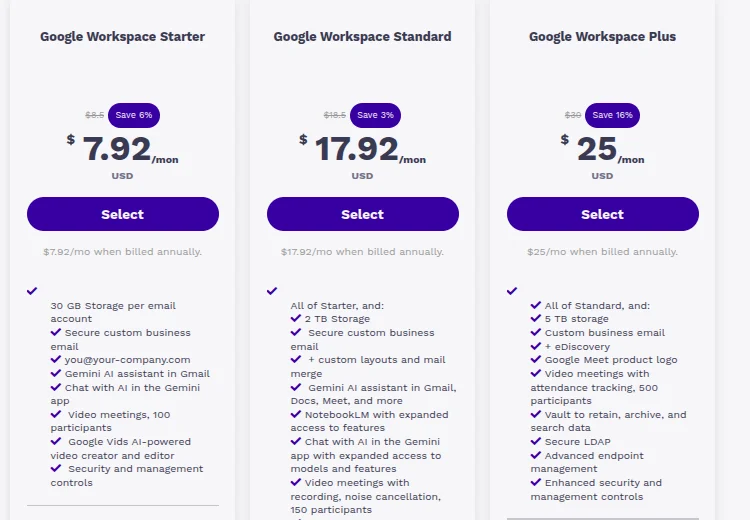
Google Workspace offers several tiers, each with different storage limits and features.
- Compare plans based on storage per user and included apps.
- Entry-level plans work well for small teams just getting started.
- Higher tiers add more storage, security controls, and admin features for growing businesses.
- Some plans include additional tools like advanced endpoint management or enhanced compliance features that only matter once your organization reaches a certain size.
Pick the plan that matches your current team size, since you can upgrade later as you grow. Downgrading is possible too, but it’s simpler to start conservatively and scale up than to overcommit early on features you won’t use for months. You can compare and purchase Google Workspace plans through Truehost alongside your domain registration.
Step 2: Sign Up for Google Workspace
- Go to the Google Workspace sign-up page and start your account setup.
- Enter your business name, size, and industry.
- Add the domain name you’ll use for email.
- Create your administrator account, which manages the entire Workspace setup.
Step 3: Verify Domain Ownership
Google needs proof that you actually own the domain before activating email on it. Full instructions are available in Google’s domain verification help.
- Verification confirms you control the domain, preventing anyone else from claiming it.
- Common methods include adding a TXT record, uploading an HTML file, or using your existing website’s meta tag.
- Add the TXT verification record Google provides to your domain’s DNS settings.
- Once added, return to the Google Admin Console and click verify. Propagation can take anywhere from a few minutes to 48 hours.
If verification doesn’t go through right away, don’t assume something’s broken. DNS changes need time to spread across servers worldwide, and checking too soon is one of the most common reasons people think verification has failed when it’s actually just still catching up.
Step 4: Update Your MX Records
MX records tell the internet where to deliver email for your domain.
- Remove any existing MX records from your previous email provider.
- Add Google’s MX record. Google now offers a simplified single-record setup: Host
@, TypeMX, Valuesmtp.google.com, Priority1. The legacy five-record configuration usingaspmx.l.google.comand its alternates is also still supported. - Save your changes in your DNS management panel.
- Allow time for DNS propagation, typically a few hours, though it can take up to 48 hours.
Mixing old and new MX records is one of the most common setup mistakes, so make sure previous records are fully removed before saving the new ones. Leaving even one old record in place can split your incoming mail between two different providers, meaning some messages arrive at your new inbox while others quietly vanish into a system you’re no longer checking.
Step 5: Configure Email Security Records
Authentication records protect your domain from spoofing and improve deliverability.
Set up SPF: Add an SPF TXT record authorizing Google’s servers to send email on your domain’s behalf.
Enable DKIM: Generate a DKIM key in the Google Admin Console, add it as a TXT record, then activate it once DNS has propagated.
Configure DMARC: Add a DMARC record specifying how receiving servers should handle messages that fail SPF or DKIM checks.
Why email authentication matters: Without these records, your emails are more likely to land in spam, and your domain becomes an easier target for phishing attempts using your name.
Set these up in order: SPF first, then DKIM, then DMARC. Google recommends letting SPF and DKIM authenticate messages for at least 48 hours before turning on DMARC, and starting your DMARC policy at “none” so you can monitor results before enforcing stricter rules that might block legitimate mail.
Step 6: Create User Email Accounts
Once your domain is verified and mail is routing correctly, start building out your team’s accounts.
- Add employees as individual users under your Workspace admin console.
- Create aliases for shared roles like sales@ or support@.
- Set up distribution groups so one email reaches multiple people at once.
- Assign user roles and admin permissions based on who needs access to what.
It’s worth resisting the urge to give everyone admin access just to save time upfront. Limiting admin privileges to the people who actually need them reduces the risk of accidental changes to DNS, security settings, or billing down the line.
Step 7: Migrate Existing Emails to Google Workspace
If you’re moving from another provider, don’t leave old messages behind.
- From cPanel email: Use Google’s Data Migration Service with your cPanel IMAP credentials.
- From Microsoft 365: Google’s migration tool supports direct Exchange and Microsoft 365 imports.
- From another Google Workspace account: Use Google’s built-in transfer tools for account-to-account migration.
- From IMAP providers generally: Most standard IMAP-based hosts can migrate using Google’s Data Migration Service.
- Google’s migration tools handle the bulk of the heavy lifting, though large mailboxes can take time to fully transfer.
Migration speed depends heavily on mailbox size and how many accounts you’re moving at once. A small team with a few gigabytes of mail per person might finish in an afternoon, while a larger organization migrating years of archived email could need several days for everything to sync completely. Plan around this timeline rather than assuming it’ll be instant.
Step 8: Configure Email Clients and Mobile Devices
Your team will likely access email across several devices and apps.
- Gmail Web: Works immediately once your account is active, no extra setup required.
- Outlook: Connect via IMAP or Google’s Outlook sync tool.
- Apple Mail: Add your account using the built-in Google or IMAP account option.
- Android devices: Sign in directly with your Google Workspace credentials.
- iPhone and iPad: Add the account through the Mail app’s Google account setup.
Step 9: Test Your Google Workspace Email
Before rolling this out to your whole team, confirm everything actually works.
- Send and receive test emails from multiple accounts and devices.
- Verify your MX records are pointing correctly using a DNS lookup tool.
- Test that SPF, DKIM, and DMARC are passing on outgoing mail.
- Check that test emails land in the inbox, not spam.
Step 10: Manage and Secure Your Google Workspace Account
Ongoing management keeps your setup secure as your team grows.
- Enable two-factor authentication for every user account.
- Configure backup email addresses for account recovery.
- Regularly review and update user permissions.
- Monitor security alerts in the Admin Console.
- Create email groups as your team structure evolves.
Common Problems When Setting Up Google Workspace Email
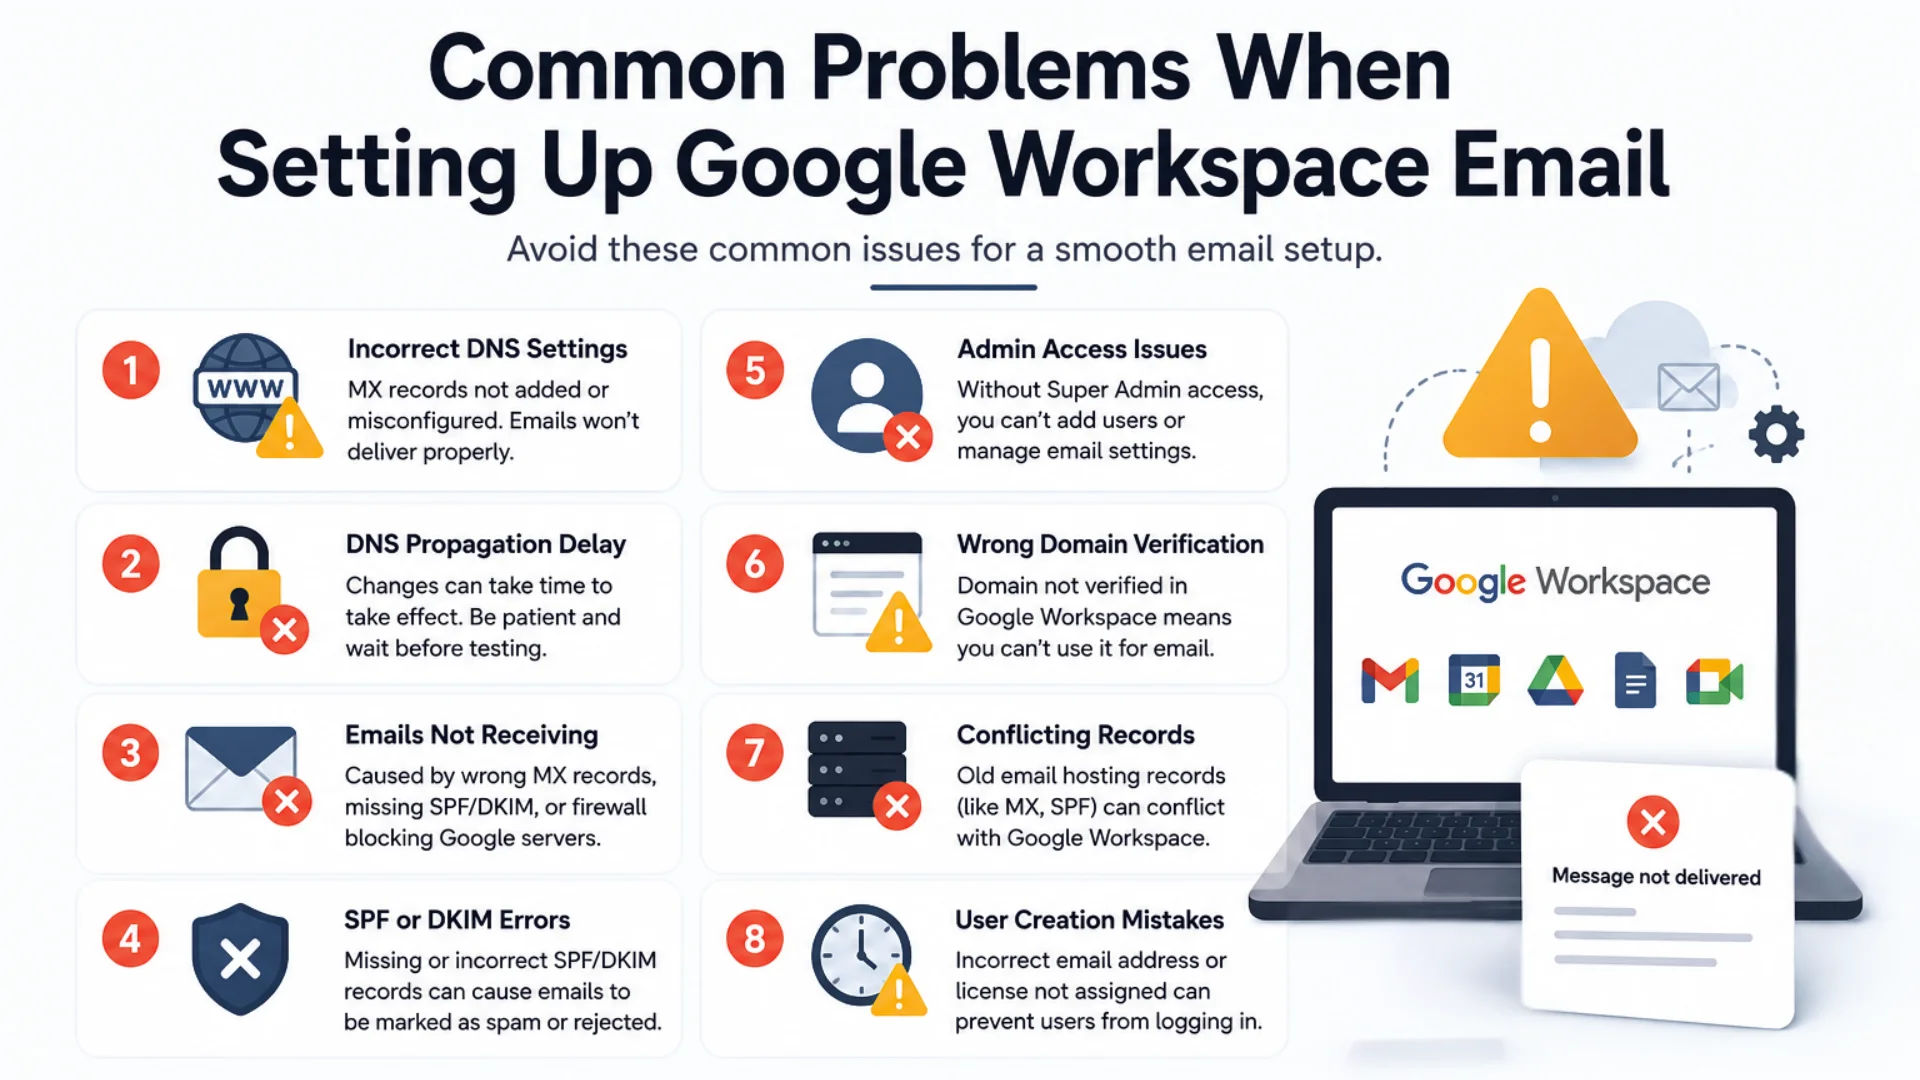
- Domain verification failed: Usually caused by a missing or mistyped TXT record, or checking before DNS has propagated.
- MX records not working: Often due to leftover records from a previous provider conflicting with Google’s.
- Emails not sending or receiving: Check MX record priority and confirm old records were fully removed.
- DNS propagation delays: Normal within the first 48 hours; avoid making repeated changes during this window.
- SPF, DKIM, or DMARC errors: Double-check record syntax, since a single typo can break authentication entirely.
- Outlook or Apple Mail connection issues: Usually resolved by re-entering credentials or using an app-specific password.
- Email going to spam: Often traced back to missing or misconfigured SPF, DKIM, or DMARC records.
Pro tip: Most of these issues share a common thread: they trace back to DNS records that are incomplete, mistyped, or still propagating. Before assuming something is fundamentally broken, it’s worth re-checking every record against what Google’s Admin Console actually specifies, since even a missing period or extra space can cause a record to fail silently.
Best Practices for Google Workspace Email Hosting
- Use strong, unique passwords for every account.
- Enable two-factor authentication across your entire team.
- Set up SPF, DKIM, and DMARC correctly from day one.
- Review user permissions regularly, especially after role changes.
- Monitor storage usage before accounts hit their limits.
- Keep recovery information current for every user.
- Archive inactive accounts instead of leaving them open indefinitely.
Pro tip: Treat this list as ongoing maintenance rather than a one-time setup task. Security settings that were correct on launch day can quietly drift out of date as your team grows, roles change, and people leave the company, so it’s worth revisiting this checklist every few months rather than only when something goes wrong.
Google Workspace vs Traditional Email Hosting
| Factor | Google Workspace | Traditional Email Hosting |
|---|---|---|
| Features | Gmail, Drive, Meet, Calendar included | Typically webmail and basic tools only |
| Storage | 30GB–5TB depending on plan | Often 1GB–100GB depending on provider |
| Security | Advanced spam and phishing protection built in | Varies significantly by provider |
| Collaboration | Deep integration across Google apps | Usually limited or none |
| Pricing | Per-user monthly subscription | Often per-mailbox, sometimes lower cost |
Which option is right for your business? Google Workspace suits teams that want productivity tools bundled with email. Traditional hosting can make sense if you just need reliable email without the extra apps, often at a lower price point.
Neither option is universally better. Match the choice to how your team actually operates, not to whichever option sounds more impressive on paper.
Common Mistakes to Avoid
- Choosing the wrong Workspace plan and paying for storage or features you don’t need.
- Forgetting to verify your domain, which blocks the entire setup from proceeding.
- Incorrect MX records, the single most common cause of email delivery failures.
- Skipping SPF, DKIM, and DMARC, leaving your domain vulnerable to spoofing and spam folders.
- Not testing email after setup, only discovering problems once real messages are affected.
- Forgetting to migrate old emails, losing access to historical conversations.
- Ignoring security settings, leaving accounts without two-factor authentication enabled.
FAQs
Is Google Workspace email hosting free?
No. Google Workspace requires a paid subscription, though pricing varies by plan and team size. There’s no permanently free tier for business use, though Google sometimes offers trial periods for new accounts.
How do I set up an email on Google Workspace?
Once your domain is verified and MX records are updated, create individual user accounts through the Google Admin Console. Each new account comes with its own inbox, storage allocation, and access to the full suite of Google apps included in your plan.
How do I move my email hosting to Google Workspace?
Sign up, verify your domain, update your MX records, then use Google’s Data Migration Service to transfer existing emails from your old provider. The tool handles most providers, including cPanel-based hosts, Microsoft 365, and other IMAP services.
Can I use my existing domain with Google Workspace?
Yes. You don’t need a new domain, just access to your existing domain’s DNS settings to complete verification and MX setup. This is the standard path for most businesses, since it lets you keep using the domain your customers already know.
How long does it take for Google Workspace email to start working?
Basic setup can be complete within a few hours, though full DNS propagation for MX and authentication records can take up to 48 hours. Most people see email flowing correctly well before that outer limit, but it’s worth building in a buffer before you fully retire your old provider.
Will I lose my existing emails when migrating to Google Workspace?
No, as long as you use Google’s migration tools correctly. Your existing emails transfer over rather than disappearing, though it’s still good practice to keep a backup of your old mailbox until you’ve confirmed everything arrived intact.
Can I use Google Workspace with multiple domains?
Yes. Google Workspace supports adding secondary domains and domain aliases under a single account, which is useful if your business operates under more than one brand name.
Ready to Host Your Business Email with Google Workspace?
Google Workspace gives your business a professional email solution backed by Gmail’s reliability, advanced security, and powerful collaboration tools. Whether you’re creating business email for the first time or migrating from another provider, proper domain configuration is the key to a smooth setup.
With Truehost, you can register your domain name, manage your DNS records, set up Google Workspace, and connect your website and domain seamlessly. Whether you’re launching a new business or upgrading your existing email hosting, Truehost provides the reliable foundation you need.
Ready to get started? Get Google Workspace through Truehost and get your professional email up and running the right way.