Domain RegistrationFind and register the perfect domain for your website.
 .COM DomainChoose a widely recognized domain to build global credibility.
 Domain TransferSeamless domain transfers with zero downtime and complete control.
 All TLDsFind and register your perfect domain. Choose from local and global extensions.
 SSL CertificatesKeep your website safe with reliable SSL Certificates that protect customer data and build trust.
 whoisCheck domain ownership details, expiration dates, and registrar information.
 US DomainRegister a .US domain and build trust in the USA.
 Web HostingEverything your website needs to run smoothly
 WordPress HostingWordPress hosting that just works
 Windows HostingReliable hosting for Windows environments
 Reseller HostingTurn hosting into your business
 Email HostingEmail that looks professional and works anywhere
 cPanel HostingFull control of your hosting with cPanel
 Affiliate ProgramJoin as a partner and earn commissions on every referral you send our way.
 Vps HostingScalable virtual servers that expand as you need.
 Dedicated ServersGet complete access and full control over your dedicated physical server.
 Managed vpsNot tech-savvy? We will take care of everything with our fully managed VPS hosting for you.
 AI Website BuilderCreate stunning websites in seconds with AI.
 Online ShopSet up a professional online store. No coding required.
 Web design serviceGet a tailored website designed to match your brand and support your goals.
 BlogFind helpful guides on web hosting, online selling, digital marketing, and more.
 Contact USYou can reach us anytime, day or night, through chat or email.
 SupportBrowse helpful guides and answers for all of our services.
A fresh VPS gets scanned within hours of going live, often before a single real visitor shows up.
Bots probe open ports, test default logins, and log every response for later use. Many owners add Cloudflare and assume the job is done. That assumption is where most setups fall apart.
Cloudflare hides your origin IP and filters traffic at the edge, but only if the origin server actually enforces that filter too.
A misconfigured firewall can leave the raw VPS IP address wide open, even with Cloudflare in front of it.
This guide walks through the full setup, from DNS to firewall lockdown, and ends with a step that proves the lockdown actually works.
Point Your Domain to Cloudflare and Configure DNS
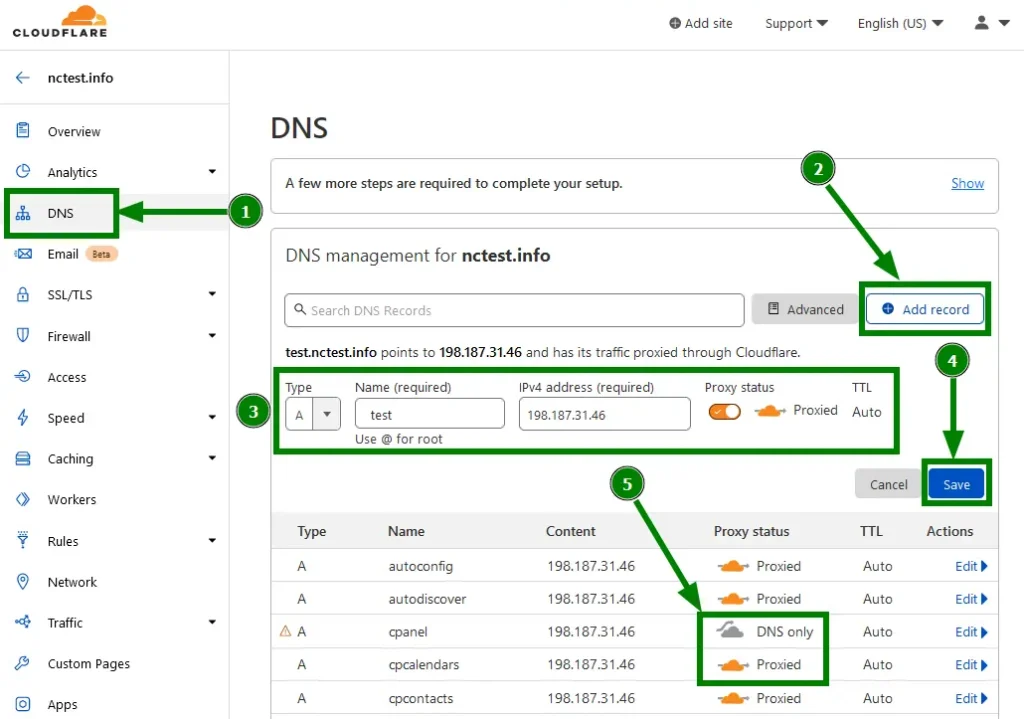
Start in the Cloudflare dashboard by adding your domain and letting Cloudflare scan your existing DNS records.
Review the scan closely, since a missed record can break mail or a subdomain once you switch nameservers.
Each DNS record has a proxy status: an orange cloud for proxied through Cloudflare, or a grey cloud for DNS-only. Use this as your baseline:
| Type | Name | Value | Proxy Status |
|---|---|---|---|
| A | @ | Your VPS IP | Proxied (orange) |
| A | www | Your VPS IP | Proxied (orange) |
| A | Your VPS IP | DNS only (grey) | |
| MX | @ | mail.yourdomain.com | DNS only (grey) |
| A or CNAME | ssh | Your VPS IP | DNS only (grey) |
Keep mail records off the proxy. Mail servers need a direct connection to work properly, and running them through Cloudflare’s proxy breaks delivery.
SSH can stay on a DNS-only record, too, since there is no benefit to hiding it behind the proxy.
Once your records are set, update your domain’s nameservers with the two Cloudflare nameservers shown on your dashboard.
Propagation can take anywhere from 5 to 24 hours. Check the Cloudflare dashboard for a green “Active” status next to your domain to confirm the switch went through.
Step 1: Set the Correct SSL/TLS Mode for Your VPS Origin
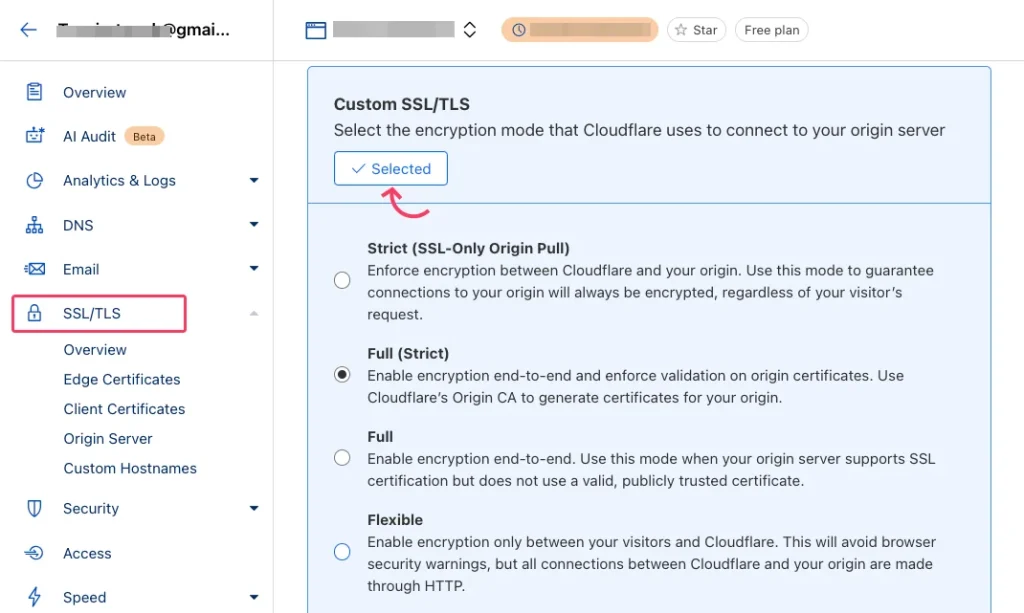
Cloudflare offers four SSL modes, and choosing the wrong one can either break your site or leave a gap in the encryption chain.
Full (Strict) is the only mode that encrypts both legs of the connection: from the visitor to Cloudflare and from Cloudflare to your VPS.
To use Full (Strict), install a Cloudflare Origin Certificate on your server first:
- In Cloudflare, go to SSL/TLS> Origin Server, then create a certificate.
- Copy the certificate and private key it gives you.
- On your VPS, save them under a path like
/etc/ssl/cloudflare/origin.pemand/etc/ssl/cloudflare/origin.key. - Point your web server config (nginx or Apache) to these files for SSL.
- Restart the web server and confirm HTTPS loads without a warning.
Once that certificate is live, switch Cloudflare’s SSL/TLS mode to Full (Strict). From there, turn on a few more settings under SSL/TLS, then Edge Certificates:
- Always Use HTTPS: on, so every HTTP request redirects to HTTPS automatically.
- HSTS: enable with a 6-month max-age, so browsers always use HTTPS for your domain.
- Minimum TLS Version: set to 1.2, which blocks outdated and vulnerable clients from connecting.
Step 2: Lock Your VPS Firewall to Cloudflare-Only Traffic
This step is the one most guides skip or get wrong, and it is the one that actually protects your origin server.
Without it, an attacker can look up your VPS IP from old DNS records or leaked logs and hit it directly, bypassing Cloudflare.
The goal is simple: your server should only accept web traffic (ports 80 and 443) from Cloudflare’s published IP ranges. Everything else on those ports gets dropped.
If you use Uncomplicated Firewall (UFW) on Ubuntu, first check your current rules:
sudo ufw status numberedIf you already have a rule allowing port 80 or 443 from anywhere, remove it before adding the Cloudflare-only rules.
Then pull Cloudflare’s current IP ranges and add allow rules for each one, covering both IPv4 and IPv6. Keep a rule allowing SSH for yourself so you do not lock yourself out.
If you use iptables, be careful with one detail that trips up even experienced admins: check your default policy.
sudo iptables -L INPUTAllow rules for Cloudflare IPs do nothing if the default INPUT policy is still. ACCEPT.
That means every other connection gets through anyway, and the allow rules are just decoration.
Set the default policy to DROP Only after you have confirmed your allow rules and SSH access are correctly in place, so you do not cut yourself off from the server.
Step 3: Configure Real IP Logging So Your Server Sees Actual Visitors
Once Cloudflare proxies your traffic, every request that reaches your VPS comes from a Cloudflare IP address, not the visitor’s real IP address.
Left unconfigured, your access logs, rate limiting, and any IP-based security tool will see Cloudflare’s edge IPs instead of actual visitors.
Nginx and Apache both support a real IP module that reads the visitor’s IP address from a header that Cloudflare sends with each request. Confirm the module is available first:
nginx -V 2>&1 | tr ' ' '\n' | grep realipStandard nginx packages on Ubuntu and Debian already include this module.
If it shows up, add a config block that maps Cloudflare’s IP ranges as trusted sources for the real IP header, then reload nginx.
After that, request your website and check the access log. You should see the visitor’s actual IP, not a Cloudflare range like 162.158.x.x or 104.16.x.x through 104.31.x.x.
Step 4: Harden with WAF, Bot Fight Mode, and Custom Firewall Rules
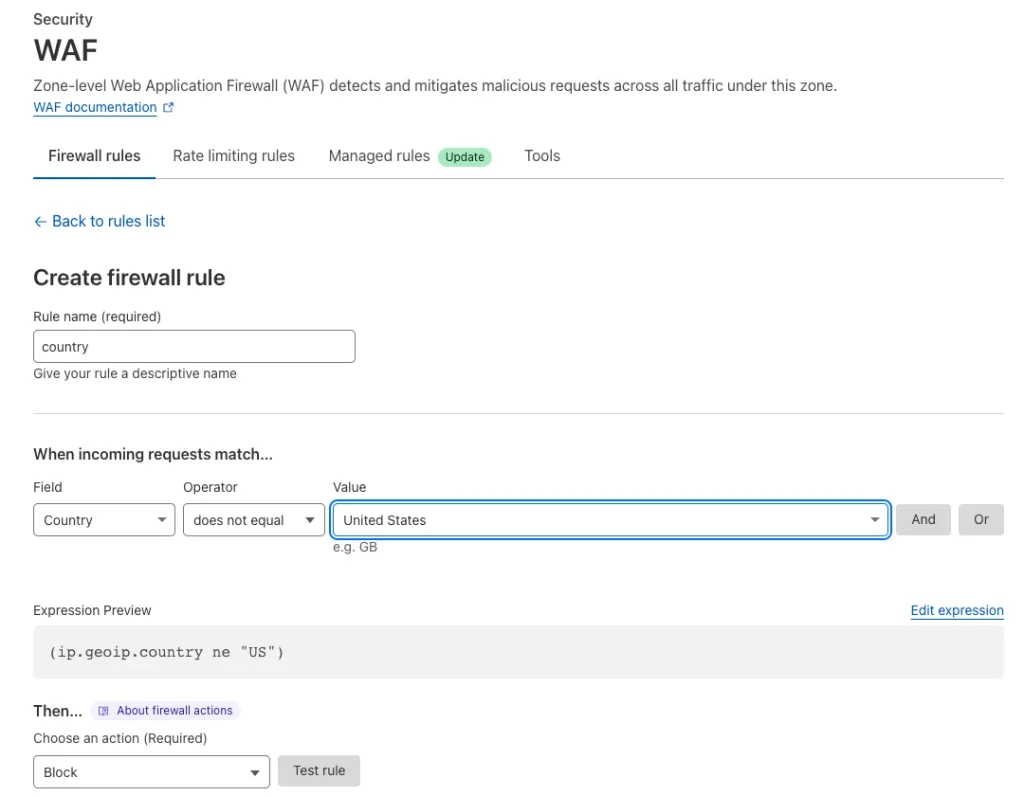
With DNS, SSL, and the firewall lockdown in place, layer on Cloudflare’s application-level protections. These sit on the free plan and take a few minutes to turn on.
- Bot Fight Mode: under Security> Bots, turn this on to automatically block known bad bots without touching your server config.
- Security Level: under Security, then Settings, set to Medium or High, depending on how much you want visitors challenged before reaching your site.
- Custom WAF rules: block requests carrying known scanner signatures, such as user agents containing sqlmap or nikto, two tools commonly used to probe for vulnerabilities.
- Rate limiting: cap requests to sensitive paths, such as
/wp-login.phpon WordPress sites, to something like 5 requests per minute per IP.
Each of these rules runs at Cloudflare’s edge, so blocked requests never reach your VPS at all. That keeps your server’s resources free for legitimate visitors.
Step 5: Verify the Lockdown Actually Works
A setup that looks correct is not the same as one that is actually locked down. The only way to know for sure is to test it from the outside.
From a device or network that is not going through Cloudflare, try to connect to your VPS IP address directly:
curl -I http://YOUR_VPS_IPIf the connection times out or gets refused, your firewall lockdown is working as intended.
If it loads your site, traffic is still reaching your origin directly, and your allow rules or default policy need another look.
Next, confirm the real IP module is active by checking a recent log entry after visiting your own site.
A real visitor IP in the log means the module is working. A Cloudflare range in the log means the config still needs a fix.
Run both checks after any change to the firewall or web server, since a routine update can quietly reset a rule.
Step 6: Keep Cloudflare’s IP Ranges Updated Automatically
Cloudflare’s IP ranges change from time to time as its network grows.
A firewall rule set that was correct on setup day can quietly go stale months later, missing new ranges or holding onto ones no longer in use.
Set up a small script that pulls the current IPv4 and IPv6 ranges from Cloudflare’s published lists and rewrites your firewall rules with them.
A cron job running once a week keeps this current without any manual work.
Log the script’s output somewhere you can check later, so a failed update does not go unnoticed.
Cloudflare Tunnel: A No-Open-Port Alternative
For VPS owners who want a stronger setup, Cloudflare Tunnel removes inbound ports entirely.
Instead of Cloudflare connecting to your server, a small piece of software called Cloudflared runs on your VPS and makes an outbound connection to Cloudflare’s network.
This flips the whole model. There are no ports 80 or 443 open to the internet, so there is nothing for an attacker to scan or connect to directly. Only the services you explicitly map through the tunnel become reachable.
To use it, your firewall needs to allow outbound traffic on port 7844, over TCP or UDP, depending on the protocol CloudFlare uses. That is the only firewall change needed on the VPS side.
This approach trades some simplicity for a smaller attack surface. It suits VPS owners running sensitive applications, internal tools, or anything where closing every inbound port outweighs the extra setup step.
Troubleshooting: Common Errors and Setup Mistakes
Most problems in a Cloudflare and VPS setup trace back to one of a handful of causes. Use this table to identify the symptom first, then jump straight to the fix.
| Symptom | Likely Cause | Fix |
|---|---|---|
| Error 521, “Web server is down” | The web server process is not running, or the firewall is blocking Cloudflare’s IP ranges. | Check the service status with systemctl status nginx, then confirm the firewall allows Cloudflare’s published ranges. |
| Error 522, “Connection timed out” | The server is overloaded and dropping packets, or your Cloudflare IP list has gone stale. | Check server load and open connections, then re-pull Cloudflare’s current IP ranges. |
| ERR_TOO_MANY_REDIRECTS or a redirect loop | SSL/TLS mode is set to Flexible, while the origin server also redirects HTTP to HTTPS | Switch the SSL/TLS mode to Full (Strict) in the Cloudflare dashboard |
| Mixed content warning or a broken padlock icon | Some page assets still load over plain HTTP | Turn on Automatic HTTPS Rewrites, then fix any hardcoded HTTP links in the site’s code. |
| Emails stop arriving after the domain moves to Cloudflare | The MX record or the mail server’s A record got proxied by mistake | Set the mail record back to DNS only (grey cloud) in the DNS settings |
| Access logs show only Cloudflare IPs, and rate limits misfire | The real IP module is not configured on the web server | Enable the realip module and map Cloudflare’s IP ranges to the visitor IP header |
| An attacker reaches the origin IP directly, despite the firewall setup | The firewall’s default policy is still ACCEPT, or an old DNS record leaked the real IP earlier | Set the default INPUT policy to DROP, and rotate the VPS IP if it was exposed before |
| SSH access is lost right after tightening the firewall | The SSH allow rule was added after the DROP policy took effect, or the wrong port was used | Log in through the hosting provider’s console, restore SSH access, then reorder the rules so SSH is allowed first |
| Cloudflare protection quietly weakens months after setup | Cloudflare’s IP ranges changed, and the scheduled update script stopped running | Check the cron job’s log and confirm the update script still runs on schedule |
| The site feels slow for some visitors, even with Cloudflare active | A dynamic page, like a cart or account page, is being cached along with static assets | Add a cache bypass rule for any page that changes per visitor or per session |
FAQs
Does Cloudflare protect a VPS from DDoS attacks?
Yes. All Cloudflare plans, including the free plan, include DDoS mitigation that absorbs large volumetric attacks at the edge before they reach your server.
That protection only holds if your origin firewall also blocks direct connections, so attackers cannot bypass Cloudflare and hit your VPS IP instead.
Does Cloudflare offer VPS?
No, Cloudflare itself doesn’t sell VPS hosting. It’s a network and security layer that sits in front of a server, not a hosting provider.
However, it does offer Cloudflare edge compute (Workers, and the related Pages Functions), which is different in kind, not just in setup.
Instead of a persistent server, your code runs as small functions on Cloudflare’s own network, distributed across its data centers worldwide.
There’s no server to patch, size, or keep running. Cloudflare spins up your code on demand, close to whoever made the request, and shuts it down right after.
Why is my VPS still getting attacked after adding Cloudflare?
The most common reason is a firewall that still allows traffic from any IP address rather than just Cloudflare’s ranges.
If your old DNS records, server logs, or a previous non-proxied setup exposed your real IP at any point, attackers can target it directly and skip Cloudflare altogether.
Can I use Cloudflare with a VPS for free?
Yes. The free plan covers DNS proxying, SSL, a global CDN, Bot Fight Mode, and basic DDoS protection, which covers most of what a small to mid-size VPS-hosted site needs.
Paid plans add more advanced WAF rules, analytics, and support options.
Does Cloudflare slow down a VPS website?
Usually, the opposite happens. Static assets get cached and served from a nearby edge location instead of your VPS, which cuts load times for visitors far from your server.
Aggressive caching can occasionally break dynamic pages, such as a shopping cart, so set cache-bypass rules for those specific paths.
Get Started With Cloudflare for VPS Today
DNS and SSL are the visible half of a Cloudflare and VPS setup.
The firewall lockdown, real IP logging, and verification step are the half that actually keep attackers out, and they are also the half that most guides skip.
Run through the verification checks in this guide whenever you touch your firewall or web server config, so that a stale rule never goes unnoticed.
Before rolling any of this out, check your VPS resource specs against what full WAF rules and real-time log processing actually need under sustained traffic.
An underprovisioned plan is one of the most common reasons this kind of setup gets abandoned halfway through.
Truehost’s VPS plans list CPU, RAM, and bandwidth for each tier, which makes that comparison a quick one to run before you start.