WordPress is certainly one of the best options if you’re looking for an easy way to build a website.
It is a powerful and popular Content Management System (CMS) used by millions of website owners and developers.
In this guide, we will look at what WordPress is, its benefits, and how to install it on Hostinger.
What is WordPress?
WordPress is an open-source content management system (CMS) that was first released in 2003.
Its intuitive user interface allows users to easily create and manage websites.
With WordPress, you can create various websites, from personal blogs and portfolios to e-commerce stores and membership sites.
To use WordPress, you must install it on a web server and set it up with a domain name and a hosting provider.
Once installed, you can use the WordPress dashboard to create and manage your website’s content, such as pages, posts, and media files.
You can also use WordPress to customize the appearance of your site and add additional functionality through plugins.
Benefits of Using WordPress
As you can guess, there are other CMSes, like Ghost, Joomla, etc, you can use to create your website.
But why WordPress?
There are several benefits to using WordPress as a CMS for creating and managing a website:
Ease of use
WordPress is known for its simplicity and ease of use. It has a user-friendly interface that allows even those with little technical knowledge to create and manage a website.
Customization
WordPress has a wide range of themes and plugins that can be used to customize the appearance and functionality of a website. This allows you to create a unique and professional-looking site that meets your needs.
Responsive design
Most WordPress themes are responsive, which automatically adjusts to different screen sizes and devices.
This is important for ensuring that your website looks good and is easy to use on smartphones and tablets.
SEO-friendly
WordPress is optimized for search engines, which can help improve the visibility of your website in search results.
It also has a range of SEO plugins that can help you optimize your website’s content for search engines.
Better SEO means better chances of your site showing up on search engines and attracting organic traffic.
Community support
Because WordPress is used by over 40% of the entire internet, it has a large and active community of users and developers who contribute to its development and offer support to those who use it.
This means you can easily find help and resources when needed.
Regular updates
Security and technological advances are key when running a website.
WordPress understands this, which is why it is constantly updated with new features and security improvements.
This helps to keep your website up-to-date and secure.
Cost
Regarding budget, WordPress is open-source software that is available for free, making it an affordable option for creating and managing a website.
However, you will still need to pay for hosting and a domain name, that is, if you are going the self-hosted way.
But if you opt for a hosted version of WordPress, you don’t have to worry about hosting.
For a better grasp of this, see the next section.
Types of WordPress Blogging Platforms
There are two main types of WordPress: WordPress.com and WordPress.org.
Both are based on the same core software but differ in terms of hosting, functionality, and the level of control you have over your website.
WordPress.com
WordPress.com is a website builder and hosting platform owned and operated by Automattic, the WordPress parent company.
Think of it as the likes of OLITT, Wix, and others.
It is a fully-managed service that allows you to create a website without installing and managing WordPress on your own web server.
With WordPress.com, you can choose from a range of customizable themes and use a variety of tools and features to create and manage your website.
Is it for you?
WordPress.com is a good option for those who want an easy and hassle-free way to create a website.
It is suitable for small businesses, personal blogs, and other simple websites.
However, it has certain limitations, such as restrictions on using certain plugins and themes and limited control over the hosting and server environment.
WordPress.org
WordPress.org, on the other hand, is the self-hosted version of WordPress.
This means that you will need to install and manage WordPress on your own web server and have full control over your website and its hosting environment.
With WordPress.org, you have access to all of the features and functionality of WordPress, and you can customize your site using any theme or plugin you choose.
Unlike WordPress.com, WordPress.org is a good option for those who want more control and flexibility over their website.
Perfect for larger businesses, e-commerce stores, and other complex websites.
But there’s a catch!
It requires more technical knowledge and resources to set up and manage, as you will need to find and purchase a web hosting provider and handle the installation and maintenance of WordPress.
So, which one should you go for?
That’s entirely up to you.
But since we are talking about using Hostinger with WordPress, it is worth noting that this company uses the WordPress.org version.
With that in mind, I will show you how to set up WordPress on Hostinger.
Choosing a Host
As mentioned earlier, when building a website with WordPress (at least the self-hosted version), you will need to choose a web hosting provider to host your website.
That’s where Hostinger comes in.
It is a great choice for hosting your WordPress website.
This company offers reliable, secure, and fast hosting services, making it a great choice for WordPress websites.
What is Hostinger?
Hostinger is a web hosting provider that offers reliable and secure hosting services.
Launched in 2004, Hostinger has been offering a variety of hosting plans to suit all budgets and needs, ranging from shared hosting to VPS and cloud hosting.
Besides that, you also get various features, such as free SSL certificates, daily backups, and one-click WordPress installations.
Why Choose Hostinger?
Hostinger is a great choice for hosting your WordPress website.
Quickly, here are its pros and cons.
Pros
- Affordable web hosting plans.
- Fast website loading speeds.
- 24/7 customer support services.
- Easy to use control panel and website builder options.
- Comprehensive security features for data protection.
Cons
- Limited storage space in the lower-tier plans.
- No free domain name for the basic plan users.
- Auto-renewal of services when payment is not made on time.
- Lack of resources in some locations at times of peak demand or high traffic periods on websites hosted by Hostinger, leading to downtime issues.
- Limited email accounts compared to other web hosting providers offered in the same price range
Let’s look at the steps you can take to set up WordPress on Hostinger.
How To Set Up WordPress on Hostinger
Remember what you need to use WordPress as your blogging platform?
Step 1: Choose a Hosting Plan

Consider your needs and budget when choosing a hosting plan for your WordPress website.
Hostinger offers a variety of plans to suit all budgets, ranging from shared hosting to VPS and cloud hosting.
Overview of Hostinger Hosting Plans
- Shared hosting: This is the most basic and affordable type of hosting offered by Hostinger. Here, your website shares server resources with other websites on the same server. This is suitable for small websites with low traffic. And you can start from $1.99 per month to host up to 1 site and 1 email account. Learn more.
- Cloud hosting is a more powerful and scalable type of hosting that uses a network of servers to host your website. With cloud hosting, your website can automatically scale up or down based on the traffic it receives. From $9.99 per month, you can host up to 300 sites and get free email and unlimited bandwidth, among other perks. Learn more.
- VPS hosting: This hosting provides a virtual private server for your website. With VPS hosting, you have more control and resources than shared hosting, but it is still less expensive than a dedicated server. From $3.49 per month, you get 1GB RAM, 20GB SSD, 1TB bandwidth, and weekly backups, among other features. Learn more.
- WordPress hosting: This is the most advanced and powerful type of hosting offered by Hostinger. This hosting plan is designed only for WordPress sites. It is worth a look, starting from $1.99 per month, where you can host up to 1 website. Learn more.
Selecting the Right Plan for You
Again, when selecting a hosting plan for your WordPress website, consider your needs and budget.
If you are just starting out, a basic shared hosting plan may be enough for your needs.
However, a VPS or cloud hosting plan may be more suitable if you want more features and capabilities.
Remember, you can always upgrade as your site grow.
Step 2: Register Your Domain Name
Once you’ve chosen a hosting plan, the next step to set up WordPress on Hostinger is registering a domain name for your website.
In a nutshell, a domain name is the address of your website, and it is what people type into their web browser to visit your website.
Without it, no one can access your website.
Domain Name Extension Options
When registering a domain name, you will need to choose a domain name extension, such as a “.com”, “.net”, or “.org”.
And when choosing a domain extension, consider the following:
- The purpose of your website: If you’re starting a personal blog, a .com extension might be suitable. If you’re creating a website for a non-profit organization, a .org extension might be more appropriate.
- Your target audience: Consider the country or region where your target audience is located. For example, if you’re targeting a specific country, you might want to use a country-specific extension, such as .co.uk for the United Kingdom or .de for Germany.
- SEO considerations: Some extensions, such as .com, .net, and .org, are more commonly used and may be easier for people to remember. Search engines may also be more easily recognized by these extensions, which could give you a slight SEO boost.
- Branding considerations: If you have a strong brand and want to use your domain name to reinforce it further, you might consider a .brand extension. These are newer extensions designed specifically for businesses and organizations to use as part of their branding efforts.
The right domain extension will ultimately depend on your specific needs and goals. It’s a good idea to do some research and consider your options carefully before deciding.
Registering Your Domain Name
Once you have the right domain, the next step is to register it. You have two options here.
Either register it with Hostinger or use a third-party registrar like Truehost.
If you choose the latter, you must change name servers to point hosting on Hostinger.
To register a domain on Hostinger, head to https://www.hostinger.com/ and click on Domains, then Domains Search.

Type your domain into the box and click Search.
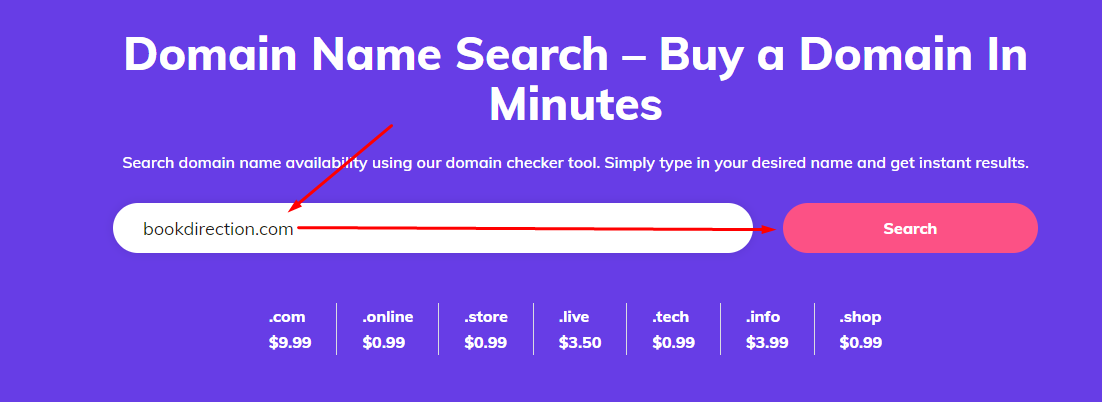
If your website name is available, click add to cart to commence the registration process.

But if it is taken, like the one below, get another name and check its availability.

Proceed to provide the required details and then make the necessary payments.
Step 3: Install WordPress on Hostinger
Once you’ve registered your domain name, you can install WordPress on your Hostinger hosting account. This can be done easily from the Hostinger Control Panel, the hPanel.
Logging Into the Hostinger hPanel
To log into the Hostinger Control Panel, you will first need to log into your Hostinger account.
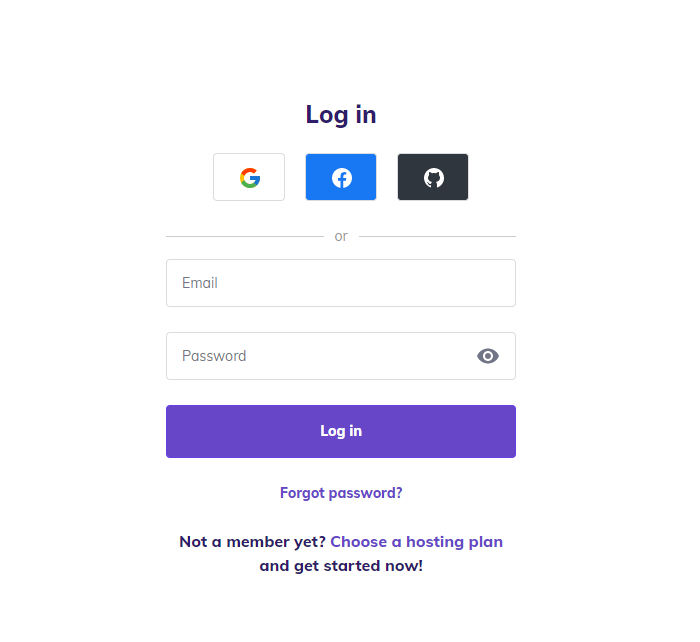
The login details you created when buying the hosting plan and domain name.
Once logged in, you can access the hPanel and start installing WordPress.
Installing WordPress
Once you’re in the hPanel, you can follow the instructions to install WordPress.
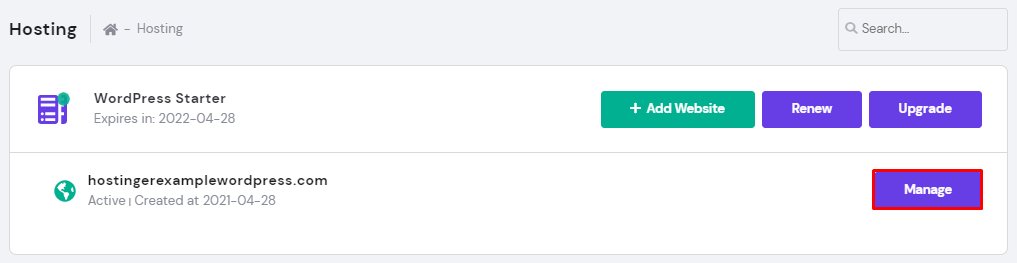
Click Hosting on the main menu.

Choose the domain name for your new WordPress-powered website and click the Manage button to access your hPanel.
On your hPanel Dashboard, locate the Auto Installer button under the Website section.
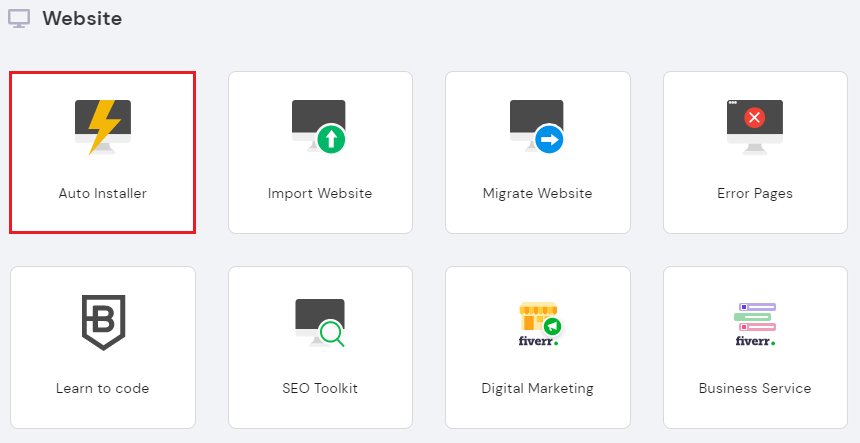
Once it opens, choose WordPress and click the Select button.

The next step is to fill out the Install WordPress form:
- Check your custom domain name and ensure it says “wordpress” next to it.
- The Administrator Username, Password, and Email are for the WordPress login. And these two don’t need to be the same as the web hosting login information. Use a strong password to prevent security breaches.
- Create a WordPress Site Title.
- Choose your preferred Language.
- Tick the Always update to the latest available version option for automatic updates.
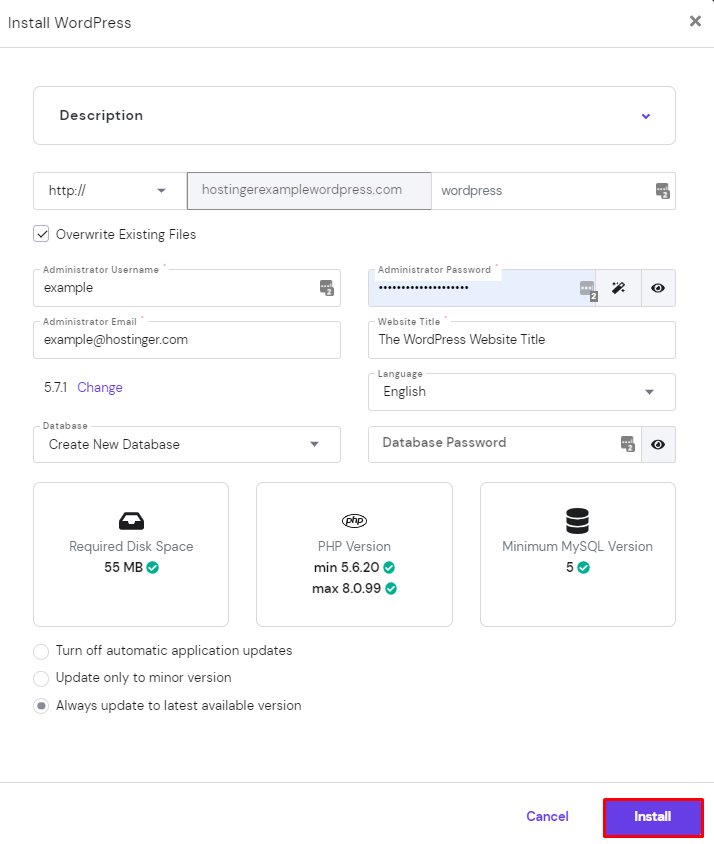
After filling out all the necessary information, hit the Install button.
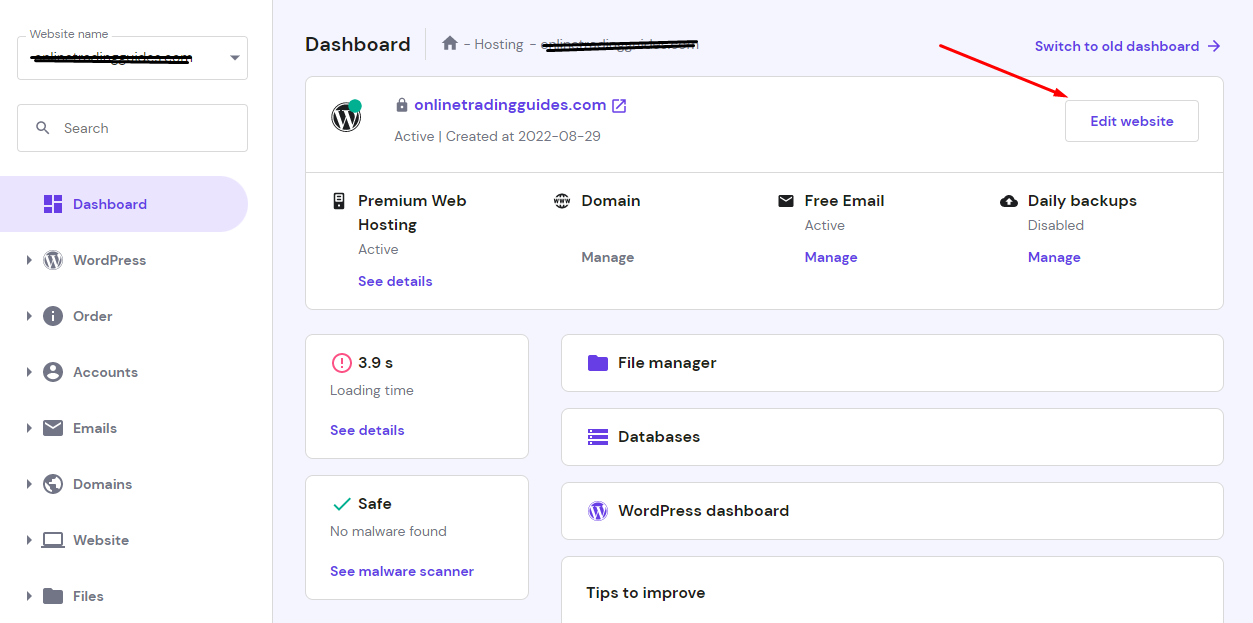
Hostinger will show Installed Applications. Click on the three dots next to your WordPress URL.
Then select Manage to go to My WordPress Dashboard.

To access your WordPress Admin Dashboard, click the Edit Website button.
Step 4: Customizing Your WordPress Site
It’s time to customize your WordPress site!
This is a step to make the site truly your own.
Installing a Theme
Let’s start with the most important part of customizing your WordPress site – installing a theme!
A theme is the design template for your WordPress site. It determines the look and feel of your website, including fonts, colors, and layout.
And thousands of free and paid themes are available, so take your time and pick one that suits your taste.
To choose and install a WordPress theme, follow these steps:
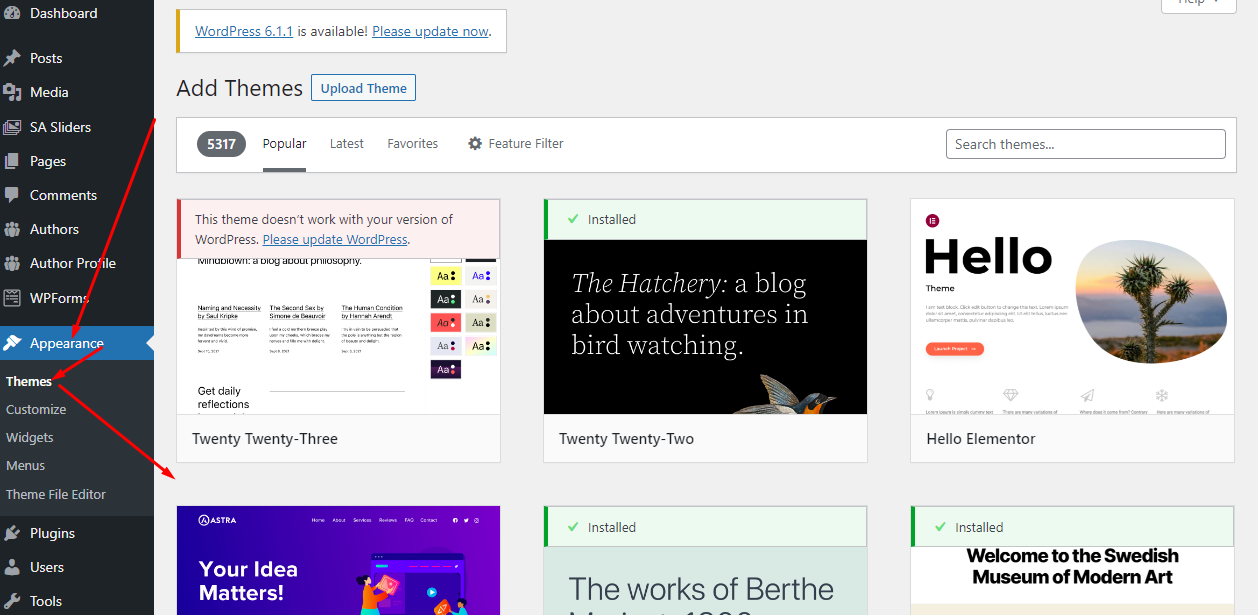
Log in to your WordPress dashboard and navigate to the “Appearance” section.
- Click on the “Themes” submenu option.
- From the “Themes” page, you can either use the search function to find a specific theme or browse through the available themes by clicking on the “Feature Filter” button and selecting your desired criteria.
- Once you’ve found a theme you like, click on the “Install” button. WordPress will then download and install the theme for you.
- Once the theme is installed, click on the “Activate” button to make it your active theme.
- Your theme is now installed and active. You can customize it by clicking on the “Customize” button, which will take you to the WordPress Customizer, where you can modify various aspects of the theme, such as the colors, fonts, and layout.
Note: Some themes may require additional steps for installation, such as uploading a zip file or installing and activating the required plugins.
Read the documentation provided with the theme for any specific instructions.
Adding Plugins

Plugins are add-ons for your WordPress site that give you extra features and functionality.
They can do everything from adding a contact form to boosting your site’s security.
Like Themes, thousands of free and paid plugins are available, so you should have no trouble finding one that suits your needs.
All you have to do is download and install the plugin, and you’re good to go!
To install a plugin on WordPress, follow these steps:
Log in to your WordPress dashboard and navigate to the “Plugins” section.
- Click on the “Add New” button.
- From the “Add Plugins” page, you can either use the search function to find a specific plugin or browse through the available plugins by clicking on the “Feature Filter” button and selecting your desired criteria.
- Once you’ve found a plugin that you want to install, click on the “Install Now” button. WordPress will then download and install the plugin for you.
- After installing the plugin, click on the “Activate” button to activate it.
The plugin is now installed and activated.
You may need to configure the plugin’s settings by clicking on the “Settings” link under the plugin’s name on the “Plugins” page.
Creating Pages and Posts
Now that you have a theme and some plugins installed, it’s time to create some content.
Pages are static content that won’t change, like an “About Us” page. Posts are dynamic content that can be updated regularly, like blog posts.
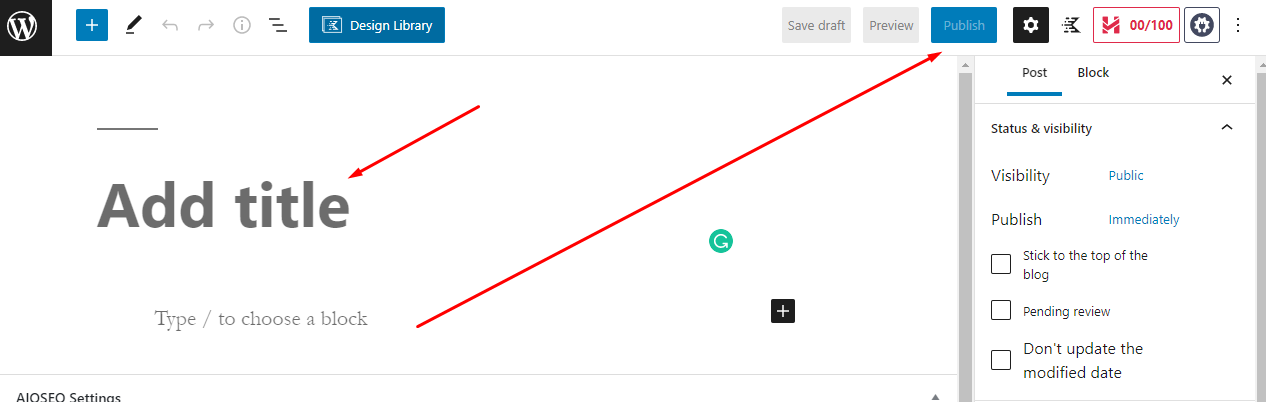
To create a page or post, simply click the “Add New” button and start typing.
You can also add images and videos to make your content more engaging.
When you’re all done, just hit the “Publish” button, and you’re ready to share your content with the world!
That’s it – you’ve successfully customized your WordPress site!
Now, sit back, relax, and enjoy your new website.
Have fun!
Related: